
ELLIPSE COMMAND
Enroll to start learning
You’ve not yet enrolled in this course. Please enroll for free to listen to audio lessons, classroom podcasts and take practice test.
Interactive Audio Lesson
Listen to a student-teacher conversation explaining the topic in a relatable way.
Introduction to the Ellipse Command
🔒 Unlock Audio Lesson
Sign up and enroll to listen to this audio lesson

Today, we will explore the Ellipse Command. Can anyone tell me what an ellipse is in geometric terms?

Isn't it like a stretched circle?
Exactly! An ellipse is like a circle that has been elongated. The Ellipse Command allows you to create these shapes by selecting three points. This makes it very useful in architectural designs where curves are necessary.

How do we actually use this command?
Great question! You can activate the command by typing 'ELLIPSE' or simply 'el'. Then, you choose three points on your drawing area.

Do those points need to be special in some way?
Not necessarily. The three points simply need to be distinct, but where you place them will affect the shape of the ellipse. Now, can anyone recall what ELLIPSE might be used for in real-life applications?

Maybe for windows or decorative features?
Exactly! Ellipses can define many aesthetic shapes in architecture. Remember 'E for Ellipse and 'E for Easy' in drawing!
Practical Application of the Ellipse Command
🔒 Unlock Audio Lesson
Sign up and enroll to listen to this audio lesson

Let’s think about a practical application of the Ellipse Command. Can anyone give me an example?
Creating a garden path or a rounded edge in a house?
Good examples! Now, if we wanted to create a new design using the ellipse, what steps would we take?
First, activate the Ellipse Command.
Correct! And then what?
Pick the first point, then the second point…
...and finally the third point where the ellipse will curve out!
That's right! Counting those steps as '1, 2, 3' can help you remember the process. It’s like a dance: 'Select, Enter, Curve!'
Common Mistakes and Tips
🔒 Unlock Audio Lesson
Sign up and enroll to listen to this audio lesson
Now let's discuss some common mistakes. What do you think might happen if points are too close together when creating an ellipse?
The shape might not look right?
Exactly! It can result in a very inaccurate or distorted ellipse. And how could we resolve that?
Maybe use clear reference points?
Right! Clear reference points aid in placing the points correctly. Always visualize how the ellipse fits within your overall drawing! Another tip – practice makes perfect. Can anyone remember a memorable saying to help with this?
'Practice makes perfect in art and curves!'
Fantastic! Remember that for all curve work!
Introduction & Overview
Read summaries of the section's main ideas at different levels of detail.
Quick Overview
Standard
The Ellipse Command allows users to create an ellipse by defining various points, essential for drawing complex shapes in CAD. This command is part of a suite of drawing tools that enhance precision in computer-aided design and architecture.
Detailed
Ellipse Command in CAD
The Ellipse Command enables users to draw ellipses by selecting three distinct points on the workspace. This command is vital for architects and engineers who require precise geometric shapes in their designs. The command is entered using either the text command or as a shortcut. The ellipse creation is usually employed for creating various architectural features. Following its introduction in the command palette, users can leverage this tool in multiple ways to enhance their design specificity and aesthetic appeal. Its ease of use, combined with functionalities such as adjusting the dimensions and position of ellipses, makes it a core tool for users in building planning and drawing.
Understanding how to use the ellipse command effectively integrates into the broader spectrum of drawing tools covered in this chapter, which also includes other shapes like lines, circles, and arcs. As we dive deeper into each command, we see their relevance to computer-aided design processes and their critical roles in visualization and planning.
Youtube Videos


Audio Book
Dive deep into the subject with an immersive audiobook experience.
Introduction to the Ellipse Command
Chapter 1 of 3
🔒 Unlock Audio Chapter
Sign up and enroll to access the full audio experience
Chapter Content
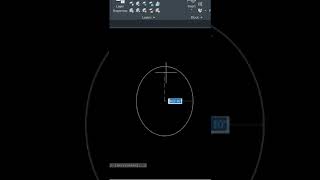
The ELLIPSE COMMAND is used to create an ellipse by selecting three points.
Detailed Explanation
The ELLIPSE COMMAND in drawing software allows users to create an elliptical shape by defining three specific points. This means you will click or specify three locations on your drawing area, and the software will calculate and create an ellipse that conforms to those points. It simplifies the process of drawing ellipses, which can often be complicated if done by hand.
Examples & Analogies
Think of drawing an ellipse like drawing a fancy oval-shaped track. If you want to create a perfect track, you need to mark points where you want the edge to curve. These points ensure that the shape remains smooth and symmetrical, just like how the software uses your three points to create a perfect ellipse.
Basic Command Format
Chapter 2 of 3
🔒 Unlock Audio Chapter
Sign up and enroll to access the full audio experience
Chapter Content
COMMAND: ELLIPSE or el.
Detailed Explanation
The command to initiate the ellipse creation process is either 'ELLIPSE' or its shortcut 'el'. You type this into the command line or access it via a tools menu in the drawing software. This command activates the function that allows you to specify the three points needed for your ellipse.
Examples & Analogies
Imagine you're launching a drawing program on your computer—just like you press a 'Start' button to begin cooking a recipe. Typing the 'ELLIPSE' command is akin to pressing that button. It prepares your workspace for creating something new!
Selecting the Points
Chapter 3 of 3
🔒 Unlock Audio Chapter
Sign up and enroll to access the full audio experience
Chapter Content
- Select the first point, which defines one edge of the ellipse.
- Select the second point, which determines the opposite edge.
- Select the third point, which helps shape the curve of the ellipse.
Detailed Explanation
When you enter the ellipse command, you are prompted to first choose the three crucial points. The first two points selected set the endpoints of the longest diameter of the ellipse, while the third point determines how 'stretched' or 'flattened' the shape will be. By clicking in the drawing area, you essentially guide the software to draw the shape just the way you want.
Examples & Analogies
Imagine you’re setting up a trampoline: you need to anchor two ends to the ground before stretching the fabric in the middle. Similarly, in drawing an ellipse, you first establish two endpoints (like anchors) that will help determine how the ellipse will stretch out.
Key Concepts
-
Ellipse Command: Used to create ellipses by defining three points.
-
Geometric Shapes: Understanding how to manipulate geometric shapes in CAD.
Examples & Applications
Using the Ellipse Command to design an architectural window.
Creating a decorative patio using elliptical shapes.
Memory Aids
Interactive tools to help you remember key concepts
Rhymes
To draw an ellipse, it’s simple as can be, / Just pick three points and you'll soon see!
Stories
Imagine a chef drawing a plate; / To prepare an ellipse is just first-rate. / He picks three spots on his artwork bright, / And with each dot, he makes shapes right.
Memory Tools
Remember 'E, P, C' - 'Ellipse, Points, Curve!' for crafting ellipses.
Acronyms
EPC - E for Ellipse, P for Points, C for Curve.
Flash Cards
Glossary
- Ellipse
A shape formed by a set of points that are equidistant from a central focus, often elongated.
- CAD
Computer-Aided Design, software that allows designers to create precise drawings and models.
- Command
An instruction given to draw, modify, or manipulate objects in CAD software.
Reference links
Supplementary resources to enhance your learning experience.