
ROTATE COMMAND
Enroll to start learning
You’ve not yet enrolled in this course. Please enroll for free to listen to audio lessons, classroom podcasts and take practice test.
Interactive Audio Lesson
Listen to a student-teacher conversation explaining the topic in a relatable way.
Introduction to the Rotate Command
🔒 Unlock Audio Lesson
Sign up and enroll to listen to this audio lesson

Today, we will discuss the Rotate Command in CAD. How many of you know what it means to rotate an object in a drawing?

Is it about changing the object's angle or position?
Exactly! When we use the Rotate Command, we change the orientation of an object about a base point. Can anyone tell me what a base point is?

Is it the point around which the object will spin?
Correct! This point remains fixed while the object rotates around it. Let's remember this with the acronym 'PIVOT' – where 'P' stands for Point, 'I' for Is, 'V' for Very, 'O' for Optimal, and 'T' for Target. A pivot point targets perfection in our designs.
How to Use the Rotate Command
🔒 Unlock Audio Lesson
Sign up and enroll to listen to this audio lesson

Now let's look at how to actually use the Rotate Command. First, you type 'ROTATE' or 'RO' and select the objects you want to rotate. Who can tell me the next step?

Do we need to specify the base point next?
Exactly! After selecting an object, you specify the base point on which it will rotate. Now, what comes next?

I think we need to enter the angle of rotation?
Correct! Once you specify the angle, the object will rotate accordingly. To help you remember the order, think of 'Select, Point, Angle' — S-P-A!
Practical Applications of the Rotate Command
🔒 Unlock Audio Lesson
Sign up and enroll to listen to this audio lesson
Let's discuss when the Rotate Command might be useful. Can anyone share a practical example?
Maybe when I need to adjust furniture layout in a building design?
Great example! Using the Rotate Command, you can easily adjust the angles of furniture to optimize space. Can anyone think of another scenario?
What about rotating parts of machinery in engineering designs?
Yes, absolutely! Aligning components for mechanical efficiency is key. Let’s remember: 'Rotate for Arrangement' — RAR!
Common Mistakes with the Rotate Command
🔒 Unlock Audio Lesson
Sign up and enroll to listen to this audio lesson
Now, let’s talk about mistakes. What do you think is a common error users might make when using the Rotate Command?
Selecting the wrong base point might be a problem?
Exactly! A wrong base point leads to unexpected rotations. Always double-check your selection. Another mistake could be misunderstanding the angle direction. What can we remember here?
Clockwise and counterclockwise?
Yes! Remember: 'Clockwise Cuts, Counterclockwise Closes' — The C-C Principle helps distinguish angles!
Recap and Summary of Key Points
🔒 Unlock Audio Lesson
Sign up and enroll to listen to this audio lesson
Let's recap what we've learned about the Rotate Command. Can someone summarize the steps for me?
We select, then we point to define the base, and finally we enter the angle.
Correct! And why is it necessary to check your base point?
To ensure the object rotates correctly!
Fantastic! Remember the importance of precision in design. Rotate for optimal layouts and efficient engineering!
Introduction & Overview
Read summaries of the section's main ideas at different levels of detail.
Quick Overview
Standard
This section covers the Rotate Command in CAD, detailing how to select objects, define a base point for rotation, and specify the angle of rotation. It emphasizes the importance of this command in modifying designs efficiently.
Detailed
Rotate Command in CAD
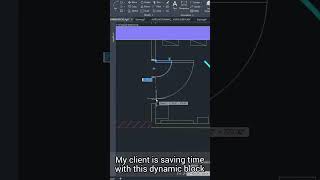
The Rotate Command in Computer-Aided Design (CAD) is crucial for modifying objects in a drawing. This command allows users to rotate selected objects around a specified base point, enabling precise positioning and orientation. To initiate the command, users type "ROTATE" or "RO" and follow prompts to select objects, define a rotation point, and specify an angle of rotation. This function is essential when aligning components or adjusting layouts, thus enhancing the flexibility and effectiveness of design modifications in building planning and drawing.
Youtube Videos


Audio Book
Dive deep into the subject with an immersive audiobook experience.
Command and Functionality
Chapter 1 of 5
🔒 Unlock Audio Chapter
Sign up and enroll to access the full audio experience
Chapter Content
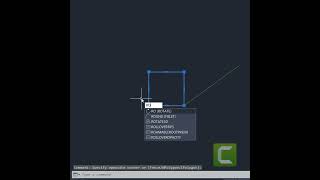
O.ROTATE COMMAND: Rotates selected object around given axis to the given angle or about a base point.
COMMAND: ROTATE or RO.
Detailed Explanation
The ROTATE command in AutoCAD is used to change the orientation of a selected object. This command allows the user to define a base point around which the object will rotate. By specifying an angle, you can rotate the object to the desired position. To initiate the command, you type ROTATE or its shorthand RO in the command line.
Examples & Analogies
Imagine holding a book open in front of you. If you want to present the book cover to someone on your left, you would rotate the book around a pivot point—the spine of the book. The ROTATE command operates in a similar way, allowing you to pivot objects around a specific point to achieve the correct orientation.
Selecting Objects
Chapter 2 of 5
🔒 Unlock Audio Chapter
Sign up and enroll to access the full audio experience
Chapter Content
Select object: select object to rotate.
Detailed Explanation
Before you can rotate an object, you need to select it. This step involves clicking on the object you wish to rotate. It's important to make sure you've selected the correct object to avoid any unintended alterations in your drawing.
Examples & Analogies
Think of this step like selecting a piece of fruit to slice. Before you can cut an apple into pieces, you need to pick the apple from the basket. Selecting the object is your first crucial step in the rotating process.
Defining the Base Point
Chapter 3 of 5
🔒 Unlock Audio Chapter
Sign up and enroll to access the full audio experience
Chapter Content
Base point: select a point on which object rotates.
Detailed Explanation
After selecting the object, the next step is to define the base point. This point acts as the pivot around which the object will rotate. You can click on a specific point on the object itself or specify coordinates. Choosing the right base point is crucial for achieving the desired rotation effect.
Examples & Analogies
Consider a door hinge; the hinge is the base point on which the door rotates. If you want to swing the door open or shut, you need to know where the hinge is. Similarly, defining the base point in the ROTATE command determines how and where your object will pivot.
Specifying the Rotate Angle
Chapter 4 of 5
🔒 Unlock Audio Chapter
Sign up and enroll to access the full audio experience
Chapter Content
Detailed Explanation
Once the base point is established, you specify the angle of rotation. This can be done by typing in a numeric value (positive for counter-clockwise rotation and negative for clockwise rotation) or by setting a reference angle by typing 'R'. This helps in determining how far to rotate the selected object.
Examples & Analogies
Imagine you are following a recipe and need to turn up the heat to a specific temperature. Specifying the angle in the ROTATE command is like deciding how much to turn the burner up; it defines the extent of the action you’re about to undertake.
Using Reference Length
Chapter 5 of 5
🔒 Unlock Audio Chapter
Sign up and enroll to access the full audio experience
Chapter Content
Reference length
Detailed Explanation
Additionally, you can use the reference length option if you want to adjust the size of the rotation instead of a specific angle. By selecting this option, you type in a distance or reference length that can help in achieving an exact rotation based on another point in your drawing. Pressing enter will proceed with the rotation using the predefined parameters.
Examples & Analogies
Think of it like adjusting a picture frame to align it perfectly with a line on the wall. You might set a specific distance from the line to ensure the frame is straight, just as you use reference lengths in the ROTATE command to achieve precision in your drawing.
Key Concepts
-
Rotate Command: A tool for rotating objects in CAD.
-
Base Point: The fixed point around which rotation happens.
-
Angle of Rotation: The angle around which the object is rotated.
Examples & Applications
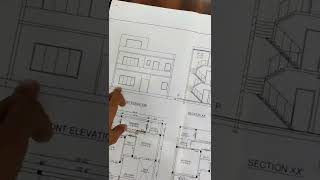
Using the Rotate Command to adjust the alignment of furniture in a floor plan.
Rotating a mechanical component to ensure proper functioning within an assembly.
Memory Aids
Interactive tools to help you remember key concepts
Rhymes
Rotate to create, angle not to hate, choose your point, to demonstrate.
Stories
Once there was a pencil that needed to be perfectly aligned with a ruler. It learned to rotate around a fixed point and found its perfect angle, making designs easier.
Memory Tools
Think 'Select, Point, Angle' (SPA) for the Rotate Command steps.
Acronyms
PIVOT - Point Is Very Optimal Target for the Rotate Command.
Flash Cards
Glossary
- Rotate Command
A command in CAD that allows users to rotate selected objects around a defined base point by a specified angle.
- Base Point
The fixed point around which a selected object rotates in a CAD drawing.
- Angle of Rotation
The degree of rotation applied to an object during the use of the Rotate Command.
Reference links
Supplementary resources to enhance your learning experience.