
Steps in MEMS Simulation Workflow
Enroll to start learning
You’ve not yet enrolled in this course. Please enroll for free to listen to audio lessons, classroom podcasts and take practice test.
Interactive Audio Lesson
Listen to a student-teacher conversation explaining the topic in a relatable way.
Geometry Creation
🔒 Unlock Audio Lesson
Sign up and enroll to listen to this audio lesson

Let's start with the first step in the MEMS simulation workflow: Geometry Creation. Why do you think this step is important?

I think it's crucial because you need a good model to analyze later.
Exactly! A well-defined geometry sets the stage for accurate simulations. Can anyone tell me what types of geometries can be created?

2D and 3D layouts!
Right! Remember, the complexity of the geometry can affect the simulation details. For two-dimensional models, we can simplify some variables and focus on different aspects. Now, let’s summarize: Geometry Creation is vital for ensuring accurate representation. Can anyone suggest a memory aid for this step?

Maybe 'Good Models First' as a reminder?
Great mnemonics! 'Geometry First' is a solid reminder. Let's move to the next step!
Material Assignment
🔒 Unlock Audio Lesson
Sign up and enroll to listen to this audio lesson

Next, we have Material Assignment. Why is this crucial in the workflow?

Because the materials dictate how the device behaves under different conditions.
Exactly! The properties like mechanical, thermal, and electrical characteristics influence the results significantly. Can anyone point out what might happen if we assign the wrong materials?
The simulation results could be totally wrong!
That's correct, which could lead to poor design decisions! To remember this, let’s use a mnemonic like 'Assign Right, Make It Bright,' meaning assign correct materials for accurate results.
That’s catchy!
Excellent! Material Assignment is key for prediction accuracy. Now, let’s continue to the next important step.
Meshing
🔒 Unlock Audio Lesson
Sign up and enroll to listen to this audio lesson
Moving on to Meshing! Can someone explain why we mesh the geometry?
It helps divide the structure into small elements for analysis.
Correct! This process is very important for FEM and CFD analyses to balance accuracy and computational resources. What's a key challenge in meshing?
Making sure the mesh is fine enough to capture all details but not so fine that it takes too long to compute.
Spot on! It’s all about finding the sweet spot. Remember, we might use the acronym 'FINE' – 'Fit, Improve, Navigate Efficiently' – to keep our meshing goals in mind. We must always strive for the right fit! Now, let’s proceed to Boundary Condition Setup.
Boundary Condition Setup
🔒 Unlock Audio Lesson
Sign up and enroll to listen to this audio lesson
Now let's discuss Boundary Condition Setup. What are some examples of boundary conditions we apply in MEMS simulations?
Forces, voltages, and temperature constraints!
Great! Each condition helps simulate real operational scenarios. If we don’t apply the correct boundary conditions, what do you think might happen?
The simulation results won’t represent reality.
Exactly! It can lead to significant inaccuracies. To help remember this concept, we could use a mnemonic: 'Set the Bounds Right, Keep the Results Bright.' Let's summarize this step: Boundary conditions are essential for creating realistic simulations. Let's continue to the Simulation Run!
Validation
🔒 Unlock Audio Lesson
Sign up and enroll to listen to this audio lesson
Let’s finish our workflow with Validation. Can anyone explain what validation means in this context?
It’s when we compare our simulation results with experimental data or analytical models!
That's it! Validation is crucial for confirming that our model accurately represents reality. If we find discrepancies, what should we do?
We should go back and check our geometry, material properties, or boundary conditions!
Very well! This iterative process ensures reliability. A mnemonic to remember might be 'Validate to Innovate,' reinforcing the concept that validation is key to achieving proper design. Remember: Without validation, our designs are just educated guesses!
Introduction & Overview
Read summaries of the section's main ideas at different levels of detail.
Quick Overview
Standard
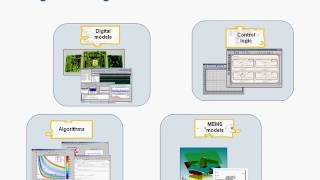
The MEMS simulation workflow includes seven crucial steps: creating the geometry of the device, assigning material properties, meshing for analysis, setting boundary conditions, running simulations, post-processing results, and validating outcomes against analytical models or experimental data. Each step is essential for ensuring accurate and reliable results in MEMS design.
Detailed
Detailed Summary
The MEMS (Micro-Electro-Mechanical Systems) simulation workflow encompasses a series of systematic steps that ensure the accurate modeling of devices prior to fabrication. The steps include:
- Geometry Creation: This initial step involves designing either a two-dimensional or three-dimensional representation of the MEMS structure, which serves as the foundation for further analysis.
- Material Assignment: Throughout this phase, the appropriate mechanical, thermal, and electrical properties of the materials used in the MEMS device are defined, ensuring the model accurately represents real-world conditions.
- Meshing: The geometry is subdivided into smaller, manageable elements. This meshing process is crucial for Finite Element Modeling (FEM) or Computational Fluid Dynamics (CFD) analyses.
- Boundary Condition Setup: Essential operational conditions like forces, voltages, or temperature constraints are applied to the geometry, mimicking real-world interactions and ensuring the simulation can produce meaningful results.
- Simulation Run: The governing equations governing the behavior of the MEMS device are solved over the meshed domain to obtain simulation results.
- Post-Processing: After the simulation run, results are visualized for metrics such as displacement, stress, capacitance, or temperature, helping assess device performance.
- Validation: Finally, the simulated results are compared to analytical models or experimental data to confirm accuracy and reliability.
Understanding these steps is vital in the MEMS design process, allowing engineers to predict performance and optimize device characteristics effectively.
Youtube Videos

Audio Book
Dive deep into the subject with an immersive audiobook experience.
Geometry Creation
Chapter 1 of 7
🔒 Unlock Audio Chapter
Sign up and enroll to access the full audio experience
Chapter Content
- Geometry Creation: Design the MEMS structure (2D or 3D layout)
Detailed Explanation
The first step in the MEMS simulation workflow is Geometry Creation. This involves designing the physical structure of the MEMS device, which can be represented in two dimensions (2D) or three dimensions (3D). The design phase is crucial because it dictates how the device will look and function. Designers use specialized CAD (Computer-Aided Design) tools to create detailed models of the MEMS components.
Examples & Analogies
Think of this step like creating a blueprint for a house. Just as an architect drafts a layout showing walls, windows, and doors, a MEMS designer creates a detailed plan of the device structure, ensuring that every part is where it needs to be for the device to work properly.
Material Assignment
Chapter 2 of 7
🔒 Unlock Audio Chapter
Sign up and enroll to access the full audio experience
Chapter Content
- Material Assignment: Define mechanical, thermal, and electrical properties
Detailed Explanation
After designing the geometry, the next step is Material Assignment. This step involves specifying the different materials that will compose the MEMS device. Each material has distinct mechanical, thermal, and electrical properties, which affect how the device behaves. For instance, the thermal conductivity of a material determines how well it can conduct heat, while its mechanical strength will determine how much stress it can withstand.
Examples & Analogies
Imagine setting up a recipe for baking a cake. Just as you need to choose the right ingredients like flour, sugar, and eggs while considering their properties (like texture and taste), MEMS designers select materials that optimize the device’s performance. For example, certain materials may be better at withstanding high temperatures while others are more effective at conducting electricity.
Meshing
Chapter 3 of 7
🔒 Unlock Audio Chapter
Sign up and enroll to access the full audio experience
Chapter Content
- Meshing: Subdivide geometry into elements for FEM or CFD analysis
Detailed Explanation
The third step is Meshing, which involves dividing the complicated geometry of the MEMS device into smaller, manageable pieces called elements. This step is vital for numerical analysis methods like Finite Element Method (FEM) or Computational Fluid Dynamics (CFD). A good mesh is crucial; if the elements are too large, the results may lack accuracy, while an excessively fine mesh can increase computation time without adding much value.
Examples & Analogies
Think of meshing like pixelating an image. Just as an image is made up of tiny squares (pixels), the MEMS device's geometry is broken down into small elements. If the squares are too large, the image looks blurry (less accurate simulation), but if you make them too small, it takes longer to process (increased computation time).
Boundary Condition Setup
Chapter 4 of 7
🔒 Unlock Audio Chapter
Sign up and enroll to access the full audio experience
Chapter Content
- Boundary Condition Setup: Apply forces, voltages, temperature, or constraints
Detailed Explanation
Once meshing is complete, the next step is Boundary Condition Setup. This involves defining the conditions that affect the MEMS behavior during simulation. Boundary conditions can include applying external forces, setting voltages, defining temperature constraints, or even fixing certain parts of the structure. These conditions simulate real-world operating environments, enabling accurate predictions of device performance.
Examples & Analogies
Picture a swimming pool with different zones. The edges of the pool can be thought of as boundary conditions: where the water is still (fixed), where there might be currents (forces), or where sunlight heats the water (temperature). In a similar way, boundary conditions in MEMS simulations define how the device interacts with the environment and what constraints it faces.
Simulation Run
Chapter 5 of 7
🔒 Unlock Audio Chapter
Sign up and enroll to access the full audio experience
Chapter Content
- Simulation Run: Solve the governing equations over the meshed domain
Detailed Explanation
The fifth step is the Simulation Run, where the defined model is computed using numerical methods. During this step, the governing equations—rooted in the physics of the MEMS device—are solved over the mesh to simulate how the device will behave. This can take time depending on the complexity of the model and the computational resources available.
Examples & Analogies
Think of this step like a weather forecast simulation. Meteorologists input various data (like humidity or temperature) into complex computational models to predict future weather patterns. Similarly, the simulation run processes the MEMS data to predict how the device will react under the specified conditions.
Post-Processing
Chapter 6 of 7
🔒 Unlock Audio Chapter
Sign up and enroll to access the full audio experience
Chapter Content
- Post-Processing: Visualize results like displacement, stress, capacitance, or temperature
Detailed Explanation
After the simulation run, the next important step is Post-Processing. This step involves analyzing and visualizing the results obtained from the simulation. Engineers look for key outputs such as displacement (how far parts move), stress (how much force is applied), capacitance (ability to store electrical energy), and temperature distributions. Post-processing helps in interpreting the data and understanding the device’s performance.
Examples & Analogies
Think of post-processing like checking the results of a scientific experiment. After mixing different chemicals, a scientist observes the reaction results to understand what happened. Similarly, in MEMS simulations, engineers examine the results to glean insights about the device's functionality and performance.
Validation
Chapter 7 of 7
🔒 Unlock Audio Chapter
Sign up and enroll to access the full audio experience
Chapter Content
- Validation: Compare simulated results with analytical models or experimental data
Detailed Explanation
The final step is Validation, where the simulation results are compared against analytical models or real experimental data to assess accuracy. It's crucial to ensure that the simulated behavior aligns with expected performance. If discrepancies arise, it may necessitate revisiting earlier steps to adjust geometries, materials, or boundary conditions.
Examples & Analogies
Validation is like proofreading an essay. Just as you would check whether your arguments are supported by evidence and that your conclusions make sense, engineers ensure that the simulation results accurately reflect what would happen in real life. If the validation shows inconsistencies, you may need to revise your work.
Key Concepts
-
Geometry Creation: The initial stage in the MEMS simulation where the device structure is designed.
-
Material Assignment: Defining the properties of materials to accurately simulate device functions.
-
Meshing: The process of breaking down the geometry into smaller elements for detailed analysis.
-
Boundary Condition Setup: Applying forces and constraints to emulate the operational environment of the MEMS device.
-
Simulation Run: Solving the governing equations to understand how the MEMS device will behave.
-
Post-Processing: Analyzing and visualizing the simulation results.
-
Validation: Ensuring that the simulation results match with real-world experimental data or analytical models.
Examples & Applications
In a simulation of a capacitive sensor, geometry creation would involve designing the shape of the sensor plates.
During material assignment, properties for silicon, such as its mechanical strength and thermal conductivity, would be specified.
In meshing, the sensor geometry may be divided into thousands of nodes to accurately analyze stress distribution.
Boundary conditions would include applying voltages to the sensor plates and simulating the pressure applied by an external force.
Post-processing would involve visualizing capacitance distribution across the sensor plates after a simulation run.
Memory Aids
Interactive tools to help you remember key concepts
Rhymes
To make a MEMS simulation quite right, Geometry first, it's out of sight!
Stories
Once a device wished to come alive. The first step, Geometry, helped it thrive. Material Assignment followed with care, ensuring each part had properties rare. Then came Meshing, dividing it small, to analyze behaviors—each detail, we call!
Memory Tools
Remember 'GMMBPSV' for Geometry, Material, Mesh, Boundary, Process, Simulate, Validate.
Acronyms
Use 'GMMBPSV' to easily recall the seven steps in the MEMS simulation workflow.
Flash Cards
Glossary
- Geometry Creation
The process of designing the 2D or 3D layout of the MEMS structure.
- Material Assignment
Defining the mechanical, thermal, and electrical properties of materials used in the MEMS device.
- Meshing
Subdividing the geometry into discrete elements for numerical analysis in simulations.
- Boundary Condition Setup
Applying operational constraints such as forces, voltages, and temperatures to the simulation model.
- Simulation Run
The process of solving governing equations over the meshed domain to obtain simulation results.
- PostProcessing
Visualizing and analyzing the results of the simulation, such as stress and displacement.
- Validation
Comparing simulation results against analytical models or experimental data to ensure accuracy.
Reference links
Supplementary resources to enhance your learning experience.