
Edit Single-line Text
Enroll to start learning
You’ve not yet enrolled in this course. Please enroll for free to listen to audio lessons, classroom podcasts and take practice test.
Interactive Audio Lesson
Listen to a student-teacher conversation explaining the topic in a relatable way.
Introduction to Single-line Text
🔒 Unlock Audio Lesson
Sign up and enroll to listen to this audio lesson

Today, we’re starting with the single-line text tool. Can anyone tell me what single-line text is used for?

Isn’t it used for short notes and labels?
Exactly! We use single-line text for short annotations. To create it, you begin by clicking on the 'Home' tab and selecting 'Single Line Text'.

What happens after I choose that option?
Great question! You then specify the insertion point. If you press ENTER, the text will automatically start below the last text you added. Remember, the keyword here is 'automatic'.

Do I need to worry about text height?
Yes, you can enter a height or click to specify one. If a height is already set in your text style, you'll skip that step!

What if I want to change the angle of the text?
You simply enter an angle value after setting height. Alright, let’s summarize what we covered!
In summary, single-line text is crucial for labels and quick notes. Start by choosing the tool, selecting your point, and specifying both height and angle if desired.
Multi-line Text Creation
🔒 Unlock Audio Lesson
Sign up and enroll to listen to this audio lesson

Now, let’s move on to multi-line text. Can anyone explain when we use this?
We use it for longer notes and formatted text, right?
Correct! For multi-line text, you start by clicking 'Home' and then 'Multiline Text'.
What’s next after that?
You’ll define a bounding box by specifying opposite corners, which sets the width for your text. If the ribbon is active, you’ll see the Text Editor appear.
How do I format the text inside?
Good observation! You can adjust indents using sliders on the ruler and set tab stops by clicking on the ruler itself. It's all about organizing your text nicely!
Is there any specific typographic style I can use?
Yes, remember to choose your desired text style from the drop-down list. Once you enter your text, you can format specific sections as needed, though note that SHX fonts do not support boldface or italics.
Let’s summarize! Multi-line text is essential for detailed annotations, and always remember to define your bounding box first.
Editing Single-line Text
🔒 Unlock Audio Lesson
Sign up and enroll to listen to this audio lesson
Lastly, editing existing single-line text is vital in CAD. Who can tell me how we do that?
Do we double-click on the text object?
Exactly! By double-clicking, you open the In-Place Text Editor.
What happens next?
You’ll make your text changes and press ENTER to save them. It's quick and straightforward!
What if I want to make changes to the formatting?
Good question! You can modify formatting by highlighting text and applying desired changes while in the editor.
Can I edit multiple lines this way?
Yes, you can edit a single line or multiple lines using this method! To conclude, remember the steps of double-clicking to edit and hitting ENTER to save changes.
Introduction & Overview
Read summaries of the section's main ideas at different levels of detail.
Quick Overview
Standard
In this section, learners are introduced to the process of creating and editing single-line text and multi-line text within CAD software. The key steps for each process are highlighted, alongside useful tips for formatting and saving text effectively.
Detailed
Detailed Summary
In this section, we explore the methods for creating and editing text within computer-aided design (CAD) software, specifically focusing on single-line and multi-line text tools. The single-line text feature is ideal for short notes and labels, allowing users to quickly place text on their designs. Users learn to specify the insertion point, height, angle, and enter the desired text. A notable aspect is the ability for the software to automatically add new text below existing text with the press of ENTER.
For more complex notes, multi-line text is used, which allows for formatted content. Key steps include defining a bounding box, setting initial formatting, and utilizing the contextual toolbar for editing. This section also emphasizes how to edit existing text directly through an in-place editor, streamlining the workflow. The guidelines provided are essential for creating professional and legible annotations in building planning and drawing.
Youtube Videos


Audio Book
Dive deep into the subject with an immersive audiobook experience.
Accessing the Edit Feature
Chapter 1 of 3
🔒 Unlock Audio Chapter
Sign up and enroll to access the full audio experience
Chapter Content
- Double-click a single-line text object.
Detailed Explanation
To edit an existing single-line text object in your drawing, you first need to select it. This is done by double-clicking the text. When you double-click, the editing interface opens, allowing you to make changes.
Examples & Analogies
Think of this step as opening a Word document by double-clicking on it to change the text inside. Just like how you need to click to open the file before you can edit it, here you double-click to get ready to edit the text in your drawing.
Using the In-Place Text Editor
Chapter 2 of 3
🔒 Unlock Audio Chapter
Sign up and enroll to access the full audio experience
Chapter Content
- In the In-Place Text Editor, enter the new text.
Detailed Explanation
Once in the In-Place Text Editor, you can see the existing text and make all the necessary changes. You can type in new text to replace what was there or edit parts of it. This feature allows you to modify text without needing to exit out of the drawing interface.
Examples & Analogies
Imagine you're editing a note on your smartphone. You select the note and can type new information right in there without needing to close and reopen the app. The In-Place Text Editor allows for that same kind of seamless editing.
Finalizing the Changes
Chapter 3 of 3
🔒 Unlock Audio Chapter
Sign up and enroll to access the full audio experience
Chapter Content
- Press ENTER.
Detailed Explanation
After you’ve edited the text to your liking, you need to finalize your changes. You do this by pressing the ENTER key. This action saves the text you entered and updates the drawing with your new text.
Examples & Analogies
It's like when you finish editing an email on your computer. You type everything you want, and once you're satisfied, you hit 'Send' to save and send your message. Here, pressing ENTER is how you 'send' your edited text back to the drawing.
Key Concepts
-
Single-line Text: Used for short notes and requires specifying height and angle.
-
Multi-line Text: Ideal for longer formats and allows for internal formatting.
-
Bounding Box: A critical step in defining the area for multi-line text entry.
-
In-place Editing: Simplifies the adjustment of existing text without needing to delete.
Examples & Applications
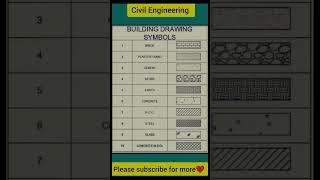
Creating labels for different sections of a building plan using single-line text.
Drafting detailed notes and descriptions of building materials using multi-line text.
Memory Aids
Interactive tools to help you remember key concepts
Rhymes
Single-line text, short and neat, Simple notes on every sheet.
Stories
Imagine you're labeling different rooms in a house plan. You first jot quick notes using single-line text, then go back to add detailed descriptions with multi-line text. This is how you organize your thoughts!
Memory Tools
To remember the steps for creating single-line text: 'Click, Point, Height, Angle, Text' - C-P-H-A-T!
Acronyms
For multi-line text, think 'BETS' - Bounding box, Enter formatting, Type text, Save changes.
Flash Cards
Glossary
- Singleline text
Text formatting for short notes and labels in CAD software.
- Multiline text
Text formatting that allows for longer notes and internal formatting within CAD.
- Bounding box
A defined area that sets the width for entering multi-line text.
- InPlace Text Editor
An interface that allows for editing existing text directly in the CAD drawing.
Reference links
Supplementary resources to enhance your learning experience.