
Accessibility in Bus Stops
Enroll to start learning
You’ve not yet enrolled in this course. Please enroll for free to listen to audio lessons, classroom podcasts and take practice test.
Interactive Audio Lesson
Listen to a student-teacher conversation explaining the topic in a relatable way.
Location and Site Planning
🔒 Unlock Audio Lesson
Sign up and enroll to listen to this audio lesson

Location is key for bus stops. We want to ensure these stops are easily reachable and not obstructed. Can anyone tell me why it's important that bus stops are near pedestrian crossings?

So people don’t have to walk far to catch the bus?
Exactly! This is especially helpful for those with mobility issues. We often refer to this principle as 'proximity.' Another important aspect is avoiding obstacles like parked cars. Can anyone think of a possible obstruction?

Street vendors or signs might block the way.
Right again! Always crucial to keep pathways clear. Let’s summarize: Proper location planning makes environments more navigable, particularly for individuals with disabilities.
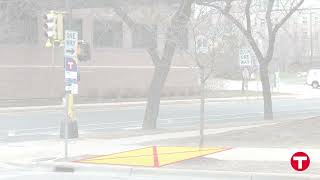
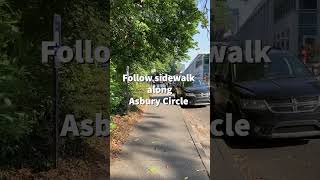
Approach Paths
🔒 Unlock Audio Lesson
Sign up and enroll to listen to this audio lesson

Now, let's talk about the approach paths leading to the bus stops. Why do you think the width of these paths matters?

If they’re too narrow, someone in a wheelchair might not fit.
Exactly! The minimum width should be 1200 mm. We also have tactile paving—can anyone explain what that is?

It's the textured surface for visually impaired people to guide them.
Great job! Remembering this detail helps make public transport accessible. So, let's remember the acronym 'PATH'—Position, Approach, Tactile, and Height— as we move on.
Shelter and Seating
🔒 Unlock Audio Lesson
Sign up and enroll to listen to this audio lesson
Moving on to shelters and seating—what do you think makes an ideal shelter for accessibility?
It should be high enough and have room for wheelchair users to get in.
That’s correct! A minimum clear height of 2100 mm is needed. What about the seating arrangement?
There should be space for a wheelchair and armrests to help people sit.
Absolutely! Armrests provide support. Remember: 'SHIELD'—Shelter height, Inclusive seating, Easy access, Level ground, Drought (for drainage).
Height and Platform Design
🔒 Unlock Audio Lesson
Sign up and enroll to listen to this audio lesson
Let's focus on height and platform design now. Why is a kerb height of 300 mm important?
It helps align with low-floor buses.
Good point! This reduces the gap and makes boarding easier. What should we ensure about the ramps?
They shouldn't be too steep, right?
Exactly! A gradient no steeper than 1:12 is ideal. When creating pathways, think ‘SAFE’—Slope, Accessible, Firm surface, Even ground.
Signage and Safety Features
🔒 Unlock Audio Lesson
Sign up and enroll to listen to this audio lesson
Last but not least, signage and safety features. Why is it essential for route maps to be in large font and Braille?
So everyone can understand the schedules!
Exactly! Clear communication is essential. And what about the tactile warning tiles?
They help to alert visually impaired people about the danger at the platform edge.
Great! Remembering 'SECURE'—Signage, Emergency alerts, Clear paths, Understanding, Reliable lighting, Emergency procedures— keeps us safe.
Introduction & Overview
Read summaries of the section's main ideas at different levels of detail.
Quick Overview
Standard
The section details critical design aspects for accessible bus stops, including location planning, approach paths, shelters, platforms, signage, and safety features, all aiming to foster inclusive public transportation for persons with disabilities.
Detailed
Accessibility in Bus Stops
Accessibility at bus stops is crucial as they are the initial point of contact for users of public transportation, especially for persons with disabilities (PwDs).
Key Points Covered:
- Location and Site Planning: Bus stops should be conveniently situated near pedestrian crossings and on level ground where feasible, avoiding obstructions.
- Approach Path: Continuous pathways must link bus stops to sidewalks, with a minimum width of 1200 mm and tactile paving for the visually impaired.
- Shelter and Seating: Shelters must be designed to be easily accessible, with adequate seating for wheelchair users and proper drainage.
- Height and Platform Design: Platforms should align with low-floor buses, featuring slip-resistant surfaces and ramps.
- Signage and Information Systems: The availability of route maps in large font and Braille, as well as digital displays that offer high contrast, is essential for effective communication.
- Safety Features: It is vital to incorporate tactile tiles near platform edges and ensure proper lighting for safety during nighttime operations.
The principles highlighted in this section not only ensure compliance with accessibility laws but also promote equity and social inclusion in public transportation systems.
Youtube Videos


Audio Book
Dive deep into the subject with an immersive audiobook experience.
Location and Site Planning
Chapter 1 of 6
🔒 Unlock Audio Chapter
Sign up and enroll to access the full audio experience
Chapter Content
Bus stops should be located within easy reach of pedestrian crossings and pathways.
Preferably positioned on level ground or provided with accessible ramps if placed on elevated areas.
Avoid placement near obstructions such as street vendors, signboards, or parked vehicles.
Detailed Explanation
This chunk emphasizes the importance of the location of bus stops in ensuring accessibility. Bus stops should be placed close to pedestrian crossings and walkways, making them easily reachable for everyone. If a bus stop is on a slope or elevated area, it should have accessible ramps to help individuals with mobility issues. It's also essential to avoid placing bus stops near potential obstructions, like street vendors or parked vehicles, as these could hinder access.
Examples & Analogies
Imagine a bus stop that’s right next to a busy street vendor. If you are in a wheelchair, reaching that bus stop could be very difficult because you have to navigate around the vendor and other obstacles. Choosing a clear and accessible location is like setting up a ready-to-use parking space for a disabled person right in front of a store, ensuring they can easily enter the store without maneuvering around obstacles.
Approach Path
Chapter 2 of 6
🔒 Unlock Audio Chapter
Sign up and enroll to access the full audio experience
Chapter Content
Continuous accessible pathways should connect bus stops with surrounding sidewalks.
Pathways must be at least 1200 mm wide and have tactile paving for the visually impaired.
Surface should be non-slippery and even, with minimal undulations.
Detailed Explanation
Accessible pathways play a crucial role in connecting bus stops to nearby sidewalks and streets. These pathways must be wide enough (at least 1200 mm) to accommodate wheelchair users and should be equipped with tactile paving to help those who are visually impaired navigate safely. The surface of these pathways must be designed to prevent slipping and should be as smooth as possible to avoid any bumps that could make navigation difficult.
Examples & Analogies
Think of walking on a smooth, flat road versus a bumpy dirt path with rocks. The flat road makes it easy for everyone, including those using wheelchairs or walking aids, to move along without worrying about falling, just as a well-designed pathway at a bus stop does.
Shelter and Seating
Chapter 3 of 6
🔒 Unlock Audio Chapter
Sign up and enroll to access the full audio experience
Chapter Content
Shelter structures should have a minimum clear height of 2100 mm and accessible from the sides.
Seating should include space for wheelchair users and provide armrests for support.
Roofs should be sloped to prevent water accumulation.
Detailed Explanation
Adequate shelter and seating at bus stops are vital for user comfort and safety. Shelters should be tall enough (at least 2100 mm) so that individuals do not feel cramped. This height also ensures accessibility from all sides, allowing people to enter and exit without difficulty. Seating should be thoughtful in its design, providing enough space for wheelchair users and including armrests for people who may need some support when sitting or standing up. Additionally, roofing should be designed with a slope to ensure rainwater does not collect, keeping spaces dry.
Examples & Analogies
Picture waiting at a bus stop during rain; if water pools up because the roof is flat, it can make your wait uncomfortable. Having a sloped roof means less water, so you stay dry, and accessible seating means you can take a rest comfortably, just like sitting down at a coffee shop table that’s designed for everyone.
Height and Platform Design
Chapter 4 of 6
🔒 Unlock Audio Chapter
Sign up and enroll to access the full audio experience
Chapter Content
Kerb height should ideally be 300 mm to ensure alignment with low-floor buses.
Platforms should be equipped with ramps having a gradient not steeper than 1:12.
Boarding platforms must be slip-resistant and adequately lit.
Detailed Explanation
The design of the bus platform is critical in ensuring that people can easily get on and off the bus. A kerb height of about 300 mm allows for smooth entry into low-floor buses, which are specifically designed to assist individuals who might struggle with higher steps. Ramps leading onto these platforms must not be too steep, with a gradient of no steeper than 1:12, which means for every 12 units of horizontal run, there’s 1 unit of vertical rise. Additionally, ensuring that these platforms are slip-resistant and well-lit is essential for safety, especially in poor lighting conditions.
Examples & Analogies
Imagine going to a playground with slides. If the slide is too high, kids might struggle to climb up. Likewise, if a bus platform is properly designed, it makes it easy for people to board without fear of slipping or stumbling, just like a well-designed slide that is safe and fun.
Signage and Information Systems
Chapter 5 of 6
🔒 Unlock Audio Chapter
Sign up and enroll to access the full audio experience
Chapter Content
Route maps and schedules should be available in large fonts and Braille.
Audio announcements should notify arrivals and route numbers.
Digital display boards should have high-contrast and adjustable brightness.
Detailed Explanation
Clear and accessible signage is key at bus stops for effective communication. All information, such as route maps and schedules, should be printed in large font sizes and also available in Braille for those who are visually impaired. Audio announcements are helpful for announcing bus arrivals and route numbers, ensuring that both sighted and visually impaired individuals receive the same notifications. Digital boards should be designed with high contrast so they are easily readable, and they should have adjustable brightness to accommodate different lighting conditions.
Examples & Analogies
Think of being in a movie theater where the screen’s brightness is perfect but suddenly it dims, making it hard to see the film. Likewise, good signage should be bright, clear, and easy to read. Audio announcements work similarly to having someone announce your favorite scene during a film, helping everyone keep track of what’s happening.
Safety Features
Chapter 6 of 6
🔒 Unlock Audio Chapter
Sign up and enroll to access the full audio experience
Chapter Content
Warning tactile tiles (truncated domes) should be placed near platform edges.
Railings or guardrails should be installed to prevent accidental falls.
Lighting must be adequate for nighttime visibility.
Detailed Explanation
Safety is paramount at bus stops, and specific features help ensure this. Warning tactile tiles, often used at the edges of platforms, provide a physical indication to alert visually impaired individuals that they are near the edge. The installation of railings or guardrails can prevent accidental falls from platforms, offering another layer of safety. Furthermore, adequate lighting is essential for visibility at night, allowing all users to navigate safely, especially during darker hours.
Examples & Analogies
Imagine crossing a busy street; without visual cues, it might be difficult to safely navigate. Similarly, tactile tiles act like a safety net at a bus stop’s edge, while guardrails are like having a firm handrail at a stairwell, keeping everyone safe from potential slips or falls.
Key Concepts
-
Location and Site Planning: Ensures bus stops are accessible and easy to reach for all individuals.
-
Tactile Paving: Provides critical guidance to visually impaired users.
-
Shelter Design: Must be adequate for accessibility, providing appropriate height and space.
-
Platform Height: Critical for aligning with vehicles for safe boarding.
-
Signage: Must be clear and accessible to facilitate wayfinding.
Examples & Applications
Bus stops located near pedestrian crossings reduce the distance that disabled individuals must travel.
Tactile paving leading to bus stops helps visually impaired users navigate safely.
Shelters designed with a clear height of 2100 mm prevent discomfort and allow for better access to all users.
Ramps with a gradient of 1:12 make it easier for individuals with mobility aids to board.
Memory Aids
Interactive tools to help you remember key concepts
Rhymes
At the bus stop, clear and bright, Tactile paths are quite the sight.
Stories
Imagine a bus stop where the path is always clear; everyone finds their way without a fear!
Memory Tools
Remember 'SHIELD' for shelters: Shelter height, Inclusive seating, Easy access, Level ground, Drought for drainage.
Acronyms
Use the acronym 'PATH' - Position (location), Approach (pathways), Tactile (paving), Height (platforms).
Flash Cards
Glossary
- Universal Design
A design philosophy that aims to make buildings, products, and environments accessible to all users, regardless of their abilities.
- Tactile Paving
Textured ground surface indicators that help visually impaired individuals navigate public spaces safely.
- Kerb Height
The height of the edge of the roadway at a bus stop, which should align with low-floor vehicle decks for ease of access.
- Gradient
The degree of steepness of a slope, important for ramps at bus stops to ensure safety and accessibility.
- Slipresistant Surface
A type of pavement that reduces the risk of slipping, especially in wet conditions.
Reference links
Supplementary resources to enhance your learning experience.