
Procedure for Drawing Flow Nets
Enroll to start learning
You’ve not yet enrolled in this course. Please enroll for free to listen to audio lessons, classroom podcasts and take practice test.
Interactive Audio Lesson
Listen to a student-teacher conversation explaining the topic in a relatable way.
Understanding the Concept of Flow Nets
🔒 Unlock Audio Lesson
Sign up and enroll to listen to this audio lesson

Today, we'll discuss flow nets in soils. What do you think are flow nets used for, Student_1?

Are they used to show how water moves through soil?
Exactly! Flow nets help us visualize water flow. Now, does anyone know what 'equipotential lines' represent?

They show areas of equal water pressure, right?
Correct! Equipotential lines mark points where the head values are the same. Let’s remember this with the acronym EQUAL - Equipotential lines Indicate Quality And Level. Can someone tell me why it's useful to have flow lines?

They show the direction of flow?
Well done, Student_3! Flow lines are indeed tangential to the direction of the flow. Let’s summarize this session: Flow nets visualize water movement via equipotential and flow lines.
Steps in Constructing Flow Nets
🔒 Unlock Audio Lesson
Sign up and enroll to listen to this audio lesson

Now, let’s delve into how we actually draw a flow net. What’s the first step? Student_4?

We need to mark all boundary conditions, right?
Exactly! Then we draw the flow cross-section to a convenient scale. Next, what do we do?
We draw a coarse net with flow lines first.
Yes! Starting with flow lines helps visualize the process. Remember the mnemonic COARSE - Create Outlines And Refine Square Edges. What is the goal of modifying the mesh, Student_2?
To ensure the areas between flow and equipotential lines are squares?
Correct! Lastly, we refine the flow net until it meets all conditions. Let’s recap: Steps are boundary markings, coarse net drawing, mesh adjustment, and refinement.
Identifying Boundary Conditions
🔒 Unlock Audio Lesson
Sign up and enroll to listen to this audio lesson
We discussed flow nets earlier. Now, can anyone name a common boundary condition, Student_3?
A submerged soil boundary is an equipotential line?
Good! This can be visualized through standpipes. What about the boundary between different soil materials, Student_4?
That would be a flow line!
Exactly! And equipotential lines on the phreatic surface maintain equal vertical intervals. Always remember the phrase 'Flow meets Boundaries', which reminds us of these essential lines. Let’s conclude with the takeaways: Submerged boundaries are equipotential, and soil boundaries are flow lines.
Introduction & Overview
Read summaries of the section's main ideas at different levels of detail.
Quick Overview
Standard
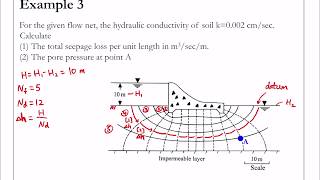
The section elaborates on the systematic approach to drawing flow nets, emphasizing the necessity of boundary conditions and the relationship between flow lines and equipotential lines. The construction involves trial and error, ensuring that the head loss between adjacent equipotential lines is consistent.
Detailed
Procedure for Drawing Flow Nets
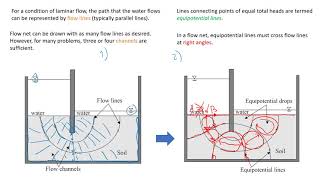
The procedure for drawing flow nets involves representing flow in soils by creating contours of equal head at every point
where flow exists. The flow net can be constructed by trial and error, remaining consistent regardless of the flow direction. Important points about flow nets include:
- Equipotential lines indicate equal head values where water levels would be the same in standpipes placed along a submerged boundary.
- Flow lines are tangential to the flow at any point, helping visualize the flow pattern.
Key Steps:
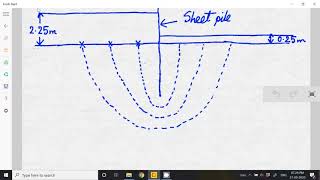
- Boundary Conditions: Mark all boundary conditions and draw a cross-section to scale.
- Initial Net: Draw a coarse net with orthogonal equipotential and flow lines, starting with flow lines for visualization.
- Mesh Adjustment: Modify the mesh such that the areas between adjacent flow and equipotential lines approximate 'squares'.
- Refinement: Repeat the modification process to hone the flow net.
Common Boundary Conditions:
- A submerged permeable boundary acts as an equipotential line (represented as CD and EF).
- A boundary between permeable and impermeable soil materials serves as a flow line (denoted as AB).
- Equipotential lines intersecting a phreatic surface maintain equal vertical intervals.
Youtube Videos


Audio Book
Dive deep into the subject with an immersive audiobook experience.
Understanding Head and Flow in Soil
Chapter 1 of 4
🔒 Unlock Audio Chapter
Sign up and enroll to access the full audio experience
Chapter Content
At every point (x,z) where there is flow, there will be a value of head h(x,z). In order to represent these values, contours of equal head are drawn.
Detailed Explanation
In fluid mechanics and hydrogeology, 'head' refers to the height of the water column and indicates the energy level of water at a specific point. This head can vary depending on the location (x, z) within the soil. To visualize the variations in this head, we draw contours which connect points of equal head. This helps in understanding how water flows through the soil matrix.
Examples & Analogies
Think of a landscape with hills and valleys. Just like the height of a hill represents a higher head compared to a valley, the head in soil indicates how 'high' the water would rise at different points. Drawing contours of equal height (head) helps us visualize how water would flow from higher areas to lower areas.
Methodology of Drawing Flow Nets
Chapter 2 of 4
🔒 Unlock Audio Chapter
Sign up and enroll to access the full audio experience
Chapter Content
A flow net is to be drawn by trial and error. For a given set of boundary conditions, the flow net will remain the same even if the direction of flow is reversed. Flow nets are constructed such that the head lost between successive equipotential lines is the same, say ∆h.
Detailed Explanation
Drawing flow nets requires a trial-and-error technique, meaning we may need to adjust our net several times to find a configuration that fits the boundary conditions correctly. The flow net displays lines of flow and equipotential lines. Importantly, the head, or pressure exerted by the water, should decrease consistently (by ∆h) between these lines, allowing us to draw accurate representations of how water flows.
Examples & Analogies
Consider building a racecourse on varying terrains. Just as you would try different paths to find one that works best while ensuring the slopes are consistent for racers, constructing flow nets involves testing until you find the perfect lines that illustrate how water moves in the soil.
Steps in Constructing a Flow Net
Chapter 3 of 4
🔒 Unlock Audio Chapter
Sign up and enroll to access the full audio experience
Chapter Content
The steps of construction are:
1. Mark all boundary conditions, and draw the flow cross section to some convenient scale.
2. Draw a coarse net which is consistent with the boundary conditions and which has orthogonal equipotential and flow lines. As it is usually easier to visualize the pattern of flow, start by drawing the flow lines first.
3. Modify the mesh such that it meets the conditions outlined above and the fields between adjacent flow lines and equipotential lines are 'square'.
4. Refine the flow net by repeating step 3.
Detailed Explanation
To construct a flow net:
1. First, identify and mark the boundaries where water enters or exits the soil. This provides guidelines for your net.
2. Next, start with a rough drawing of the flow lines, which shows the path water will follow. It’s important to make sure that these flow lines are perpendicular (orthogonal) to the equipotential lines.
3. Adjust the grid or mesh to ensure that areas between the flow lines and equipotential lines remain as 'square' shapes.
4. Finally, refine your drawing by revisiting the mesh and making necessary adjustments to ensure accuracy.
Examples & Analogies
Imagine using a map to chart a course for a bike race. You begin by marking where the race starts and ends (the boundary conditions). Then, you draw the route with clear paths (flow lines) while ensuring paths intersect at right angles (equipotential lines). By adjusting your paths as needed, you ensure racers can navigate smoothly, similar to refining your flow net.
Common Boundary Conditions
Chapter 4 of 4
🔒 Unlock Audio Chapter
Sign up and enroll to access the full audio experience
Chapter Content
The most common boundary conditions are:
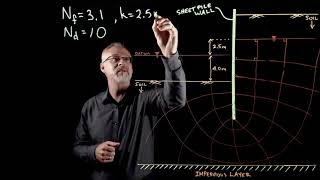
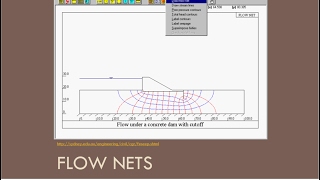
(a) A submerged permeable soil boundary is an equipotential line. This could have been determined by considering imaginary standpipes placed at the soil boundary, as for every point the water level in the standpipe would be the same as the water level. (Such a boundary is marked as CD and EF in the following figure.)
(b) The boundary between permeable and impermeable soil materials is a flow line (This is marked as AB in the same figure).
(c) Equipotential lines intersecting a phreatic surface do so at equal vertical intervals.
Detailed Explanation
When drawing flow nets, it's important to understand the common conditions at the boundaries:
(a) A submerged permeable boundary, where water can flow freely, acts as an equipotential line, meaning all points have the same head (pressure).
(b) Conversely, a boundary between permeable (water can flow through) and impermeable (water cannot flow through) materials is represented as a flow line, indicating where water is moving.
(c) Lastly, equipotential lines intersecting a phreatic surface (the level of groundwater) do so at regular (equal) intervals, which helps maintain the consistency of the flow representation.
Examples & Analogies
Think of a water bottle filled halfway with different materials at the bottom. The water's surface represents the phreatic surface and the top of the different materials creates flow lines. Where the water can flow easily (permeable) is like an open pathway, while areas where it cannot flow act like walls obstructing the water.
Key Concepts
-
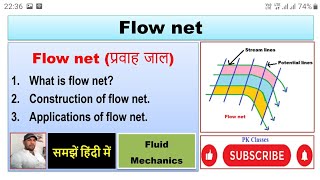
Flow Nets: Visual representations of soil flow, illustrating paths and head contours.
-
Equipotential Lines: Lines of equal head values, crucial for identifying boundaries.
-
Flow Lines: Indicate the trajectory of water flow, orthogonal to equipotential lines.
-
Boundary Conditions: Conditions that define how and where flow occurs in a flow net.
Examples & Applications
A typical flow net shows water movement through a soil layer, with equipotential lines spaced evenly, allowing for clear understanding of hydraulic gradients.
In engineering, flow nets help design drainage systems by understanding how water moves around structures.
Memory Aids
Interactive tools to help you remember key concepts
Rhymes
In the soil, flows go round, lines are drawn to make them found.
Stories
Imagine a gardener who uses standpipes to measure water levels; wherever the pipes show the same level, that's an equipotential line!
Memory Tools
R.E.M. for Remember Equipotential Mesh: Draw the Rough then Adjust Mesh for square areas.
Acronyms
P.E.A.C.E - Permeable, Equipotential, Areas, Consistent, Equidistant.
Flash Cards
Glossary
- Flow Net
A graphical representation of flow paths and equipotential lines in a soil.
- Equipotential Line
Lines that connect points of equal hydraulic head in a given fluid.
- Flow Line
Paths that fluid particles follow and are always tangential to the velocity vector of the flow.
- Boundary Condition
The conditions at the limits of a flow net that affect the flow pattern.
Reference links
Supplementary resources to enhance your learning experience.