
The Design Cycle in Action
Enroll to start learning
You’ve not yet enrolled in this course. Please enroll for free to listen to audio lessons, classroom podcasts and take practice test.
Interactive Audio Lesson
Listen to a student-teacher conversation explaining the topic in a relatable way.
Inquire and Analyze
🔒 Unlock Audio Lesson
Sign up and enroll to listen to this audio lesson

To start our exploration of the Design Cycle, let's focus on the first phase: Inquire and Analyze. Can anyone explain why it's essential to understand user needs before starting a project?

I think it's because we need to build something that people actually want.
Exactly! By analyzing user needs, we ensure our designs are not just creative but also functional and relevant. We can remember this phase with the acronym 'R.U.N': Research, Understand, and Needs.

How do we research user needs, though?
Great question! You can conduct surveys or interviews and observe how potential users interact with existing solutions. This will help define the problem we aim to solve.

So we’re basically gathering information before jumping to solutions?
Exactly! Collecting the right data is crucial. Let's summarize: This phase is all about gathering insights to ensure our design is user-centered.
Develop Ideas
🔒 Unlock Audio Lesson
Sign up and enroll to listen to this audio lesson

Moving on to the second phase: Develop Ideas. What do you think our goal is in this phase?

To come up with creative solutions, right?
Yes! This is where creativity shines. We can sketch ideas, create wireframes, or even storyboards. Does anyone know a tool we can use for designing wireframes?
I think we can use Figma for that!
Correct! Figma is perfect for creating prototypes. Remember, planning is critical. Let's note that understanding the structure of our solution through tools and sketches helps clarify our thoughts.
So, what’s next after we sketch our ideas?
Next, we need to organize these ideas and finalize the features we want to develop. Let’s recap: this phase is about brainstorming and structuring our ideas.
Create the Solution
🔒 Unlock Audio Lesson
Sign up and enroll to listen to this audio lesson
Now let's discuss the third phase: Create the Solution. What does this stage involve?
Actually building the app or website, right?
Exactly! Here we put our plans into action. We use coding to bring our designs to life. What programming languages can we use in this phase?
HTML, CSS, and JavaScript for web design!
Great! And for mobile app development, we can look at Swift for iOS and Kotlin for Android. As you build, remember to continuously test different features. This will help identify any issues early.
What if things don't work out during testing?
Good point! If something doesn’t work, that's a chance to improve. This phase is iterative; we can adjust as needed. Remember to document your progress too!
Evaluate
🔒 Unlock Audio Lesson
Sign up and enroll to listen to this audio lesson
Finally, we reach the Evaluate phase. Can someone remind me why evaluation is important in our projects?
To see how well our solution works and gather feedback!
Exactly! Gathering feedback from users is vital for understanding how we can improve our design. How can we effectively gather this feedback?
We can run surveys or have users perform tests on our app!
Great suggestions! Data from feedback helps us make informed decisions. Let’s summarize this phase as gathering insights to refine our project and enhance user experience.
Introduction & Overview
Read summaries of the section's main ideas at different levels of detail.
Quick Overview
Standard
In this section, we explore the MYP Design Cycle and how it can be applied to digital design projects. The process involves inquiring and analyzing user needs, developing ideas through planning and design, creating the solution via coding, and evaluating the outcome based on feedback.
Detailed
The Design Cycle in Action
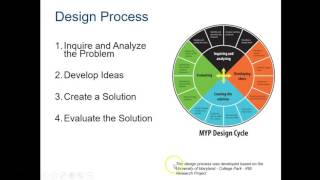
The Design Cycle is an essential methodology within the MYP framework that helps organize and streamline the design process across various digital projects. This section outlines the phases of the Design Cycle and their application to digital design:
- Inquire and Analyze: This phase emphasizes understanding user needs and defining the problem clearly. This sets a strong foundation for the project and ensures that the final product is relevant and user-centered.
- Key Actions: Conduct research, interviews, and surveys to gather requirements.
- Develop Ideas: Here, students brainstorm and sketch out their ideas, using tools like Figma for wireframes and storyboarding for visualizing their app or website's structure.
- Key Actions: Create sketches, flowcharts, and models to represent ideas visually.
- Create the Solution: In this phase, students engage in the actual coding or building process, where they develop their app or website based on the outlined structure and features.
- Key Actions: Utilize programming languages and tools as needed.
- Evaluate: The final phase involves testing the created solution, gathering user feedback, and reflecting on potential improvements.
- Key Actions: Conduct usability tests, analyze feedback, and iterate the design based on findings.
By following this systematic approach, students can effectively tackle design challenges, allowing creativity and technology to merge in their projects.
Youtube Videos

Audio Book
Dive deep into the subject with an immersive audiobook experience.
Step 1: Inquire and Analyse
Chapter 1 of 4
🔒 Unlock Audio Chapter
Sign up and enroll to access the full audio experience
Chapter Content
- Inquire and Analyse:
- Research user needs.
- Define the problem.
Detailed Explanation
The first step of the Design Cycle involves understanding who the users are and what they need. This means doing research to gather information about users’ preferences, behaviors, and the challenges they face. Once you have a good understanding of the users, the next task is to define the specific problem that you aim to solve with your design.
Examples & Analogies
Imagine you want to create a new app for students to manage their homework. First, you would talk to students to understand their pain points—perhaps they often forget assignments or have trouble keeping track of due dates. By analyzing their feedback, you could clearly define the problem your app intends to solve: helping students remember and organize their homework efficiently.
Step 2: Develop Ideas
Chapter 2 of 4
🔒 Unlock Audio Chapter
Sign up and enroll to access the full audio experience
Chapter Content
- Develop Ideas:
- Sketch ideas (use Figma or paper).
- Plan structure (wireframes, flowcharts).
Detailed Explanation
In the second step, developers and designers brainstorm possible solutions to the defined problem. This often begins with sketching out ideas, which can be done digitally (using tools like Figma) or on paper. It’s also essential to plan the structure of your solution using wireframes or flowcharts that outline how the app or website will function and the flow of information.
Examples & Analogies
Think of this step like drafting a blueprint before building a house. An architect sketches different designs and layouts to visualize how the house will look and function. Similarly, you sketch your app’s layout and design the flow of information so you know what features will be included and how users will navigate through them.
Step 3: Create the Solution
Chapter 3 of 4
🔒 Unlock Audio Chapter
Sign up and enroll to access the full audio experience
Chapter Content
- Create the Solution:
- Code the app or website.
- Test different features.
Detailed Explanation
This third step involves actually creating the product you've designed. This might include coding the app or website, setting up databases, and implementing graphics. Additionally, thorough testing of each feature is crucial to ensure everything works as intended, identifying bugs, and fixing issues that arise.
Examples & Analogies
Imagine you have been following a recipe to bake a cake. After measuring and mixing all the ingredients (coding the app), you need to bake it and check if it rises correctly (testing features). If the cake falls or doesn’t taste right, you go back and adjust your recipe or baking time (fixing bugs).
Step 4: Evaluate
Chapter 4 of 4
🔒 Unlock Audio Chapter
Sign up and enroll to access the full audio experience
Chapter Content
- Evaluate:
- Gather feedback.
- Reflect on improvements.
Detailed Explanation
The final step in the Design Cycle focuses on obtaining feedback on your completed design from users. This feedback is critical as it can provide insights into how the solution is received and what can be improved. Reflecting on this feedback allows designers to identify any shortcomings and make the necessary adjustments in future iterations of the project.
Examples & Analogies
Consider a chef presenting their dishes at a tasting event. They not only want guests to enjoy the food but also value their opinions to refine their recipes. Just as the chef gathers feedback to enhance their culinary skills, designers use user feedback to improve their digital products and better meet user needs.
Key Concepts
-
Inquire and Analyze: Gathering user needs to inform design.
-
Develop Ideas: Brainstorming and sketching ideas.
-
Create the Solution: Implementing ideas through coding.
-
Evaluate: Gathering feedback for improvement.
Examples & Applications
Using Figma to create a wireframe for an education app.
Conducting user interviews to define the objectives of a school project.
Memory Aids
Interactive tools to help you remember key concepts
Rhymes
Inquire and Analyze to know what they despise, Develop Ideas, let creativity arise, Create the Solution, code and build our guise, Evaluate at the end, for user feedback wise.
Stories
Imagine a student named Alex who wants to create an app for tracking assignments. Alex first talks to classmates to understand their struggles; that's Inquire and Analyze. Next, Alex sketches ideas and thinks about features, which is Develop Ideas. Then, Alex codes the app, creating it step by step—Create the Solution. Finally, Alex asks friends for feedback and considers their advice to enhance the app—this is Evaluate.
Memory Tools
I.D.E.A - Inquire, Develop, Execute, Assess.
Acronyms
R.U.N - Research, Understand, Needs for gathering user insights.
Flash Cards
Glossary
- Design Cycle
A systematic approach to solving problems, especially in design and technology projects.
- User Needs
Requirements or desires that users have regarding a product or service.
- Wireframe
A visual guide that represents the skeletal framework of a website or app.
- Prototype
An early sample or model created to test a concept or process.
- Evaluation
The process of assessing the performance and effectiveness of a solution.
Reference links
Supplementary resources to enhance your learning experience.