
The Design Cycle in App Development
Enroll to start learning
You’ve not yet enrolled in this course. Please enroll for free to listen to audio lessons, classroom podcasts and take practice test.
Interactive Audio Lesson
Listen to a student-teacher conversation explaining the topic in a relatable way.
Inquire and Analyze
🔒 Unlock Audio Lesson
Sign up and enroll to listen to this audio lesson

Let's begin with the first stage of the Design Cycle, which is Inquire and Analyze. Why do you think it's crucial to understand our users before we start designing?

To make sure the app will be useful for them?
Exactly! Knowing the users' needs helps us define the problems we're solving. Can anyone give an example of a user need?

Maybe a student needs help keeping track of assignments?
Great example! Knowing that, we can start thinking about features that would help with tracking assignments. Remember the acronym 'A.I.D.'—Analyze User needs, Identify problems, and Define solutions.

What if we can’t find enough information about the users?
That's a good question! We may conduct surveys or interviews to gather more insights. Let's recap: Inquire and Analyze is about understanding who our users are and what they need.
Develop Ideas
🔒 Unlock Audio Lesson
Sign up and enroll to listen to this audio lesson

Now, let’s move to the second stage: Develop Ideas. What do you think we should do after identifying user needs?

We should brainstorm solutions!
Absolutely! Brainstorming is key. After brainstorming, how can we visualize our ideas?
By sketching wireframes!
Correct! Wireframes are essential as they lay out the app's structure and functionality. Remember the mnemonic 'S.S.P.'—Sketch, Structure, Plan!
Can we use online tools for this?
Yes, tools like Figma are excellent for creating wireframes. Let's summarize: In this stage, we sketch ideas, plan how the app will function, and prepare for development.
Create the Solution
🔒 Unlock Audio Lesson
Sign up and enroll to listen to this audio lesson
In the third stage, Create the Solution, we bring our ideas to life. What tools might we use to build our app?
We could use MIT App Inventor!
That's right! MIT App Inventor is beginner-friendly. Additionally, we can use Thunkable or even code it ourselves. Why is testing important at this stage?
To make sure everything works!
Exactly. Testing helps uncover issues before launch. Remember the acronym 'T.E.S.T.'—Test Every Single Tool!
Should we get feedback from users while doing this?
Yes! Getting user feedback during development is crucial for making improvements.
Evaluate
🔒 Unlock Audio Lesson
Sign up and enroll to listen to this audio lesson
Finally, the last stage: Evaluate. Why do you think evaluation is essential?
To fix any problems before releasing the app!
Exactly! Evaluation allows us to gather user feedback and make necessary improvements. Can anyone suggest how we might evaluate an app?
We could use surveys or ask users to test it out.
Great suggestions! Remember the mnemonic 'R.A.F.'—Reflect, Analyze feedback, and Fix issues.
Is it common to keep improving after launching the app?
Yes! Continuous evaluation is crucial, as technology and user needs may change over time. Let's summarize: Evaluation involves testing, gathering feedback, and making ongoing improvements.
Introduction & Overview
Read summaries of the section's main ideas at different levels of detail.
Quick Overview
Standard
This section introduces the Design Cycle involved in app development, covering key steps such as inquiry, idea development, solution creation, and evaluation. Each stage emphasizes the importance of understanding user needs and iterative improvements.
Detailed
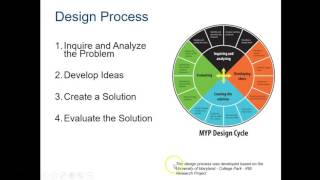
The Design Cycle in App Development
The Design Cycle is crucial for developing effective applications. It consists of four key stages:
- Inquire and Analyze: This initial phase involves understanding the users, exploring their needs, and defining the problems you aim to solve with your app. It sets the foundation for the entire design process.
- Develop Ideas: In this stage, designers brainstorm creative solutions by sketching wireframes and storyboarding the app’s flow. This visual representation helps clarify features and user interactions.
- Create the Solution: Here, developers build the app using tools like Thunkable or MIT App Inventor, or by coding natively. This stage involves bringing the ideas to life through actual application creation.
- Evaluate: The final step involves testing the app to gather user feedback and making necessary improvements. This iterative process ensures that the final product meets user expectations and functions effectively.
This design cycle is integral in app development as it encourages a user-centered approach and emphasizes iterative refinement.
Youtube Videos

Audio Book
Dive deep into the subject with an immersive audiobook experience.
Step 1: Inquire and Analyse
Chapter 1 of 4
🔒 Unlock Audio Chapter
Sign up and enroll to access the full audio experience
Chapter Content
- Inquire and Analyse – Who are the users? What problem are you solving?
Detailed Explanation
In this first step, it's important to understand the users who will be using your app. You need to ask essential questions: Who are they? What do they need? What problem will your app solve for them? By analyzing these aspects, you can pinpoint the specific needs and challenges your app should address. This inquiry sets a strong foundation for your design process, grounding it in real user experiences.
Examples & Analogies
Think of it like planning a party. Before sending out invitations, you first need to know your guests. Understanding their preferences and dietary requirements ensures everyone enjoys the event. Similarly, learning about your app’s users helps you create something they will love.
Step 2: Develop Ideas
Chapter 2 of 4
🔒 Unlock Audio Chapter
Sign up and enroll to access the full audio experience
Chapter Content
- Develop Ideas – Sketch wireframes, storyboard your app.
Detailed Explanation
In the second step, you start brainstorming and sketching your ideas. Wireframes are simple blueprints of your app's layout. They show where buttons, text, and images will be placed. Storyboarding involves mapping out the user journey through the app step-by-step. This visual planning helps you organize your thoughts and envision how the app will function, which is crucial before diving into the actual development.
Examples & Analogies
Imagine you are an architect designing a house. Before construction, the architect creates detailed blueprints and might even sketch out different concepts to visualize how each room will flow together. Similarly, wireframes and storyboards help app developers visualize and plan the app layout and user experience.
Step 3: Create the Solution
Chapter 3 of 4
🔒 Unlock Audio Chapter
Sign up and enroll to access the full audio experience
Chapter Content
- Create the Solution – Use app builders (like Thunkable, MIT App Inventor) or code natively.
Detailed Explanation
Once you have your designs, it’s time to create the app. You can use app builders which provide visual tools for designing the app without needing to write code, or you can code it natively for full control over functionality. This phase transforms your ideas into an actual product, turning wireframes and sketches into a working app that users can interact with.
Examples & Analogies
Think of a chef preparing a meal. After selecting the recipe and gathering ingredients (the planning phase), the chef follows the steps to cook the dish. Using the right tools and techniques, the chef transforms these raw ingredients into a delicious meal, much like how developers turn designs into functional apps.
Step 4: Evaluate
Chapter 4 of 4
🔒 Unlock Audio Chapter
Sign up and enroll to access the full audio experience
Chapter Content
- Evaluate – Test your app and improve based on feedback.
Detailed Explanation
The final step involves evaluating your app once it’s built. Testing allows you to identify any bugs or issues that users might experience. Gathering feedback is crucial; it helps you understand what works well and what needs improvement. This feedback loop is essential for refining your app, ensuring it functions properly and meets user expectations before launching it to the public.
Examples & Analogies
Imagine giving a presentation for the first time. After practicing, you might ask friends for their feedback. Some might point out areas where you could improve your delivery or clarify your points. Incorporating their suggestions would make your future presentations more effective, just as improving your app based on user feedback enhances its usability.
Key Concepts
-
Inquire and Analyze: The first stage involves understanding user needs.
-
Develop Ideas: The second stage focuses on sketching and brainstorming solutions.
-
Create the Solution: The third stage is about building the app using various tools.
-
Evaluate: The final stage involves testing and gathering feedback for improvements.
Examples & Applications
An educational app to track student homework assignments.
A weather app that provides location-based forecasts.
A mental wellness reminder app that notifies users to take breaks.
Memory Aids
Interactive tools to help you remember key concepts
Rhymes
To design our app right, we start with a sight, inquiring and analyzing gives us insight!
Stories
Imagine a gardener, first studying the soil (Inquire), sketching the garden layout (Develop), planting seeds (Create), and adjusting based on plant growth (Evaluate).
Memory Tools
Use 'D.I.E.' to remember the Design Cycle steps: Define user needs, Innovate ideas, Execute solutions.
Acronyms
A.I.D.
Analyze
Identify
Define – The method to understand user needs.
Flash Cards
Glossary
- Design Cycle
A structured process used in developing applications, involving inquiry, idea development, creation, and evaluation.
- Wireframe
A visual representation of an app's layout and functions, used to plan its structure.
- UI/UX Design
User Interface and User Experience design focuses on making applications intuitive and visually appealing.
- Prototype
Early sample or model of the application used for testing concepts.
Reference links
Supplementary resources to enhance your learning experience.