
Creating the Solution
Enroll to start learning
You’ve not yet enrolled in this course. Please enroll for free to listen to audio lessons, classroom podcasts and take practice test.
Interactive Audio Lesson
Listen to a student-teacher conversation explaining the topic in a relatable way.
Introduction to Creating the Solution
🔒 Unlock Audio Lesson
Sign up and enroll to listen to this audio lesson

Today, we’re focusing on the 'Creating the Solution' stage of the MYP Design Cycle. This is where you bring your ideas to life. Who can remind me what we aimed to do in the previous stage?

We developed our ideas and made plans for our designs!
Exactly! And now we’ll follow that plan. One important thing is to construct a logical plan. Can anyone explain what a logical plan might include?

Like steps on how to build our project and what materials we need?
Yes, very good! It helps to keep us organized and efficient. Remember, we can use the acronym TDD—Tools, Designs, Documents—to help us remember what we need for this stage.

What if something doesn't go as planned?
Great question! Adaptability is key. You’ll need to problem-solve and make adjustments as needed. Always document these changes, too, as you’ll reflect on them later!

So, we take notes and take pictures while we’re building?
Correct! Documentation is crucial. Let’s recap: we start with a logical plan, gather our tools, and remain adaptable. Each step is important towards creating a successful solution.
Technical Skills and Tools
🔒 Unlock Audio Lesson
Sign up and enroll to listen to this audio lesson

Let’s dive deeper into the tools you will use for 'Creating the Solution.' Can anyone name some tools we might need?
We could use 3D printers or maybe some crafting materials?
Absolutely! Both physical and digital tools are essential. Think about how each tool contributes to making your solution functional. How do we ensure we’re using these tools effectively?
By knowing how to operate them and following our plans!
Exactly right! If you’re using software, for instance, be sure you understand its features. Let's create a mnemonic, 'FEAST'—Fit, Execute, Adapt, Share, Test—to remember to fit your plans with your tools, execute your ideas successfully, adapt to changes, share your progress, and test your product.
How do we test our prototypes?
Great follow-up! Testing should occur throughout your building phase. As you create, you’ll check if your design meets the specifications. Remember, the goal is always improvement, so feedback is important!
So we keep iterating until it works perfectly?
Yes! Iteration is part of the design process. Let’s summarize: knowing your tools, following your plans, and being ready to adapt are vital for a successful solution.
Reflection and Justification
🔒 Unlock Audio Lesson
Sign up and enroll to listen to this audio lesson
Now, let’s address a crucial aspect of 'Creating the Solution'—reflection. Why do you think reflecting on our changes is important?
To understand what worked and what didn’t, maybe?
Exactly! Reflection helps you learn and improve in future projects. When you tweak your design, document why you made those changes. Can anyone give an example of a change they might make?
If my prototype isn't stable, I might change the design to make it sturdier.
Perfect example! You’ll want to keep a record of that. Let’s create a memory aid: CARS—Capture, Analyze, Reflect, Sustain. Capture your changes, analyze what these changes achieve, reflect on the impacts, and sustain those successful ideas in future designs.
What if nobody gives us feedback?
If that happens, seek out opinions from peers or mentors. Gathering diverse feedback is key for improvement. Remember, reflecting on and justifying changes not only enhances your current project but fosters your growth as a designer.
So, it's like building a better version of ourselves each time?
Precisely! Every iteration builds skills and knowledge. To wrap up: reflection, documentation, and justification are your tools for continuous improvement.
Introduction & Overview
Read summaries of the section's main ideas at different levels of detail.
Quick Overview
Standard
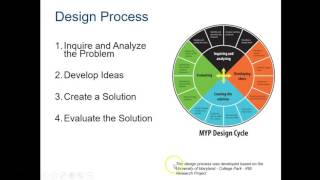
In the 'Creating the Solution' stage of the MYP Design Cycle, students utilize their planning to build their projects. This phase emphasizes technical skills, adaptability, and the documentation of the development process, ensuring that students learn to reflect and justify any modifications made to their initial designs.
Detailed
Creating the Solution
In this section, we delve into the third stage of the MYP Design Cycle, 'Creating the Solution.' This stage is pivotal in transforming ideas generated in the previous phase into tangible products, prototypes, or systems. The process requires a logical approach to creation, demonstrating technical skills, and adapting plans based on real-time challenges.
Key Objectives
- Construct a logical plan: Students need to formulate a coherent strategy to guide the creation of their solutions.
- Demonstrate technical skills: Employing appropriate tools and methodologies is essential for building effective solutions.
- Follow the plan: Adhering to the pre-set guidelines ensures consistency and coherence throughout the development process.
- Justify changes: Reflection on changes made to the original plans is crucial; students must understand the reasoning behind adaptations.
Key Activities
- Building the Solution: Utilizing relevant tools, materials, and software to create the final output.
- Documenting the Process: Keeping a record involves photos, videos, and notes to track the development.
- Problem-solving: Students are encouraged to think critically and creatively to tackle unexpected issues that arise during construction.
- Testing Functionality: After creating the product, it's vital to check its performance and make necessary adjustments.
Example in Practice
For instance, if a student is working on an eco-friendly water bottle project, their task would include 3D printing a prototype and assessing its durability, grip, and usability. Throughout this process, they would reflect on their choices, such as switching lid designs to enhance user experience.
This stage not only helps students materialize their ideas but also fosters essential skills such as adaptability, technical proficiency, and critical reflection, making it a cornerstone of the MYP Design Cycle.
Youtube Videos

Audio Book
Dive deep into the subject with an immersive audiobook experience.
Overview of Creating the Solution
Chapter 1 of 4
🔒 Unlock Audio Chapter
Sign up and enroll to access the full audio experience
Chapter Content
Now it’s time to bring your ideas to life. This stage focuses on building the actual product, prototype, or system according to the plans developed in the previous stage.
Detailed Explanation
In this stage, students take their ideas from the planning phase and begin to create the actual product or prototype. This is a crucial moment in the design process, where theoretical plans transition into tangible results. Essentially, it's about executing the designs and making something physical or functional.
Examples & Analogies
Think of this phase like a chef preparing a meal. After gathering ingredients and planning the recipe, the chef begins cooking, which is similar to executing a design plan to create the final product.
Objectives of Creating the Solution
Chapter 2 of 4
🔒 Unlock Audio Chapter
Sign up and enroll to access the full audio experience
Chapter Content
Objectives:
- Construct a logical plan to create the solution.
- Demonstrate technical skills when making the solution.
- Follow the plan to create a functional solution.
- Justify changes made to the original plan.
Detailed Explanation
The objectives outline what students should aim to achieve during this stage. These include developing a clear, step-by-step plan for building the solution, applying necessary skills (like 3D modeling or woodworking), and adapting the plan as issues arise. Justification of any changes made is also important, as it reflects thoughtful decision-making based on real-world challenges.
Examples & Analogies
Imagine a builder constructing a house. They have a blueprint (the original plan) and must follow it closely but may also need to make adjustments if they find an issue with the foundation. This adaptability is crucial for success.
Key Activities in Creating the Solution
Chapter 3 of 4
🔒 Unlock Audio Chapter
Sign up and enroll to access the full audio experience
Chapter Content
Key Activities:
- Use tools, software, or materials to build your solution.
- Document your process with photos, videos, and notes.
- Problem-solve and adapt as unexpected issues arise.
- Test the functionality of your solution.
Detailed Explanation
This segment highlights the specific tasks students engage in during this phase. They will use various tools (like software for design or physical tools for construction), keep a record of their progress, tackle any problems that come up, and ensure their solution works as intended through testing. Detailed documentation also helps reflect on the process later.
Examples & Analogies
Consider students building a model airplane. They not only assemble the parts (using tools) but also take photos at each step, troubleshoot issues such as weight balance, and test fly the airplane to see if it flies correctly.
Examples of Creating the Solution
Chapter 4 of 4
🔒 Unlock Audio Chapter
Sign up and enroll to access the full audio experience
Chapter Content
Example:
You might 3D print a prototype of your bottle, or create a digital model, and test its grip, durability, and functionality. You’d reflect on changes made along the way (e.g., switching to a different lid design for better usability).
Detailed Explanation
In this example, students apply their design ideas by creating a prototype using a 3D printer or digital tools. They systematically test its features, such as how comfortable it is to hold, whether it stays intact during use, and how well it serves its purpose. This hands-on experience is essential in assessing design effectiveness.
Examples & Analogies
Imagine an inventor creating a new type of phone case. They first create a design digitally, print it as a prototype, and then test how well it protects the phone and how easy it is to use. This iterative process helps refine the final product.
Key Concepts
-
Logical Plan: A structured sequence of steps necessary for developing a design.
-
Technical Skills: Skills pertaining to the use of various tools and methods in creation.
-
Documentation: The act of recording the development process, critical for reflection.
-
Adaptability: The ability to adjust plans as needed based on experiences during creation.
-
Iteration: The process of refining and improving solutions through ongoing feedback.
Examples & Applications
A student designs a water bottle and realizes during testing that the cap leaks, prompting a redesign for better sealing.
During a class project, a student shifts from wooden models to 3D-printed prototypes due to material limitations.
Memory Aids
Interactive tools to help you remember key concepts
Rhymes
When you create with skill and care, a plan and tools will get you there.
Stories
Imagine a young inventor who, with a map (the logical plan), sets off on a journey. Along the way, she faces storms (challenges) but adapts her sails (plans) and captures every moment in a journal (documentation). Her ship emerges stronger through this iterative journey.
Memory Tools
C.A.R.S - Capture changes, Analyze impact, Reflect on experience, Sustain successful features.
Acronyms
T.D.D. - Tools, Designs, Documents to remember what is necessary for creating the solution.
Flash Cards
Glossary
- Logical Plan
A structured approach detailing the steps and resources necessary for creating a solution.
- Technical Skills
The abilities required to effectively utilize tools and methods in the creation process.
- Documentation
The process of recording the development journey through notes, photos, and videos.
- Adaptability
The ability to change plans and strategies based on new information or challenges encountered.
- Iteration
The process of repeating steps to refine and improve a solution based on testing and feedback.
Reference links
Supplementary resources to enhance your learning experience.