
What is the MYP Design Cycle?
Enroll to start learning
You’ve not yet enrolled in this course. Please enroll for free to listen to audio lessons, classroom podcasts and take practice test.
Interactive Audio Lesson
Listen to a student-teacher conversation explaining the topic in a relatable way.
Inquiring and Analyzing
🔒 Unlock Audio Lesson
Sign up and enroll to listen to this audio lesson

Today, we dive into the first stage of the MYP Design Cycle: Inquiring and Analyzing. This stage is crucial because it sets the foundation of our project.

Why is it so important to understand the audience we design for?
Great question! Understanding the audience ensures that our solutions meet real needs. Can anyone think of a time they designed something without knowing their audience?

I made a survey for a project once, and it didn't get many responses because I didn’t share it with the right people.
Exactly! It’s all about gathering insights to shape your design effectively. Remember, the acronym R.E.A.D: Research, Explore, Analyze, Define. Who remembers what makes up SEED for the needs assessment?

Isn’t it Survey, Evaluate, Explore, and Define?
That’s correct! These tools help you understand the problem better. By the end of this stage, you should have a clear design brief outlining your problem and the direction for your solution.

So, what kind of activities do we conduct during this stage?
Activities include interviews, surveys, and analyzing existing solutions. Always remember: understanding the issue leads to the most innovative solutions!
Developing Ideas
🔒 Unlock Audio Lesson
Sign up and enroll to listen to this audio lesson

Transitioning to the second stage, Developing Ideas, this is where creativity meets structured planning. Why do you think brainstorming is important here?
I think it helps generate many ideas, even if they are not all perfect.
Exactly! The idea is to unleash creativity without limitations. Remember to utilize the acronym P.I.C.S: Plan, Ideas, Criteria, Sketches. Why do we need design specifications?
To ensure our designs meet certain requirements!
Correct! Design specifications become our guiding stars during the project. Can anyone share an example of a design they’ve planned before?
When I made a model car, I had to decide on materials and size before starting to build.
Perfect example! Also, don't forget that developing accurate drawings or prototypes is crucial. Planning effectively will lead you to successful execution in the next stage.
Creating the Solution
🔒 Unlock Audio Lesson
Sign up and enroll to listen to this audio lesson
Now, let’s explore Creating the Solution—the phase where your ideas come to life! What are some challenges you might face while building?
There could be issues with materials not behaving how I expect them to.
And sometimes designing takes longer than planned!
Absolutely! That’s why documenting your process is essential. Capture your trials with pictures and notes. Does anyone know other methods we can use to reference our design during creation?
Maybe flowcharts to visualize steps and decisions?
That's an excellent strategy! Always prepare to adapt and amend your original plan if required. Flexibility ensures a better end product.
Evaluating
🔒 Unlock Audio Lesson
Sign up and enroll to listen to this audio lesson
Finally, we arrive at Evaluating. Why do you think evaluation is crucial after completing a project?
It helps us understand what worked and what didn’t.
And we learn how to improve for next time!
Exactly! Evaluation is about reflection. Use the acronym F.A.C.E: Feedback, Assess, Compare, Enhance. What should be included in our evaluation process?
We should gather feedback from users and see if we meet the specifications.
Well said! Collecting feedback and comparing results will instill lifelong skills. What’s one thing you could improve on based on your evaluations?
Introduction & Overview
Read summaries of the section's main ideas at different levels of detail.
Quick Overview
Standard
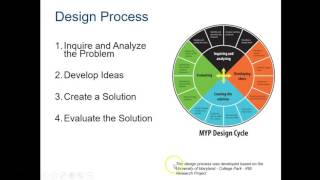
The MYP Design Cycle comprises four key stages: Inquiring and Analyzing, Developing Ideas, Creating the Solution, and Evaluating. Each stage fosters critical thinking, creativity, and iterative learning, allowing students to approach design problems effectively.
Detailed
The MYP Design Cycle
The MYP Design Cycle is a pivotal framework in the Middle Years Programme, guiding students through the process of problem-solving and design. It consists of four interactive stages: Inquiring and Analyzing, Developing Ideas, Creating the Solution, and Evaluating. Each stage has defined objectives that facilitate focused thinking, detailed research, innovative creation, and reflective evaluation.
Key Stages:
- Inquiring and Analyzing: Students understand the problem, their audience and the need for solutions. Key tasks include conducting user interviews, analyzing existing products, and writing a detailed design brief.
- Developing Ideas: This is where creativity shines. Students brainstorm and plan realistic solutions, creating sketches and design specifications. They must rigorously develop feasible concepts, gathering resources required for execution.
- Creating the Solution: Students bring their designs to life by constructing a prototype or product, adapting their plans as necessary based on practical challenges faced during execution.
- Evaluating: A critical reflection stage where students assess their solutions against original goals, gather feedback, and contemplate improvements for future iterations.
The cyclical nature of the design cycle encourages repeated exploration of these stages to refine both solution quality and the students' design thinking skills. Overall, the MYP Design Cycle fosters essential skills such as critical thinking, creativity, problem-solving, and effective research, preparing students for future endeavors in various fields.
Youtube Videos
Audio Book
Dive deep into the subject with an immersive audiobook experience.
Overview of the MYP Design Cycle
Chapter 1 of 5
🔒 Unlock Audio Chapter
Sign up and enroll to access the full audio experience
Chapter Content
The MYP Design Cycle is a structured framework consisting of four key stages:
1. Inquiring and Analyzing
2. Developing Ideas
3. Creating the Solution
4. Evaluating
Each stage contains specific objectives that help guide your thinking, research, creation, and reflection. The design cycle is iterative, meaning you may revisit stages as you refine your ideas and solutions.
Detailed Explanation
The MYP Design Cycle is a method that helps students organize their approach to design projects. There are four main steps: Inquiring and Analyzing, Developing Ideas, Creating the Solution, and Evaluating. Each step has specific goals that guide students in what to focus on during their work. Importantly, the design process is not linear; students may circle back to earlier stages to refine their ideas as they learn and grow through the project.
Examples & Analogies
Think of the MYP Design Cycle like cooking a meal. First, you gather ingredients (Inquiring and Analyzing), then you plan your recipe (Developing Ideas), next you cook the meal (Creating the Solution), and finally, you taste the dish and think about how it tastes and how it could be improved next time (Evaluating).
Stage 1: Inquiring and Analyzing
Chapter 2 of 5
🔒 Unlock Audio Chapter
Sign up and enroll to access the full audio experience
Chapter Content
This is the foundation of the design process. In this stage, you aim to understand the problem you are solving, who you are designing for, and why your solution matters. Objectives:
• Explain and justify the need for a solution.
• Identify and prioritize primary and secondary research.
• Analyze existing products that inspire or influence your work.
• Develop a detailed design brief.
Key Activities:
• Conduct user interviews and surveys.
• Research similar products or solutions.
• Identify user needs and market gaps.
• Write a design brief that summarizes the problem and the direction for your solution.
Example:
If you're designing an eco-friendly water bottle, you'd research environmental impacts of plastic, analyze existing reusable bottles, and define what your new product needs to improve.
Detailed Explanation
In the first stage, 'Inquiring and Analyzing,' students investigate the problem they aim to solve. They must understand the context and importance of their project. Objectives for this stage include explaining why a solution is necessary, doing thorough research, examining existing products, and creating a design brief that outlines their findings and design aims. This stage is crucial, as it lays a solid understanding of the problem and user needs before moving forward.
Examples & Analogies
Imagine you're trying to create a new phone app. Before you start building it, you would first ask potential users what features they want and check out existing apps to see what works and what doesn't. This helps ensure your app will meet real needs and stand out.
Stage 2: Developing Ideas
Chapter 3 of 5
🔒 Unlock Audio Chapter
Sign up and enroll to access the full audio experience
Chapter Content
In this phase, creativity and planning come together. You move from understanding the problem to brainstorming and planning possible solutions. Objectives:
• Develop design specifications.
• Present a range of feasible design ideas.
• Develop accurate, scaled drawings or digital prototypes.
• Present a detailed planning proposal.
Key Activities:
• Sketch multiple designs and select the best one based on your research.
• List out criteria your design must meet (e.g., cost, materials, usability).
• Create diagrams or 3D models using tools like Tinkercad, Fusion 360, or hand drawings.
• Plan the steps and resources needed to build your chosen design.
Example:
For the water bottle project, you might present ideas with different shapes, materials, or features (e.g., built-in filter). Then, choose one idea based on feasibility and design goals.
Detailed Explanation
The 'Developing Ideas' stage is where students leverage their creativity to brainstorm potential solutions to the problem identified. Students will create design specifications that determine what their solution should achieve. They are encouraged to sketch different designs and select the most viable option, along with planning how to execute the project effectively. This includes understanding materials, costs, and usability as part of their planning.
Examples & Analogies
Consider designing a playground. In this phase, you'd draw different layouts and ideas for swings, slides, and climbing frames. You would check if they fit in your budget and how safe they are before deciding on the final design.
Stage 3: Creating the Solution
Chapter 4 of 5
🔒 Unlock Audio Chapter
Sign up and enroll to access the full audio experience
Chapter Content
Now it’s time to bring your ideas to life. This stage focuses on building the actual product, prototype, or system according to the plans developed in the previous stage. Objectives:
• Construct a logical plan to create the solution.
• Demonstrate technical skills when making the solution.
• Follow the plan to create a functional solution.
• Justify changes made to the original plan.
Key Activities:
• Use tools, software, or materials to build your solution.
• Document your process with photos, videos, and notes.
• Problem-solve and adapt as unexpected issues arise.
• Test the functionality of your solution.
Example:
You might 3D print a prototype of your bottle, or create a digital model, and test its grip, durability, and functionality. You’d reflect on changes made along the way (e.g., switching to a different lid design for better usability).
Detailed Explanation
During the 'Creating the Solution' phase, students actualize their designs by constructing the product or prototype. This involves following a structured plan and utilizing the necessary tools and materials. Students should document their building process, noting any changes or challenges encountered, which fosters adaptability and problem-solving skills.
Examples & Analogies
Think of this stage like baking a cake. You have your recipe (plan) from the previous stage. As you bake, you might need to adjust the oven temperature if the cake is rising too fast or add frosting differently than you initially planned. Documenting this process helps you learn for next time.
Stage 4: Evaluating
Chapter 5 of 5
🔒 Unlock Audio Chapter
Sign up and enroll to access the full audio experience
Chapter Content
The final phase is about reflection—on the product, the process, and your personal growth as a designer. It's an essential step to identify what worked well and what could be improved. Objectives:
• Design and carry out tests to evaluate the product or solution.
• Evaluate the success of the solution based on design specifications.
• Explain how the solution could be improved.
• Reflect on your learning and the impact of the design cycle.
Key Activities:
• Gather feedback from users and peers.
• Compare the final product to the original goals and specifications.
• Suggest realistic improvements.
• Reflect on your journey through the design cycle.
Example:
After testing your water bottle, you find the cap leaks slightly. You note this and propose a tighter seal in future designs. You also reflect on your improved skills in 3D modeling and research.
Detailed Explanation
In the 'Evaluating' stage, students assess their completed products and the entire design process. This includes gathering feedback, testing the product against initial objectives, and identifying areas for improvement. Students are encouraged to reflect on their experiences and personal growth that occurred throughout the design cycle. This helps to develop critical thinking and self-assessment skills.
Examples & Analogies
Picture finishing a school project. After you present it, you gather feedback from classmates and teachers, noting which parts were engaging and which could be better. You might think about how to improve your next project based on this reflection.
Key Concepts
-
Inquiring and Analyzing: Understanding the problem and audience.
-
Developing Ideas: Brainstorming and planning feasible solutions.
-
Creating the Solution: Actual construction and implementation of designs.
-
Evaluating: Reflection and assessment of the design process and outcomes.
Examples & Applications
Designing an eco-friendly water bottle by analyzing plastic waste impacts and competitor products.
Creating a mobile app for efficient task management, focusing on user needs and simplicity.
Memory Aids
Interactive tools to help you remember key concepts
Rhymes
Inquire, create, then evaluate, good designs lead to great fate!
Stories
Once in a land of inventors, a young designer was lost, but by following the cycle of design, he learned to solve problems at any cost.
Memory Tools
Remember ‘I.D.C.E’ to recall Inquire, Develop, Create, and Evaluate!
Acronyms
P.I.C.S for Developing Ideas
Plan
Ideas
Criteria
Sketches.
Flash Cards
Glossary
- MYP Design Cycle
A structured framework of stages in design that guides students from problem identification to solution evaluation.
- Inquiring and Analyzing
The first stage of the design cycle focused on understanding the problem and gathering necessary information.
- Developing Ideas
The second stage where students brainstorm, sketch, and plan feasible design solutions.
- Creating the Solution
The third stage focused on the actual construction and implementation of the chosen design.
- Evaluating
The final stage that involves assessing the solution and reflecting on the design process for improvements.
Reference links
Supplementary resources to enhance your learning experience.