
Optimization of Dead-Load Efficiency
Enroll to start learning
You’ve not yet enrolled in this course. Please enroll for free to listen to audio lessons, classroom podcasts and take practice test.
Interactive Audio Lesson
Listen to a student-teacher conversation explaining the topic in a relatable way.
Introduction to Dead-Load Efficiency
🔒 Unlock Audio Lesson
Sign up and enroll to listen to this audio lesson

Welcome class! Today we're exploring how the shape of long-span structures can significantly enhance dead-load efficiency. Can anyone tell me why that's important?

Is it because it helps reduce the amount of materials we need?
Exactly! By optimizing shapes, we can minimize material usage while maintaining strength. This principle is often seen in arches, which closely resemble the moment diagrams. Can anyone think of examples of structures that use this principle?

Bridges and large roofs!
Great points! Remember, the goal is to have designs that transmit loads effectively through compression. Let's delve deeper!
Understanding Arch Structures
🔒 Unlock Audio Lesson
Sign up and enroll to listen to this audio lesson

Let’s talk about arches in detail. How do you think they handle loads differently than beams?

Maybe because they carry loads through compression rather than bending?
Good insight! That's correct. Arches transmit loads primarily in axial compression while minimizing bending moments. So what kind of load does a parabolic arch subjected to uniform loads experience?

It experiences compression only!
Yes! This efficiency is why we see arches being used in long spans. Let’s keep discussing the equations that describe this behavior.
Equilibrium and Forces in Arches
🔒 Unlock Audio Lesson
Sign up and enroll to listen to this audio lesson
Now, let’s explore the forces acting on arches. Who can tell me how the vertical reaction is calculated in an arch?
It’s based on the total load divided by the length of the arch, right?
Spot on! We know that due to symmetry, the vertical reaction can be defined as V = wL. Why is this important for our understanding of arch efficiency?
Because it helps us ensure the arch remains stable under load!
Exactly, stability is key! Now, think about horizontal reactions. What's crucial for maintaining equilibrium?
The relationship between horizontal and vertical forces!
Great observation! Let's wrap up this session with how these forces inform our design decisions.
Introduction & Overview
Read summaries of the section's main ideas at different levels of detail.
Quick Overview
Standard
To optimize dead-load efficiency in long-span structures, this section emphasizes the importance of forming structures in alignment with their moment diagrams. It highlights the utility of geometrically efficient designs like arches, which effectively reduce bending moments while primarily transmitting loads via axial compression.
Detailed
Detailed Summary
This section explores the optimization of dead-load efficiency in long-span structures, stressing the significance of aligning structural shapes with associated moment diagrams. Such configurations — particularly arches, suspended cables, or prestressed concrete beams — are often parabolic, promoting effective load management. It further discusses the advantages of curved structures for spans over 100 feet, specifically in terms of materials used and labor efficiency. The historical use of arches is also noted for their inherent capacity to resist compression. The equilibrium of forces in arches is examined, explaining how vertical reactions manifest due to symmetry. Key equations governing arch stability, such as those determining horizontal reactions and moments, are presented frequently, emphasizing that a well-designed arch minimizes bending moments while maximizing compressive forces. The section concludes with recommendations on designing arches, such as maintaining an optimal span-to-rise ratio to avoid buckling, further reiterating why arches remain vital in modern structural engineering.
Youtube Videos
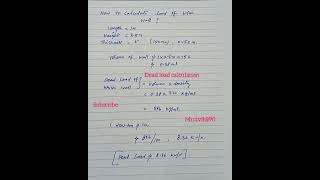
![What is the dead load & how to calculate it? [Step-by-step tutorial]](https://img.youtube.com/vi/IlDAKsAPMFg/mqdefault.jpg)


Audio Book
Dive deep into the subject with an immersive audiobook experience.
Shape Optimization
Chapter 1 of 5
🔒 Unlock Audio Chapter
Sign up and enroll to access the full audio experience
Chapter Content
In order to optimize dead-load efficiency, long span structures should have their shapes approximate the corresponding moment diagram, hence an arch, suspended cable, or tendon configuration in a prestressed concrete beam all are nearly parabolic.
Detailed Explanation
To achieve the best performance of a long-span structure, such as an arch or a prestressed concrete beam, its shape should closely match the moment diagram, which represents the distribution of bending moments (forces that cause bending) throughout the structure. This means that structures like arches and cables are usually designed to take on a parabolic shape since this allows them to efficiently handle loads.
Examples & Analogies
Think of a well-designed bridge. If the arches are shaped like a smooth, upward curve (like a parabola), they can better handle the weight of cars and trucks passing over them, distributing the load more effectively than if they were flat.
Economical Construction Choices
Chapter 2 of 5
🔒 Unlock Audio Chapter
Sign up and enroll to access the full audio experience
Chapter Content
Long span structures can be built using flat construction such as girders or trusses. However, for spans in excess of 100 ft, it is often more economical to build a curved structure such as an arch, suspended cable or thin shells.
Detailed Explanation
When building structures that span large distances (over 100 feet), using curved designs like arches or cables is often more cost-effective compared to using flat designs like girders or trusses. This is because curved structures can efficiently handle more weight with less material, which can lower construction costs and make these kinds of designs preferable for longer spans.
Examples & Analogies
Consider the difference between a flat wooden beam and a curved archway. The flat beam might work for short distances, but for a wide hallway, a curved archway can span the area with less material while supporting the same weight, making it cheaper and lighter.
Historical Context of Arches
Chapter 3 of 5
🔒 Unlock Audio Chapter
Sign up and enroll to access the full audio experience
Chapter Content
Since the dawn of history, mankind has tried to span distances using arch construction. Essentially this was because an arch required materials to resist compression only (such as stone, masonry, bricks), and labour was not an issue.
Detailed Explanation
Historically, arches have been a fundamental architectural feature, as they made it possible to construct large spans using materials that primarily handle compressive forces, like bricks or stone. These materials are strong when pressed together, allowing for the building of structures that can last for centuries.
Examples & Analogies
Imagine ancient Roman aqueducts. These large structures used stone arches to transport water over long distances while requiring minimal labor, as the stones could be stacked in such a way to efficiently distribute weight without modern construction technology.
Static Issues in Arch Design
Chapter 4 of 5
🔒 Unlock Audio Chapter
Sign up and enroll to access the full audio experience
Chapter Content
The basic issues of static in arch design are illustrated where the vertical load is per unit horizontal projection (such as an external load but not a self-weight). Due to symmetry, the vertical reaction is simply V = wL, and there is no shear across the midspan of the arch.
Detailed Explanation
In arch design, understanding how loads affect the structure is crucial. A vertical load acting on the arch leads to a reaction force. The vertical reaction can be calculated easily because of the symmetrical nature of most arches, which helps determine how much weight can be supported without causing failure. Additionally, there’s no shear (sideways force) at the midpoint, simplifying calculations.
Examples & Analogies
Think of a playground swing set. When kids swing, the force is directed downward, similar to how a load acts on an arch. The supports at each end feel the weight symmetrically, with no lateral forces complicating the support needed in the middle.
Design for Minimal Moments
Chapter 5 of 5
🔒 Unlock Audio Chapter
Sign up and enroll to access the full audio experience
Chapter Content
Since equilibrium requires H to remain constant across the arch, a parabolic curve would theoretically result in no moment on the arch section.
Detailed Explanation
In a properly designed arch, the horizontal component of the reaction force (H) remains constant, which ideally means that there should be no bending moments acting on the arch. This condition can be achieved with a parabolic shape, allowing for efficient load distribution that minimizes stresses and potential deformation across the curve.
Examples & Analogies
Consider a perfectly balanced seesaw that pivots at its center. If each side is weighted perfectly, there won't be any bending moments at the pivot point. Similarly, a parabolic arch can stay balanced and strong under a load, effectively managing the forces involved.
Key Concepts
-
Optimization of load shapes: Aligning arch shapes to moment diagrams reduces material use.
-
Compression in arch structures: Arches primarily carry loads through axial compression, unlike beams which undergo bending.
-
Equilibrium of forces: Understanding vertical and horizontal reactions in arch structures is crucial for design.
Examples & Applications
The Sydney Harbour Bridge, which uses a structural arch design to enhance load-carrying efficiency.
The Duomo in Florence is a historical example of an arch functioning by compressive forces, significantly reducing stress on materials.
Memory Aids
Interactive tools to help you remember key concepts
Rhymes
Arch your back and bend with grace, Compression holds the load in place.
Stories
Imagine ancient builders crafting grand arches. They realized they could lift heavy stones high, using only the compressive strength of materials, defying heights with ease.
Memory Tools
Remember 'ACED': Arch shapes, Compression, Equilibrium, Dead-load efficiency.
Acronyms
ARCH
Axial Compression
Resisting Bending
Creates High efficiency.
Flash Cards
Glossary
- Deadload efficiency
A measure of how effectively a structure can support its own weight and additional loads.
- Moment diagram
A graphical representation of the internal moments of a structure under loading conditions.
- Axial compression
A force that compresses material along its length, acting along the axis.
Reference links
Supplementary resources to enhance your learning experience.