
Procedure
Enroll to start learning
You’ve not yet enrolled in this course. Please enroll for free to listen to audio lessons, classroom podcasts and take practice test.
Interactive Audio Lesson
Listen to a student-teacher conversation explaining the topic in a relatable way.
Effect of Compaction on Soil
🔒 Unlock Audio Lesson
Sign up and enroll to listen to this audio lesson

Today, we’re going to explore how compaction impacts soil properties, especially swelling and shrinkage. Can anyone start by explaining what happens to soy when it gets compacted?

Compacted soil has less space for air and water, which means it can swell and shrink less, right?
Exactly! Less void space means reduced potential for both swell and shrink, making the soil more stable. Remember this: Less space equals less change! Can anyone think of why dry soil might swell more than wet soil?

Dry soil has random orientation, which can lead to more swell when water is added.
That's correct! The orientation and moisture deficiency contribute to higher swell pressure. Good job connecting those dots!
Standard Proctor’s Compaction Test
🔒 Unlock Audio Lesson
Sign up and enroll to listen to this audio lesson

Now let's discuss the Standard Proctor’s Compaction Test. What do you think is the main goal of this test?

To determine how much we can compact the soil, I believe?
Spot on! This test helps find the optimum moisture content and maximum dry density. Can anyone list the first few steps of the procedure?

First, we need about 3 kg of soil that passes through a 4.75 mm sieve.
Yes, and then we determine the quantity of water to add based on the soil type! Let’s not forget the importance of weighing the mould before we start.
Compaction Procedure Steps
🔒 Unlock Audio Lesson
Sign up and enroll to listen to this audio lesson
Continuing with our compaction procedure, why is it essential to scratch the top surface after each layer?
To help bond the layers together better, right?
Correct! And what should we do before weighing our mould with the compacted soil?
Make sure to grease the inner surfaces first to avoid sticking!
Exactly! These small details ensure accurate results in our testing. Let’s not forget to collect a water content sample from the middle before repeating the trial.
Modified Compaction Test
🔒 Unlock Audio Lesson
Sign up and enroll to listen to this audio lesson
Lastly, let’s talk about the Modified Compaction Test. Why was it developed?
It was to improve compaction for heavy loads, especially in airfields!
Exactly! Higher compaction levels ensure safety and effectiveness, especially for heavy aircraft. Remember this acronym - 'HAC': Heavy Aircraft Compaction.
Got it! That makes it easier to recall the importance.
Introduction & Overview
Read summaries of the section's main ideas at different levels of detail.
Quick Overview
Standard
The section outlines the Standard Proctor's Compaction Test procedure, emphasizing the impact of compaction on soil volume change. The relationship between water content, soil type, and compaction is elaborated, showing how varying conditions affect swell and shrinkage behaviors.
Detailed
Procedure of the Standard Proctor’s Compaction Test
This section explains a critical procedure for soil compaction testing, formally known as the Standard Proctor’s Compaction Test, based on IS 2720 – Part VII (1987).
Key Points Covered:
- Effect of Compaction: Compaction significantly reduces void spaces in soil, leading to lower swell and shrinkage rates. The moisture content's role is crucial, as dry compaction generally results in greater swell pressure than wet compaction due to water deficiency.
- Required Apparatus: The apparatus includes a specific cylindrical metal mould, a collar, and a rammer, all designed to check soil density and moisture interaction precisely.
- Compaction Procedure:
- Start with dry, pulverized soil passing through a 4.75 mm sieve.
- Weigh the empty mould, prepare the soil-water mix according to soil type, compact in layers, ensuring uniform blows and integrity between layers.
- Measure the final weight to analyze the compacted density and adjust the process accordingly for accurate results.
- Modified Compaction Test: It reflects a more recent requirement for higher compaction levels, particularly relevant for supporting heavy aircraft during WWII and beyond.
In summary, this procedure not only provides insights into soil density and optimal moisture content but is pivotal for construction and engineering, impacting structural integrity and design.
Youtube Videos


Audio Book
Dive deep into the subject with an immersive audiobook experience.
Preparation of Soil Sample
Chapter 1 of 6
🔒 Unlock Audio Chapter
Sign up and enroll to access the full audio experience
Chapter Content
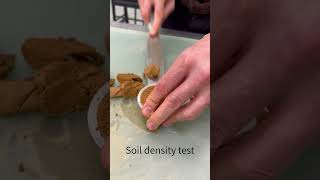
- About 3 kg of dry soil, with all lumps pulverized and passing through 4.75 mm sieve is taken.
- The quantity of water to be added in the first trial is decided. (Less for coarse grained soil and more for fine grained soil).
Detailed Explanation
The procedure begins with preparing the soil sample. A specific amount of dry soil, approximately 3 kg, is needed. This soil must be free of lumps and should pass through a sieve with 4.75 mm openings to ensure it is uniform. Then, you determine how much water to add, based on the type of soil. Coarse-grained soil, like sand, requires less water compared to fine-grained soil, like clay, which needs more water for proper compaction.
Examples & Analogies
Think about baking a cake. If you want a light and fluffy cake (like coarse-grained soil), you wouldn’t add too much liquid. But if you were making a dense pudding (like fine-grained soil), you would need more liquid to get the right consistency.
Mould Preparation
Chapter 2 of 6
🔒 Unlock Audio Chapter
Sign up and enroll to access the full audio experience
Chapter Content
- Mould without base plate & collar is weighed.
- The inner surfaces of mould, base plate and collar are greased.
Detailed Explanation
Once the soil sample is ready, the next step involves preparing the mould. The mould, which is a cylindrical container designed for compacting the soil, must be weighed to know its initial mass before adding the soil. After weighing, the inner surfaces of the mould, plate, and collar are greased to prevent the soil from sticking to the sides, which ensures smoother removal after compaction.
Examples & Analogies
Imagine using a cookie cutter to shape dough. Just as you would grease the cutter to stop the dough from sticking, greasing the mould helps the compacted soil easily come out without breaking.
Compaction of Soil
Chapter 3 of 6
🔒 Unlock Audio Chapter
Sign up and enroll to access the full audio experience
Chapter Content
- Water and soil are thoroughly mixed.
- Soil is placed in mould and compacted in three uniform layers, with 25 blows in each layer. Blows are maintained uniform and vertical and height of drop is controlled.
Detailed Explanation
Next, the greased mould is filled with the properly mixed soil and water. The soil is compacted in three layers, where each layer undergoes 25 blows from the rammer. It is crucial that the blows are uniform and vertical, and the rammer should drop from a consistent height to ensure the soil is compacted evenly across all layers.
Examples & Analogies
Consider packing a suitcase. You can’t just pile clothes haphazardly; instead, you would layer them neatly and press down evenly to fit everything in, much like how soil is compacted in layers to maximize density.
Layer Integrity and Height Control
Chapter 4 of 6
🔒 Unlock Audio Chapter
Sign up and enroll to access the full audio experience
Chapter Content
- After each layer, top surface is scratched to maintain integrity between layers.
- The height of top layer is so controlled that after compaction, soil slightly protrudes into collar.
- Excess soil is scraped.
Detailed Explanation
After compacting each layer, the surface is scratched to help bond with the next layer, preventing separation. The top layer's height is adjusted so that when fully compacted, it slightly presses against the collar of the mould. This ensures optimal density. Any excess soil is then removed to keep the final sample neat and uniform.
Examples & Analogies
Think of stacking books; if the top book isn't aligned properly, it could slide off. Scratching the layers helps them stick better together, just like making sure each book has a solid foundation to rest on.
Final Weighing and Sample Collection
Chapter 5 of 6
🔒 Unlock Audio Chapter
Sign up and enroll to access the full audio experience
Chapter Content
- Mould and soil are weighed (W).
- A representative sample from the middle is kept for the determination of water content.
- The procedure is repeated with increasing water content.
Detailed Explanation
Once the soil has been compacted, the next step is to weigh the mould with the compacted soil to get a measurement denoted as W. A sample is taken from the middle of the compacted soil, which will be used to find out its moisture content. This entire process is repeated with different amounts of water added to analyze how varying moisture affects the soil's density and compaction.
Examples & Analogies
It’s like checking the density of a sponge after soaking it with different amounts of water. By weighing the sponge each time, you see how the absorbed water changes its overall mass.
Repeating the Process
Chapter 6 of 6
🔒 Unlock Audio Chapter
Sign up and enroll to access the full audio experience
Chapter Content
- The number of trials shall be at least 6 with a few after the decreasing trend of bulk density.
Detailed Explanation
To ensure accuracy in the results, the process should be repeated at least six times, each time adjusting the water content. This helps observe the trend in bulk density, particularly if it begins to decrease, indicating a saturation point for the soil's compaction.
Examples & Analogies
Think of testing a new recipe. You might make it multiple times, tweaking the ingredients slightly each time to see what gives the best taste and texture. Similarly, these trials help find the ideal moisture content for soil compaction.
Key Concepts
-
Compaction Effect: Reduces void space leading to lower swell and shrink rates.
-
Proctor Test Steps: A series of steps to determine optimum moisture content for soil compaction.
-
Modified Compaction Test: A test evolved from the original to support heavier loads.
-
Soil Types: Different water content requirements for coarse vs fine-grained soils.
Examples & Applications
Dry soil typically exhibits greater swell pressure compared to wet soil.
Fine-grained soils require more water in the compaction process than coarse-grained soils.
Memory Aids
Interactive tools to help you remember key concepts
Rhymes
When you're compacting soil today, less void space is the way!
Stories
Imagine a sponge soaked in water versus a dry sponge; the dry sponge takes shape but if you drop water, it can expand more. Just like dry soil under pressure!
Memory Tools
RGC: Remember to Grease your Cylinder in the Proctor test!
Acronyms
PCT
Proctor Compaction Test - Pressure Creates Tension!
Flash Cards
Glossary
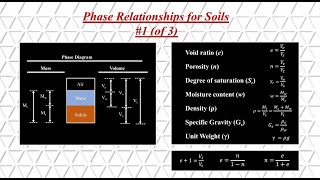
- Void Space
The space between soil particles that can be filled with air or water.
- Swell Pressure
The pressure exerted by soil as it swells due to water absorption.
- Proctor Compaction Test
A test to determine the optimum moisture content and maximum dry density of soil.
- Maximum Dry Density
The highest density achieved by compacting soil at a specific moisture level.
Reference links
Supplementary resources to enhance your learning experience.