
Standard Proctor’s Compaction Test
Enroll to start learning
You’ve not yet enrolled in this course. Please enroll for free to listen to audio lessons, classroom podcasts and take practice test.
Interactive Audio Lesson
Listen to a student-teacher conversation explaining the topic in a relatable way.
Importance of Compaction
🔒 Unlock Audio Lesson
Sign up and enroll to listen to this audio lesson

Today, we're discussing the Standard Proctor’s Compaction Test. Can anyone tell me why compaction of soil is crucial in construction?

Is it to prevent swelling and shrinkage?
Exactly! Compaction reduces void spaces, which helps in stabilizing the soil and reducing its tendency to swell and shrink. Remember, lower voids mean a more stable structure!

What happens if the soil is compacted dry of optimum moisture?
Good question! Soil that is too dry during compaction tends to have greater swell and swell pressure due to random orientation. We need to find the right moisture content!
So let's summarize: proper compaction is essential to ensure stability and reduce undesirable soil behavior like swelling. Does that help?
Apparatus Used in the Test
🔒 Unlock Audio Lesson
Sign up and enroll to listen to this audio lesson

Can anyone list some essential apparatus used in the Standard Proctor Test?

There's a cylindrical metal mould and a collar.
Great! The cylindrical mould has specific dimensions. It's important for containing our soil during the test. What can you tell me about the rammer?

It weighs 2.5 kgf and is dropped from a height of 304.8 mm!
Exactly! The height and weight help achieve the correct energy for compacting the soil layers. Remember, energy application is key in compaction!
Now, why do you think the collar is important?
It helps control the height of the soil when compacted.
Exactly! It ensures we get consistent results. Always remember, every component in the test has a vital role.
Step-by-Step Procedure of the Test
🔒 Unlock Audio Lesson
Sign up and enroll to listen to this audio lesson
Let's go over the procedure. What is the first step in conducting our Standard Proctor Test?
We prepare 3 kg of dry soil and sieve it through 4.75 mm.
Correct! Will it be enough to just prepare the soil?
We also need to decide how much water to add based on the soil type.
Exactly! Then, we proceed to weigh the mould and grease it before adding the soil-water mixture, compacting in layers. Can anyone tell me why we compact in layers?
To ensure even compaction and control the density!
Exactly! Compacting in layers helps achieve uniformity. Now, who remembers what happens after we compact each layer?
We scratch the surface to maintain integrity between the layers.
Correct! Maintaining integrity is essential for accurate measurements. Well done, everyone!
Observation and Results
🔒 Unlock Audio Lesson
Sign up and enroll to listen to this audio lesson
After completing the compaction, what do we do with the collected samples?
We weigh the mould and soil to get the total weight!
Right! And why is it important to take water sample from the middle?
To determine the water content for accurate calculations!
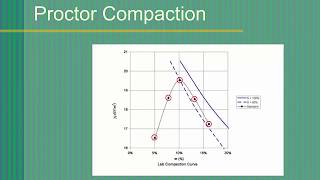
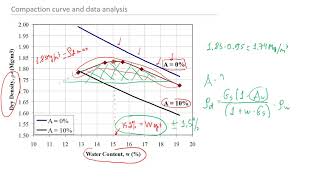
Exactly, and we should repeat the procedure with varying moisture content to determine trends in bulk density. What trends do we expect as we increase water content?
The bulk density will increase until we reach the optimum moisture content and then decrease.
Correct! It’s vital for us to analyze these trends for understanding the soil's behavior during different compaction states. Excellent participation today!
Introduction & Overview
Read summaries of the section's main ideas at different levels of detail.
Quick Overview
Standard
This section covers the equipment and procedure used in the Standard Proctor’s Compaction Test, emphasizing its importance for understanding soil compaction, its effect on swell and shrink behavior, and the necessary adjustments for different types of soil.
Detailed
Standard Proctor’s Compaction Test
The Standard Proctor’s Compaction Test, as defined in IS 2720 – Part VII – 1987, aims to determine the moisture-density relationship of soil. This test is essential for evaluating how soil behaves under compaction and provides insight into its stability for engineering applications.
Apparatus
The test involves specific apparatus:
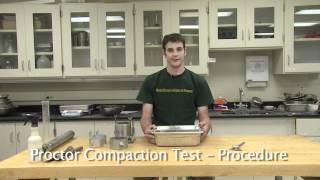
1. Cylindrical Metal Mould: This has a detachable base plate with internal dimensions of 101.6 mm (diameter), 116.8 mm (height), and a volume of 945000 mm³.
2. Collar: A height of 50 mm is used to allow the soil to slightly protrude during compaction.
3. Rammer: Weighing 2.5 kgf (25 N) and dropped from a height of 304.8 mm to achieve effective compaction.
Procedure
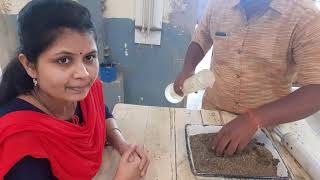
- Approximately 3 kg of dry soil is prepared, sieved through a 4.75 mm sieve, and mixed with water, where the amount varies based on the soil's grain size.
- The mould (without a base plate) is weighed, and greasing is performed for easy removal.
- The prepared soil-water mix is compacted in three layers, with 25 uniform blows applied to each layer, ensuring vertical and consistent blows.
- After compacting, the top layer is allowed to slightly protrude, and excess soil is scraped off.
- The total weight (W) is recorded, and a water content sample is retrieved. This process is repeated with varying water contents, usually over six trials, to observe trends in bulk density.
The information gathered from this test is crucial in understanding the optimal compaction of soil, which directly affects its behavior regarding swelling and shrinkage. Compacted soil that occurs dry of optimum moisture has a tendency to swell and exhibit higher swell pressure due to inefficient water distribution in the soil matrix.
Youtube Videos


Audio Book
Dive deep into the subject with an immersive audiobook experience.
Apparatus
Chapter 1 of 2
🔒 Unlock Audio Chapter
Sign up and enroll to access the full audio experience
Chapter Content
- Cylindrical metal mould with detachable base plate (having internal diameter 101.6 mm, internal height 116.8 mm and internal volume 945000 mm3)
- Collar of 50 mm effective height
- Rammer of weight 2.5 kgf (25 N) with a height of fall of 304.8 mm
Detailed Explanation
This chunk outlines the apparatus needed for the Standard Proctor’s Compaction Test. The main components include:
- Cylindrical Metal Mould: This is where the soil sample will be compacted. The dimensions are specified to ensure a consistent volume for testing.
- Collar: It is an extension of the mould used to increase its height, allowing for a larger volume of soil to be compacted.
- Rammer: This is the tool used to compact the soil. It has a specific weight and drop height, which are important for applying consistent force during compaction.
Examples & Analogies
Think of the cylindrical mould as a cookie cutter, where the cookie batter is the soil. Just as we need the right size and shape of the cookie cutter to bake perfect cookies, we need the correct mould dimensions for our compaction test to ensure reliable results.
Procedure Steps
Chapter 2 of 2
🔒 Unlock Audio Chapter
Sign up and enroll to access the full audio experience
Chapter Content
- About 3 kg of dry soil, with all lumps pulverized and passing through 4.75 mm sieve is taken.
- The quantity of water to be added in the first trial is decided. (Less for coarse-grained soil and more for fine-grained soil).
- Mould without base plate & collar is weighed.
- The inner surfaces of mould, base plate and collar are greased.
- Water and soil are thoroughly mixed.
- Soil is placed in mould and compacted in three uniform layers, with 25 blows in each layer. Blows are maintained uniform and vertical and height of drop is controlled.
- After each layer, top surface is scratched to maintain integrity between layers.
- The height of top layer is so controlled that after compaction, soil slightly protrudes into collar.
- Excess soil is scrapped.
- Mould and soil are weighed (W).
- A representative sample from the middle is kept for the determination of water content.
- The procedure is repeated with increasing water content.
- The number of trials shall be at least 6 with a few after the decreasing trend of bulk density.
Detailed Explanation
This chunk details the steps involved in conducting the Standard Proctor’s Compaction Test:
1. Begin with 3 kg of dry soil, ensuring it’s free from lumps and sieved to the right size.
2. Decide the amount of water to mix with the soil, adjusting for the grain size.
3. Weigh the empty mould.
4. Grease the mould's surfaces to prevent soil from sticking.
5. Mix the soil with water evenly.
6. Place the soil into the mould in three layers, using a specified rammer technique to apply 25 blows for each layer, ensuring uniform compaction.
7. Scratch the surface after each layer to help the next layer bond.
8. Control the height so that it slightly protrudes after compaction.
9. Remove any excess soil.
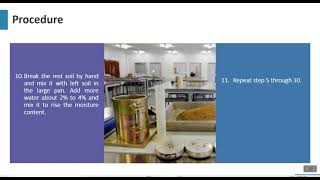
10. Weigh the mould with the compacted soil.
11. Save a sample from the middle for water content analysis.
12. Repeat the process with differing water amounts.
13. Aim for at least six trials to find the optimal moisture content for maximum density.
Examples & Analogies
Imagine you are making a layered cake. Each layer must be packed down evenly for the cake to rise properly. Just as you would use a special tool to compact the layers of cake batter, here you use a rammer to compact the soil, ensuring that each layer interacts properly for a solid result in construction.
Key Concepts
-
Compaction: The process of increasing soil density and stability by reducing void spaces.
-
Optimal Moisture Content: The specific moisture level at which soil reaches maximum density when compacted.
-
Standard Proctor Test: A lab test to determine the relationship between moisture content and dry density of soil.
Examples & Applications
When constructing a building foundation, soil is compacted using the Proctor test to ensure stability and safety.
In road construction, the Proctor test helps determine the appropriate moisture content for the subgrade layer, preventing future road damage.
Memory Aids
Interactive tools to help you remember key concepts
Rhymes
In layers we pack the soil tight, For strong foundations, do it right!
Stories
Once, a builder learned that soil's might depended on how it was packed tight—using the Proctor test to find just the right moisture, his buildings stood firm and weathered the storms.
Memory Tools
Remember the acronym 'PACK' - Prepare soil, Add water carefully, Compact in layers, and Keep track of weight.
Acronyms
PCT - Proctor Compaction Test, which stands for Prepare, Compact, Test!
Flash Cards
Glossary
- Proctor Test
A standardized test to determine the optimal moisture content and maximum dry density of soil.
- Compaction
The process of increasing soil density by reducing air voids through mechanical means.
- Void Space
The space within soil that is unoccupied by solid particles, filled with air or water.
- Swell Pressure
The pressure generated by the swelling of soil when it absorbs moisture.
- Bulk Density
The mass of soil per unit volume, including both solids and voids.
Reference links
Supplementary resources to enhance your learning experience.