
Atterberg Limits Testing
Enroll to start learning
You’ve not yet enrolled in this course. Please enroll for free to listen to audio lessons, classroom podcasts and take practice test.
Interactive Audio Lesson
Listen to a student-teacher conversation explaining the topic in a relatable way.
Introduction to Atterberg Limits Testing
🔒 Unlock Audio Lesson
Sign up and enroll to listen to this audio lesson

Today, we're going to discuss Atterberg Limits Testing. Can anyone tell me why understanding soil plasticity is important in engineering?

It helps in determining how the soil behaves under different moisture conditions!
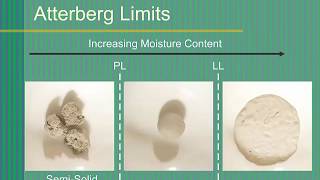
Exactly! Atterberg limits help us understand the range of water content where soils change from solid to liquid states. The two main limits are the Plastic Limit and the Liquid Limit. Let’s explore these in detail.

What’s the Plastic Limit?
The Plastic Limit is the moisture content where the soil starts to crumble when molded. Think of it as the dry end of the plastic range. Can anyone think of a scenario where this information might be useful?

When building foundations in certain soil types, right?
Exactly, great example! Understanding these limits helps prevent issues related to soil instability.
Liquid Limit and Testing Methodology
🔒 Unlock Audio Lesson
Sign up and enroll to listen to this audio lesson

Now, let’s move to the Liquid Limit. It’s the point at which soil flows like liquid. Who can explain how we can determine this limit?

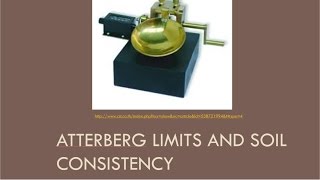
Isn’t it measured using that Casagrande apparatus?
Yes! The Casagrande method is commonly used. By applying a standard groove, we can observe how much moisture allows the soil to flow. Can anyone see why this limit is crucial for engineering purposes?
It tells us how much water we could safely add without losing stability.
Absolutely! The effective structural design relies on knowing how much moisture content can be safely managed.
Plasticity Index and Its Significance
🔒 Unlock Audio Lesson
Sign up and enroll to listen to this audio lesson
Now that we have covered PL and LL, let’s discuss the Plasticity Index or PI. Do any of you recall how it’s calculated?
Isn't it the difference between the Liquid Limit and Plastic Limit?
Exactly! PI = LL - PL. Higher PI values indicate a soil that remains plastic over a wider range. Why is this significant in our field?
It affects how we design structures that will support the soil.
Right! Understanding the PI helps engineers determine how much load a given soil can carry without changing its properties.
Practical Applications of Atterberg Limits
🔒 Unlock Audio Lesson
Sign up and enroll to listen to this audio lesson
To wrap up our lesson, let's dive into some real-world applications of Atterberg Limits. Why do you think they are tested in construction?
To ensure the soil can support buildings and roads?
Exactly! These tests help predict how soil will behave under loads and moisture changes. Can anyone think of specific uses?
Evaluating the stability of slopes?
That's a perfect example! Atterberg limits play a critical role in earthwork projects as well. Overall, they ensure safety and durability in civil engineering.
Introduction & Overview
Read summaries of the section's main ideas at different levels of detail.
Quick Overview
Standard
This section elaborates on the significance of Atterberg Limits Testing, particularly how plastic limits, liquid limits, and plasticity indices provide crucial insight into the engineering properties of soils. The analysis focuses on how these characteristics influence the soil's ability to withstand changes in moisture and load.
Detailed
Atterberg Limits Testing
Atterberg Limits Testing is a fundamental procedure in soil mechanics that measures the plasticity of fine-grained soils. The Atterberg limits include the plastic limit (PL), liquid limit (LL), and plasticity index (PI). These limits help to classify and understand the behavior of soils under varying moisture conditions.
Plastic Limit (PL)
The plastic limit is the moisture content at which soil transitions from a plastic state to a semi-solid state. This limit indicates the minimum water content at which the soil can still be molded without crumbling.
Liquid Limit (LL)
The liquid limit is defined as the moisture content at which the soil changes from a plastic state to a liquid state. It is determined using the Casagrande apparatus and indicates the soil's ability to flow under the effect of applied stress.
Plasticity Index (PI)
The plasticity index is calculated as the difference between the liquid limit and the plastic limit (PI = LL - PL). It represents the range of moisture content over which the soil remains plastic and is a critical factor in determining the soil's workability.
Understanding Atterberg Limits is essential for engineers and geologists, as it allows for better design of foundations, earth structures, and the overall assessment of soil behavior in various environmental conditions.
Youtube Videos


Audio Book
Dive deep into the subject with an immersive audiobook experience.
Purpose of Atterberg Limits Testing
Chapter 1 of 3
🔒 Unlock Audio Chapter
Sign up and enroll to access the full audio experience
Chapter Content
Atterberg limits should be performed on the soil-lime mixtures corresponding to optimum lime content as determined above.
Detailed Explanation
Atterberg Limits Testing is used to determine the plasticity characteristics of soil. When we mix soil with lime, we must evaluate how the physical properties of the mixture change. By performing Atterberg Limits tests on the soil-lime mixtures that have the optimum lime content, we assess how the soil's behavior - like its plasticity - changes due to the lime stabilization. Optimum lime content is the amount of lime that achieves the best results in enhancing soil properties.
Examples & Analogies
Think of Atterberg Limits Testing like tasting food when cooking. Just as a cook tests a dish to find the right blend of ingredients for the perfect flavor, engineers test the soil-lime mixture to find the right amount of lime that makes the soil behave optimally—strong and workable.
Importance of Evaluating Compaction
Chapter 2 of 3
🔒 Unlock Audio Chapter
Sign up and enroll to access the full audio experience
Chapter Content
Compaction shall be performed in accordance with AASHTO T 99 on the optimum lime and soil mixture to evaluate the drop in maximum dry density in relation to time (depending on the delay between the lime-soil mixing).
Detailed Explanation
Compaction is crucial in determining how well the soil-lime mixture can support structures, such as roads or buildings. The AASHTO T 99 test indicates the maximum dry density the soil can achieve when compacted optimally. Evaluating the drop in maximum dry density over time helps us understand how the soil-lime mixture will behave after mixing and whether its strength decreases due to factors like time delays in construction.
Examples & Analogies
Imagine packing a suitcase. If you compress your clothes nicely at first, you can fit many items. But if you leave packed clothes undisturbed for some time, they might not stay as tightly compacted. Similarly, in soil-lime mixtures, we test to see how long that 'packed' state holds and whether any settling occurs over time, which could affect stability.
Additional Tests Required for Stabilization
Chapter 3 of 3
🔒 Unlock Audio Chapter
Sign up and enroll to access the full audio experience
Chapter Content
In the case of stabilization, the Unconfined Compression Test (AASHTO T 208) and California Bearing Ratio (AASHTO T 193, soaked) or resilient modulus (AASHTO T 307) tests at 95% compaction shall be performed in addition to the above tests corresponding to optimum lime-soil mixture of various predominant soil types.
Detailed Explanation
When stabilizing soil with lime, it’s important to evaluate the soil's stability and load-bearing capacity. The Unconfined Compression Test measures the strength of the soil under unconfined conditions. The California Bearing Ratio (CBR) evaluates how well the soil can support traffic loads, while the resilient modulus test assesses the material's response to repeated loading. These tests are conducted after achieving 95% compaction to ensure the soil-lime mixture is effective for its intended use.
Examples & Analogies
Consider a bridge that needs to support heavy vehicles. Engineers conduct tests, similar to weighing the load capacity of a bridge, to ensure that the soil beneath is solid and capable of bearing the weight. The Unconfined Compression Test and CBR show us if our lime-stabilized soil has the required strength and stiffness just like how engineers validate the bridge's capability.
Key Concepts
-
Plastic Limit: The moisture content at which the soil can no longer be molded.
-
Liquid Limit: The moisture content at which soil flows as liquid.
-
Plasticity Index: Indicates the range of moisture where soil remains plastic.
Examples & Applications
A Plastic Limit of 20% indicates that below this moisture, the soil behaves like a solid.
A Liquid Limit of 30% shows that at this moisture, the soil can easily flow or deform.
Memory Aids
Interactive tools to help you remember key concepts
Rhymes
Plastic limit's when soil gets dry, / Below which it can't take shape or cry.
Stories
Imagine a sculptor shaping wet clay. The moment the clay dries out too much, it crumbles, signifying the plastic limit.
Memory Tools
To remember Atterberg limits: PL = 20 (Plastic Limit), LL = 30 (Liquid Limit), PI = LL - PL.
Acronyms
PL for Plastic Limit, LL for Liquid Limit—PI helps you determine the soil's pliability!
Flash Cards
Glossary
- Atterberg Limits
Measurement of the plasticity characteristics of soil; includes Plastic Limit, Liquid Limit, and Plasticity Index.
- Plastic Limit (PL)
The moisture content at which soil changes from a plastic to a semi-solid state.
- Liquid Limit (LL)
The moisture content at which soil changes from a plastic to a liquid state.
- Plasticity Index (PI)
The difference between the Liquid Limit and the Plastic Limit; indicates the plasticity range of soil.
Reference links
Supplementary resources to enhance your learning experience.