
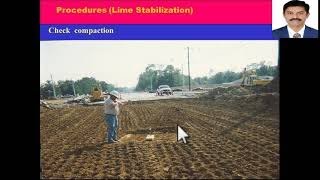
Procedures for Lime Stabilization
Enroll to start learning
You’ve not yet enrolled in this course. Please enroll for free to listen to audio lessons, classroom podcasts and take practice test.
Interactive Audio Lesson
Listen to a student-teacher conversation explaining the topic in a relatable way.
Introduction to Lime Stabilization
🔒 Unlock Audio Lesson
Sign up and enroll to listen to this audio lesson

Today, we’re going to talk about lime stabilization. Can anyone tell me why we would want to stabilize soil?

To make it stronger or less plastic?
Exactly! Stabilizing soil helps improve its strength and reduces its plasticity. Now, what factors do you think affect how effectively lime can work with soil?

Maybe the soil’s pH or its organic content?
That's right! Other important factors include drainage and clay mineralogy. Remember, we look for how lime changes the soil from plastic to more friable forms.
Lime Content Determination Procedures
🔒 Unlock Audio Lesson
Sign up and enroll to listen to this audio lesson

Now let’s discuss the specific procedures to figure out how much lime we need. What initial tests can we start with?

Mechanical and physical tests!
Correct! Then, we need to take pH readings of both the soil and lime. Why is the pH important?

It helps us understand how lime will react with the soil?
Exactly! We aim for a pH of around 12.4 to ensure effective stabilization. We should set up five sample bottles with lime percentages between 3% and 7%. Any thoughts on why we need different percentages?
To see which amount works best?
Right! This helps us determine the minimum amount of lime needed to reach that target pH.
Measuring pH and Understanding Results
🔒 Unlock Audio Lesson
Sign up and enroll to listen to this audio lesson
Let’s explore what happens after mixing lime with soil. How do we measure the pH of our mix?
We transfer a part of the slurry to a beaker and use a pH meter!
Exactly! Make sure the pH meter is calibrated correctly. What do we do if our pH readings don't reach 12.30 or 12.40?
We might need to test more samples with higher lime percentages?
Yes! If we still don't reach 12.30, it indicates we need to trial more lime to achieve stabilization.
Testing and Evaluation after Stabilization
🔒 Unlock Audio Lesson
Sign up and enroll to listen to this audio lesson
Once we determine the optimum lime content, what tests should we run on the lime-soil mixture?
Atterberg limits, and we also need compaction tests!
Great! Compaction is critical here to evaluate how the density of mixed soil changes over time. How does this help us?
It tells us how stable and strong the final soil will be!
Exactly! Knowing these properties informs us of the soil’s suitability for construction projects.
Introduction & Overview
Read summaries of the section's main ideas at different levels of detail.
Quick Overview
Standard
The section discusses how lime reacts with soils, leading to enhanced soil characteristics such as reduced plasticity and increased strength. It outlines procedures for determining the optimal amount of lime needed for stabilization, including testing methods and pH measurements.
Detailed
Comprehensive Overview of Lime Stabilization
Lime stabilization is a process where lime interacts with medium, moderately fine, and fine-grained soils, fundamentally altering their properties. The effects of this reaction include a decrease in plasticity, an increase in workability, reduced swelling, and enhanced strength. Key characteristics influencing the soil's ability to stabilize include pH levels, organic content, natural drainage, and clay mineralogy.
As a guideline, soils treated with lime should exhibit an increase in particle size due to cementation, resulting in reduced plasticity and enhanced internal friction among soil particles, ultimately improving shear strength and workability.
To ascertain the necessary amount of lime for effective stabilization, the section details a series of steps including mechanical and physical soil tests, measuring pH values of soil and lime mixtures, using the Eades and Grim pH test to find the optimal lime content capable of achieving a pH of 12.4 or equivalent to lime's pH.
Practical instructions are provided, such as preparing five sample bottles with varying lime percentages (3% to 7%) and measuring the mixture's pH after defined intervals. Further tests, including Atterberg limits and compaction tests, are essential to ascertain the soil-lime mixture's integrity and suitability for stabilization.
Youtube Videos


Audio Book
Dive deep into the subject with an immersive audiobook experience.
Lime Stabilization Benefits
Chapter 1 of 8
🔒 Unlock Audio Chapter
Sign up and enroll to access the full audio experience
Chapter Content
Lime reacts with medium, moderately fine and fine-grained soils to produce decreased plasticity, increased workability, reduced swelling, and increased strength.
Detailed Explanation
Lime stabilization involves adding lime to certain types of soil, specifically medium, moderately fine, and fine-grained soils. This process alters the soil's properties in several beneficial ways: it decreases plasticity (which makes the soil less sticky), increases workability (allowing for easier manipulation of the soil), reduces swelling (which helps to maintain stability), and increases the overall strength of the soil structure.
Examples & Analogies
Think of lime stabilization like adding flour to a dough. Just as flour helps bind the ingredients together and makes the dough easier to work with, lime helps to solidify and enhance the performance of soil, making it easier to build on.
Key Soil Properties Influencing Lime Reactions
Chapter 2 of 8
🔒 Unlock Audio Chapter
Sign up and enroll to access the full audio experience
Chapter Content
The major soil properties and characteristics that influence the soils ability to react with lime to produce cementitious materials are pH, organic content, natural drainage, and clay mineralogy.
Detailed Explanation
For effective lime stabilization, several soil properties need to be considered. The pH of the soil indicates its acidity or alkalinity. Organic content refers to the amount of decomposed plant and animal material in the soil, which can affect how lime reacts. Natural drainage relates to how water moves through the soil, affecting moisture levels. Lastly, clay mineralogy refers to the specific types of clay minerals present, which can influence how well lime interacts with the soil.
Examples & Analogies
Picture baking a cake. The ingredients (like pH, organic content, natural drainage, and clay mineralogy) all must be just right for the cake to rise well with baking powder (lime). If one ingredient is off, the cake may not come out as expected.
Determining Lime Requirements
Chapter 3 of 8
🔒 Unlock Audio Chapter
Sign up and enroll to access the full audio experience
Chapter Content
The following procedures shall be utilized to determine the amount of lime required to stabilize the subgrade.
Detailed Explanation
To determine how much lime is needed for soil stabilization, a series of procedures must be followed, which include conducting physical tests on the soil, checking the pH levels both of the soil and the lime, and utilizing specific tests like the Eades and Grim pH test. It is essential to find the right amount of lime that ensures the soil reaches a target pH level for effective stabilization.
Examples & Analogies
Imagine you are adjusting the seasoning in a soup. You taste the soup and add salt incrementally, checking the flavor at each step until it tastes just right. Similarly, in lime stabilization, you add lime gradually and test the pH until it reaches the target level for stabilization.
Testing Procedures for Lime Content
Chapter 4 of 8
🔒 Unlock Audio Chapter
Sign up and enroll to access the full audio experience
Chapter Content
Perform mechanical and physical tests on the soils. Determine the separate pH of soil and lime samples. Determine optimum lime content using Eades and Grim pH test. A sufficient amount of lime shall be added to soils to produce a pH of 12.4 or equal to the pH of lime itself.
Detailed Explanation
To find the best amount of lime for the specific soil, mechanical and physical tests must be conducted first. The next step is measuring the pH of the soil and lime samples. The goal is to add a sufficient amount of lime until the mixture reaches a pH of 12.4 or matches the pH of lime itself. This indicates that the soil is properly treated.
Examples & Analogies
This process is like adjusting the acidity of lemonade. If you want the drink to be refreshing and enjoyable, you need to measure the lemon juice (like lime in soil) and balance it with water and sugar to reach the right taste (target pH).
Experimental Setup and pH Measurement
Chapter 5 of 8
🔒 Unlock Audio Chapter
Sign up and enroll to access the full audio experience
Chapter Content
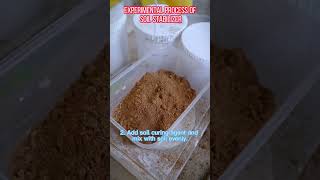
Representative samples of air-dried, minus No. 40 soil is equal to 20 g of oven-dried soil are weighed to the nearest 0.1 g and poured into 150-ml plastic bottles with screw on tops. It is advisable to set up five bottles with lime percentages of 3, 4, 5, 6, and 7. This will ensure, in most cases, that the percentage of lime required can be determined in one hour.
Detailed Explanation
To test the optimal lime content, samples of dried soil need to be weighed and placed into bottles. Five different bottles should then be set up, each containing different lime percentages (3% to 7%). This setup allows for a quick determination of the required lime percentage, ideally within an hour.
Examples & Analogies
Think of this procedure like preparing different cups of tea with varying amounts of sugar. By tasting each cup, you quickly find out which one has the perfect level of sweetness that you prefer, similar to how different lime percentages can show what works best for soil stabilization.
Mixing and Measuring pH
Chapter 6 of 8
🔒 Unlock Audio Chapter
Sign up and enroll to access the full audio experience
Chapter Content
Shake the bottle to mix the soil and dry lime. Add 100 ml of CO2-free distilled water to the bottles. Shake the soil-lime mixture and water until there is no evidence of dry material on the bottom.
Detailed Explanation
After adding the lime to the soil in the bottles, it’s crucial to mix the two thoroughly. Then, CO2-free distilled water is added to help create a slurry mixture. The bottles should be shaken until no dry material remains at the bottom to ensure full reaction potential of the lime with the soil.
Examples & Analogies
This mixing can be compared to making a smoothie. You add fruits (soil) and yogurt (lime) to a blender, and then you blend it well to ensure that everything is mixed smoothly without any chunks left, resulting in a consistent and tasty product.
Monitoring pH and Further Testing
Chapter 7 of 8
🔒 Unlock Audio Chapter
Sign up and enroll to access the full audio experience
Chapter Content
After one hour, transfer part of the slurry to a plastic beaker and measure the pH. The pH meter must be equipped with a Hyalk electrode and standardized with a buffer solution having a pH of 12.00.
Detailed Explanation
After allowing the mixtures to settle for an hour, a sample is taken to measure the pH levels. It's essential to use a calibrated pH meter to ensure accurate readings. The goal is to see if the pH has reached the target of 12.40, which indicates adequate lime content for soil stabilization.
Examples & Analogies
This step is like checking the battery level of your phone after charging. If the battery (soil) has reached the desired charge (pH), then you know it's ready for use. If not, it indicates you might need to charge it more (add more lime).
Final Tests and Assessments
Chapter 8 of 8
🔒 Unlock Audio Chapter
Sign up and enroll to access the full audio experience
Chapter Content
Atterberg limits should be performed on the soil-lime mixtures corresponding to optimum lime content as determined above. Compaction shall be performed in accordance with AASHTO T 99 on the optimum lime and soil mixture to evaluate the drop in maximum dry density in relation to time (depending on the delay between the lime-soil mixing).
Detailed Explanation
After determining the optimal lime content, it is important to perform Atterberg limits tests to assess the plasticity characteristics of the lime-soil mixtures. Additionally, compaction tests are conducted to evaluate how the soil reacts under specific compaction conditions and over time after mixing with lime.
Examples & Analogies
Think of this stage as the final taste test and presentation of a dish. You want to ensure that the flavors (soil properties) are correct, and the presentation is appealing (ensuring proper compaction) before serving it at a dinner party.
Key Concepts
-
Lime Reactivity: Lime interacts with soil to improve its physical properties.
-
pH Levels: Critical for determining the necessary lime content for stabilization.
-
Optimum Lime Content: The specific percentage of lime required to achieve desired soil properties.
-
Soil Testing Methods: Various tests are conducted to ascertain soil suitability post-treatment.
Examples & Applications
Using 5% lime in a clayey soil sample showed a significant increase in shear strength compared to untreated soil.
An experiment measuring the pH of lime-soil mixtures indicates a clear improvement when lime reaches 12.4.
Memory Aids
Interactive tools to help you remember key concepts
Rhymes
When lime is mixed, let’s check the pH, a number so high keeps weaknesses at bay.
Stories
Imagine a wizard sprinkling lime on mud to turn it into a strong castle foundation. The castle stands tall because the mud has transformed into firm soil.
Memory Tools
LIME: Look Into Making soil Elastic - to remember that lime makes soil elastic and strong.
Acronyms
LIME
Lime Improvement Means Efficiency - focusing on lime's role for enhancing soil performance.
Flash Cards
Glossary
- Lime Stabilization
A process that employs lime to enhance soil properties, making it stronger and less plastic.
- pH
A scale that measures acidity or alkalinity, which is crucial for lime-soil chemical reactions.
- Atterberg Limits
Tests that determine the plasticity characteristics and water content of soil.
- California Bearing Ratio (CBR)
A test that measures the strength of subgrade soil for road and pavement design.
- Compaction
The process of densifying soil by reducing air gaps, which can affect strength and stability.
Reference links
Supplementary resources to enhance your learning experience.