
Example Project
Enroll to start learning
You’ve not yet enrolled in this course. Please enroll for free to listen to audio lessons, classroom podcasts and take practice test.
Interactive Audio Lesson
Listen to a student-teacher conversation explaining the topic in a relatable way.
Defining the Problem
🔒 Unlock Audio Lesson
Sign up and enroll to listen to this audio lesson

Today, we will start by defining the problem our robotic arm must solve in the science lab. Why do you think a robotic arm could be helpful here?

It could help us safely handle test tubes, especially when they are heated or dangerous.

And it would allow us to do some experiments using limited human assistance!
Exactly! Safety and convenience are key. Let's remember our acronym 'SIMPLE'—Safety, Innovation, Mechanics, Precision, Learning, Efficiency. This will help us stay focused on design goals.

So after identifying the problem, what’s next?
Great question! We’ll move into designing and building. Reflect on what features our robotic arm needs to have.

It should be durable and able to move smoothly.
Correct! Durability and smooth operation will prove essential for effective lab work. Let's summarize what we've learned: identifying the need for innovation in lab tools can lead to improved safety and learning.
Designing and Building
🔒 Unlock Audio Lesson
Sign up and enroll to listen to this audio lesson

Now that we understand the problem, let's talk about tools and materials. What design software can we use?
We can use CAD software like TinkerCAD!
I think Fusion 360 is also good for more advanced designs.
Yes, both are excellent choices. Additionally, material selection is crucial. We need lightweight yet strong materials. Any thoughts?
Maybe we can use plastic for the body and metal for the joints?
Exactly! Balancing weight and strength is vital. Remember, we have to keep our work user-centered. What does that mean for our design?
It means we should make it easy to control and safe for user interaction.
Well said! Safety and usability are essential. At the end of this part, remember to create sketches of your concepts before proceeding.
Programming and Testing
🔒 Unlock Audio Lesson
Sign up and enroll to listen to this audio lesson
Now we need to talk about the programming of our robotic arm. Who can explain how we’ll control it?
We can use an Arduino for controlling the arm's motors.
I read we can use sensors to help with the movements too!
Great! Sensors will help the robot respond to its environment. Let’s remember the 'INPUT' principle—Identify, Name, Program, Utilize, Test. Can anyone summarize its importance?
It helps in keeping our developing process organized!
Correct! Finally, we’ll need to test and iterate our robot arm's movements. Testing gives us results to refine our design. What criteria should we use for testing?
We should look at how well it grips the test tubes and how accurately it can place them.
Exactly! Testing against performance criteria will guide our improvements. Remember, this iterative process is key to successful design.
Iterating Based on Feedback
🔒 Unlock Audio Lesson
Sign up and enroll to listen to this audio lesson
We’ve built our prototype and done some testing. What’s our next step?
We need to gather feedback to see how we can improve it!
I think talking to potential users will give us valuable insights!
Absolutely! Feedback is crucial for iteration. Let’s introduce the acronym 'REFINE': Review, Evaluate, Fix, Improve, Navigate, Enhance. Why is it important?
It keeps us focused on making our design better based on real-world usage!
Well put! It’s essential to make our project user-centered. In conclusion, feedback allows us to refine and enhance our projects, ensuring they meet user needs effectively.
Introduction & Overview
Read summaries of the section's main ideas at different levels of detail.
Quick Overview
Standard
In this section, students apply theoretical knowledge of robotics, engineering, and prototyping to design a functional robotic arm that can grip test tubes, rotate, and move them safely. The project emphasizes the integration of mechanical and programming skills.
Detailed
Example Project: Designing a Robotic Arm for a School Science Lab
In this section, students are tasked with creating a robotic arm designed to assist in a science lab environment by gripping, rotating, and safely placing test tubes. The project encapsulates the full design cycle outlined in the MYP Design approach, emphasizing practical application and interdisciplinary knowledge from engineering and robotics.
Key Elements of the Project:
- Define the Problem: Understand the specific needs of the science lab, ensuring the arm can work effectively with existing equipment.
- Design & Build: Plan the structure of the robotic arm, selecting materials that offer balance between weight and strength. Use CAD software for initial designs.
- Programming: Write code for controlling the robotic arm using microcontrollers like Arduino, ensuring it can execute movements precisely.
- Testing and Iteration: Create prototypes of the robotic arm, test their functionality and performance based on predefined success criteria, and make necessary improvements.
The project promotes hands-on experience with real-world applications of robotics in education, emphasizing not only technical skills but also iterative design processes, teamwork, and creative problem-solving.
Youtube Videos
Audio Book
Dive deep into the subject with an immersive audiobook experience.
Project Overview
Chapter 1 of 4
🔒 Unlock Audio Chapter
Sign up and enroll to access the full audio experience
Chapter Content
Designing a robotic arm to assist in a school science lab. It must be able to grip test tubes, rotate, and safely place them.
Detailed Explanation
In this project, the goal is to design a robotic arm that will help in a science lab. The arm needs to perform a few specific actions: it must grip test tubes, rotate them when needed, and carefully place them back in their designated spots. This requires thinking about how the arm will move and operate with precision.
Examples & Analogies
Think of a robotic arm like a helping hand. Imagine you're trying to organize a cluttered desk. A robot can be designed to mimic the movements of your hand—grabbing items, turning them around, and putting them back into place—just like a person would if they were cleaning up. This robotic arm can do the same tasks in a lab, where precision and care are crucial.
Key Features of the Robotic Arm
Chapter 2 of 4
🔒 Unlock Audio Chapter
Sign up and enroll to access the full audio experience
Chapter Content
It must be able to grip test tubes, rotate, and safely place them.
Detailed Explanation
The robotic arm has several important features. First, it needs a gripping mechanism that can securely hold test tubes without breaking them. Second, the arm should have the ability to rotate, which means it can change the angle at which it holds the test tubes, making it easier to place them in different spots. Finally, safety is a priority; the arm must operate in a way that minimizes the risk of dropping or damaging the test tubes.
Examples & Analogies
Imagine if you had to carry fragile glasses from one place to another without spilling or breaking them. You would need a steady hand and careful movements. The robotic arm is designed to act like your hand, securing the glasses tightly and moving them carefully. Just like you would adjust your grip if something feels shaky, the arm must be designed to adapt to ensure the test tubes are handled safely.
Design Considerations
Chapter 3 of 4
🔒 Unlock Audio Chapter
Sign up and enroll to access the full audio experience
Chapter Content
When designing the robotic arm, consider aspects like the material for construction, range of motion, and precision of movements.
Detailed Explanation
Designing the robotic arm involves several considerations. The choice of material is crucial; it needs to be sturdy yet lightweight, so the arm can move easily. The range of motion determines how far the arm can stretch and bend, which affects its ability to reach different areas of the lab. Lastly, precision is vital, as the arm must be able to perform tasks with accuracy to avoid accidents or mistakes.
Examples & Analogies
Think of a crane on a construction site. The crane is built from strong materials to lift heavy things, but it’s also designed for movement—able to reach high places and maneuver without dropping anything. In the same way, the robotic arm must be constructed to be strong but light enough to move smoothly, ensuring that it can reach the right spots in the lab without dropping the test tubes.
Programming the Robotic Arm
Chapter 4 of 4
🔒 Unlock Audio Chapter
Sign up and enroll to access the full audio experience
Chapter Content
Program the arm to execute tasks such as gripping, rotating, and placing test tubes efficiently.
Detailed Explanation
After designing the arm, the next step is to program it. This involves writing code that tells the arm how to grip, rotate, and place test tubes. The programming must be precise, ensuring that the arm performs each task smoothly and accurately. This is often done using a microcontroller that interprets the commands and controls the movements of the motors in the arm.
Examples & Analogies
Programming the robotic arm can be compared to teaching someone how to perform a chore, like making a sandwich. You have to explain each step: where to grab the bread, how much to spread the peanut butter, and how to cut the sandwich in half. Just like giving detailed instructions makes it easier for someone to make a sandwich perfectly, programming gives the robotic arm clear tasks so it can work effectively in a lab.
Key Concepts
-
Robotics: The combination of mechanical engineering, electrical engineering, and computer science to create machines.
-
Prototyping: The process of creating physical models to test and refine designs.
-
User-Centered Design: An approach focusing on the needs and experiences of end-users throughout the design process.
-
Iterative Design: The method of continuously improving a project through cycles of design, testing, and feedback.
Examples & Applications
Designing a robotic arm to pick and place objects in a lab setting, examining both functionality and user experience.
Creating a prototype of a classroom robotic assistant that follows user commands to facilitate teaching.
Memory Aids
Interactive tools to help you remember key concepts
Rhymes
In the lab with things to do, a robotic arm that’s safe and new, handles test tubes with care you see, helps learning grow for you and me.
Stories
Once there was a science lab where students struggled to handle delicate test tubes. They designed a robotic arm that could grip them safely, helping both teachers and students achieve more in experiments.
Memory Tools
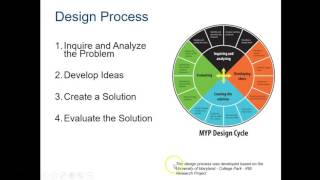
To remember the steps in the design process, use 'Define, Design, Develop, Discuss, Deliver'—D5 to keep your project alive!
Acronyms
When designing think of the acronym 'SMART'
Specific
Measurable
Achievable
Relevant
Time-bound.
Flash Cards
Glossary
- UserCentered Design (UCD)
An approach that emphasizes meeting the needs and feedback of end-users in the design process.
- Iterative Design
A design process that involves repeated cycles of prototyping, testing, and refining based on feedback.
- Prototyping
The process of creating a tangible model of a product for testing and improvement purposes.
- Sensors
Devices that detect and collect data about the environment for feedback to control systems.
- Actuators
Mechanical components that produce movement in a robotic system, usually powered by motors.
Reference links
Supplementary resources to enhance your learning experience.