
The Design Cycle in Action
Enroll to start learning
You’ve not yet enrolled in this course. Please enroll for free to listen to audio lessons, classroom podcasts and take practice test.
Interactive Audio Lesson
Listen to a student-teacher conversation explaining the topic in a relatable way.
Inquiring and Analyzing
🔒 Unlock Audio Lesson
Sign up and enroll to listen to this audio lesson

Let's start with the first stage of the MYP Design Cycle: Inquiring and Analyzing. This involves identifying a problem and researching what solutions already exist. Why is it important to know about existing solutions?

So we don't reinvent the wheel and can build on previous ideas?
Exactly! This is crucial for effective design. We can avoid potential pitfalls and improve upon what has come before. Can anyone think of an example where existing solutions were analyzed?

What about designing a new kind of backpack? We should look at current designs to see what works and what doesn't.
Great point! Research can lead to innovative designs. Remember, define your design specifications well; use the acronym R.E.S.E.A.R.C.H. Relate, Evaluate, Shape, Explore, Analyze, Realign, Confirm, and Hope.

That's a helpful way to remember!
Yes! So, what are some specifications we might define during this stage?

Things like size, weight, functionality, and aesthetics!
Perfect! Understanding these helps guide our design decisions.
Developing Ideas
🔒 Unlock Audio Lesson
Sign up and enroll to listen to this audio lesson

Now, let’s transition to Developing Ideas. This involves sketching concepts and developing design ideas. Why do you think sketching is important?
It helps visualize our thoughts before actually building something!
Exactly! Sketching allows for iterative improvements without wasting materials. What about the justification of the chosen design?
I guess it’s about explaining why one design is better than others based on the specifications.
Yes! Justification is key; it’s about making your thoughts clear. Let's remember the mnemonic **J.U.S.T.I.F.Y.**: Justify, Understand, Support, Test, Include, Feedback, and Yield. Can you think of a way we might justify a design choice?
If the design is more user-friendly and meets the specifications better, that makes it a strong choice!
Absolutely! Clear justification will help you convey your design decisions effectively.
Creating the Solution
🔒 Unlock Audio Lesson
Sign up and enroll to listen to this audio lesson
Moving on to Creating the Solution, what steps do you think are crucial in this phase?
Making a plan and choosing the right tools?
Exactly! Constructing a logical plan is essential. Remember the safety protocols while you work. What tools do you think might be important?
Tools like saws or 3D printers could be useful!
Right! It’s all about efficiency and safety. Do you think prioritizing safety is important while creating?
Absolutely! We must protect ourselves while making our designs.
Yes! Always communicate about safety and best practices. Let's remember the acronym **S.A.F.E.T.Y.**: Secure, Assess, Follow, Evaluate, Tell, Yes!
Evaluating the Design
🔒 Unlock Audio Lesson
Sign up and enroll to listen to this audio lesson
Finally, we reach the Evaluating stage. Why do you think evaluation is a critical step?
To test how well our design meets the criteria we set!
Correct! It’s not just about testing; it's also about reflection. What might you include in your evaluation?
We should mention what went well and what could be improved.
Great observation! Use the acronym **R.E.F.L.E.C.T.**: Reflect, Evaluate, Feel, Learn, Explore, Consider, and Talk to gather a well-rounded evaluation of your project.
That’s a good approach to ensure we improve future designs!
Exactly! Continuous improvement is the goal. Ultimately, evaluating our work leads to better designs in the future.
Case Study: Smart Water Dispenser
🔒 Unlock Audio Lesson
Sign up and enroll to listen to this audio lesson
Let's examine a real project using the Design Cycle, the Smart Water Dispenser. What was the challenge?
To reduce water waste in schools!
Correct! During the Inquiring phase, they used flow sensors to track water usage and researched waste reduction methods. What might be a robotics element involved?
They used a motion sensor for touchless activation!
Exactly! It enhances usability. In this project, they iterated prototypes using cardboard and eventually 3D printed the final design. Why is prototyping important?
It lets you test different designs safely before committing to the final version!
Well done! Iteration is essential in fine-tuning the product. Do you remember the outcome of the project?
Yes! They reduced water waste by 30%.
Exactly right! This shows how applying the Design Cycle can lead to significant real-world impacts.
Introduction & Overview
Read summaries of the section's main ideas at different levels of detail.
Quick Overview
Standard
This section discusses the MYP Design Cycle, breaking down the stages involved in product design—inquiring and analyzing, developing ideas, creating the solution, and evaluating the results. The inclusion of a case study on a smart water dispenser illustrates practical applications of these stages in reducing waste.
Detailed
The Design Cycle in Action
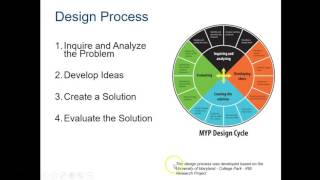
The Design Cycle is a structured process that guides students through the steps of product design, ensuring that they engage systematically in problem-solving. In this section, we will explore the key stages of the MYP Design Cycle:
- Inquiring and Analyzing: This stage involves identifying a specific problem, researching existing solutions, and defining the design specifications needed to solve the problem effectively.
- Developing Ideas: Once the problem is well-defined, students brainstorm ideas, sketch concepts, and digitally develop their design ideas, justifying their chosen solutions based on set criteria.
- Creating the Solution: In this stage, students must construct a logical plan detailing how they will bring their design to life, using appropriate tools while following safety protocols during construction.
- Evaluating: Finally, students test their designs against the established criteria, reflecting on both the product and the process, while suggesting meaningful improvements.
A practical example is provided through a case study on a smart water dispenser designed to minimize waste in schools, showcasing the integration of engineering, robotics, and prototyping principles throughout the design cycle. This interdisciplinary approach demonstrates how effective problem-solving can significantly impact environment-related challenges.
Youtube Videos

Audio Book
Dive deep into the subject with an immersive audiobook experience.
Stages of the MYP Design Cycle
Chapter 1 of 2
🔒 Unlock Audio Chapter
Sign up and enroll to access the full audio experience
Chapter Content
- Inquiring and Analyzing:
- Identify a problem.
- Research existing solutions.
- Define design specifications.
- Developing Ideas:
- Sketch concepts.
- Develop design ideas digitally.
- Justify chosen solution.
- Creating the Solution:
- Construct a logical plan.
- Use appropriate tools.
- Follow safety protocols during construction.
- Evaluating:
- Test against design criteria.
- Reflect on the product and process.
- Suggest improvements.
Detailed Explanation
The MYP Design Cycle is a structured process that guides students through their design projects. It consists of four main stages: Inquiring and Analyzing, Developing Ideas, Creating the Solution, and Evaluating.
- Inquiring and Analyzing: This is the starting point where students identify a specific problem they want to solve. They must research existing solutions to understand what has already been done and define specifications that their product must meet.
- Developing Ideas: In this stage, students sketch their ideas and develop them using digital tools, allowing them to visualize their concepts. They also need to justify why they have chosen a particular solution based on their research and analysis.
- Creating the Solution: Here, students construct a detailed plan to build their product. They must select the right tools for the job and follow safety protocols to ensure a safe working environment during construction.
- Evaluating: Finally, students test their product against the design criteria they established earlier. They reflect on both the product and the process used to create it, identifying areas for improvement.
Examples & Analogies
Think of the design cycle like planning a road trip. First, you analyze where you want to go (Inquiring and Analyzing) and check for existing routes (researching solutions). Next, you map out the best path, considering stops along the way (Developing Ideas). After that, you fill up your gas tank and pack your bags to hit the road (Creating the Solution). Finally, once you return, you look back at your journey to see what went well and what could be improved for next time (Evaluating).
Case Study: Smart Water Dispenser
Chapter 2 of 2
🔒 Unlock Audio Chapter
Sign up and enroll to access the full audio experience
Chapter Content
Challenge: Design a smart water dispenser that limits waste in school environments.
- Engineering: Used flow sensors to track water use.
- Robotics: Included a motion sensor for touchless activation.
- Prototyping: Iterated using cardboard mock-ups and then a 3D printed final version.
- Outcome: Reduced water waste by 30% in trial.
Detailed Explanation
This case study illustrates how the design cycle can be applied in a real-world scenario. The challenge was to design a smart water dispenser that minimizes water waste in schools.
- Engineering: Engineers designed a system equipped with flow sensors that monitor water usage, ensuring that only the necessary amount of water is dispensed.
- Robotics: A motion sensor was integrated to allow users to activate the dispenser without touching it, promoting hygiene and further reducing waste.
- Prototyping: The design began with simple cardboard mock-ups to test the concept, followed by a more advanced prototype created through 3D printing, which closely resembles the final product.
- Outcome: After testing, the smart water dispenser managed to reduce water waste by 30% during the trial, showcasing the effectiveness of thoughtful design and the importance of iterative prototyping based on real feedback.
Examples & Analogies
Imagine you are tasked with creating an advanced faucet for a school. You would start by figuring out how students currently waste water (engineering) and then design a faucet that turns on automatically when someone approaches it (robotics). After doodling some ideas on paper, you create a basic model out of cardboard to visualize and test your ideas before crafting a high-quality version with a 3D printer. Finally, when tested in the school, your faucet ends up saving a lot of water—that means your design worked!
Key Concepts
-
Design Cycle: A systematic approach to product design consisting of inquiry, development, creation, and evaluation stages.
-
Prototyping: The process of creating models to test ideas before final production.
-
User Specification: Setting criteria that a design must fulfill to meet user needs and functionality.
Examples & Applications
The Smart Water Dispenser project demonstrates how integrating engineering, robotics, and prototyping can reduce waste in educational contexts.
A collapsible bike helmet designed to protect users while being convenient to store showcases the application of engineering principles in product design.
Memory Aids
Interactive tools to help you remember key concepts
Rhymes
Inquire, analyze, don’t be shy, develop ideas, let creativity fly! Create with care, always beware, evaluate right, improve in sight!
Acronyms
R.E.S.E.A.R.C.H.
Relate
Evaluate
Shape
Explore
Analyze
Realign
Confirm
Hope for success!
Stories
Once upon a time, a young inventor followed the Design Cycle. They inquired about a problem, developed a brilliant idea, created a prototype, tested it, and learned valuable lessons that led to their success!
Memory Tools
J.U.S.T.I.F.Y.: Justify, Understand, Support, Test, Include, Feedback, and Yield your design decisions.
Flash Cards
Glossary
- Inquiring and Analyzing
The first stage of the MYP Design Cycle where a problem is identified, and research is conducted on existing solutions.
- Developing Ideas
The second stage in the MYP Design Cycle that involves brainstorming, sketching concepts, and justifying chosen designs.
- Creating the Solution
The phase of the design cycle where a logical plan is constructed, tools are selected, and safety protocols are followed during the construction of the design.
- Evaluating
The final stage of the design process where the design is tested against criteria and reflects on the product as well as the process.
- Prototyping
The practice of creating a tangible model of a product to test its validity and usability prior to full-scale production.
Reference links
Supplementary resources to enhance your learning experience.