
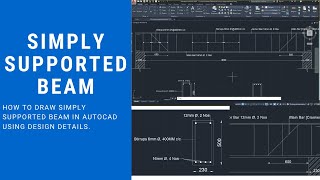
Detailed section of a Simply Supported Doubly Reinforced beam
Enroll to start learning
You’ve not yet enrolled in this course. Please enroll for free to listen to audio lessons, classroom podcasts and take practice test.
Interactive Audio Lesson
Listen to a student-teacher conversation explaining the topic in a relatable way.
Introduction to Simply Supported Doubly Reinforced Beams
🔒 Unlock Audio Lesson
Sign up and enroll to listen to this audio lesson

Today, we're discussing simply supported doubly reinforced beams. Can anyone tell me what a doubly reinforced beam is?

Is it a beam that has reinforcement on both the top and bottom?
That's correct! A doubly reinforced beam has both tensile and compressive reinforcements for enhanced structural performance. Let's remember: DRB for 'Doubly Reinforced Beam'.

What makes these beams different from singly reinforced ones?
Great question! Singly reinforced beams have reinforcement only on one side. Doubly reinforced beams are designed to handle greater loads and moments.

So, they are used for larger structures?
Exactly! Now, let’s dive into the design specifics.
Design Parameters
🔒 Unlock Audio Lesson
Sign up and enroll to listen to this audio lesson

For our doubly reinforced beam, we have a clear span of 5.4 meters, and the beam size is 300 mm by 800 mm. Why do you think we need to know these dimensions?
They help determine how much load the beam can handle!
Exactly, dimensions affect the overall strength and stability. We also need to consider the supports, which are 300 mm in bearing. Can you repeat the acronym for clear span? It's an important concept!

C.S. for clear span!
Good job! Remembering C.S. is crucial for understanding beam calculations!
Reinforcement Details
🔒 Unlock Audio Lesson
Sign up and enroll to listen to this audio lesson
Now, let's look at the reinforcement details. The tensile reinforcement consists of #7 - 25ϕ bars. Why do we choose different bar sizes?
I think it's because different loads require different sizes to handle stress.
Exactly! The size impacts how much stress each beam section can effectively support. The compression reinforcement involves #4 - 25ϕ bars. Can anyone summarize why we use both tensile and compression reinforcement?
To handle both types of forces effectively!
Perfect! Finally, let’s talk about how we arrange shear reinforcement.
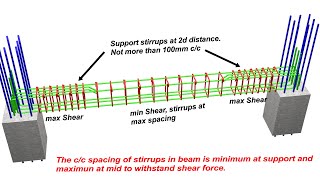
Shear Reinforcement
🔒 Unlock Audio Lesson
Sign up and enroll to listen to this audio lesson
Shear reinforcement is critical for preventing shear failure. In our design, we have stirrups of 12ϕ at specified intervals. Can someone explain why we have different spacings in the shear reinforcement?
Different spacings help accommodate varying shear forces throughout the beam length.
Precisely! As the distance from the support increases, the shear force typically decreases, allowing for wider spacing. Let’s remember: S for Shear reinforcement spacing.
How do we ensure the stirrups are placed correctly?
We follow the design parameters and check them against structural safety codes to ensure compliance.
Conclusion and Recap
🔒 Unlock Audio Lesson
Sign up and enroll to listen to this audio lesson
To wrap up, we discussed the key elements of our simply supported doubly reinforced beam. Who can list some important design considerations?
Clear span, bearing sizes, types of reinforcement, and spacing!
Correct! Each of these factors plays a crucial role in the beam's performance. Keep using your memory aids: DRB for doubly reinforced and S for shear. Great job today, everyone!
Introduction & Overview
Read summaries of the section's main ideas at different levels of detail.
Quick Overview
Standard
The section outlines the design parameters and reinforcement details for creating drawings of a simply supported doubly reinforced beam, including specifications for tensile and compression reinforcement, spacing of stirrups, and supports.
Detailed
Detailed Summary of Simply Supported Doubly Reinforced Beam
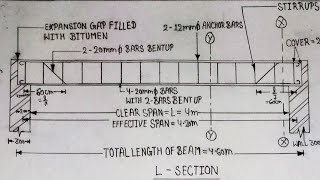
In this section, the construction and reinforcement specifications for a simply supported doubly reinforced beam are outlined. The design includes a clear span of 5.4 meters, bearing on supports measuring 300 mm, and a beam size of 300 mm wide and 800 mm deep. Key structural components involve:
- Main Tensile Reinforcement: Utilizing #7 - 25ϕ bars with four straight bars and three bent-up bars positioned 1400 mm from the support to enhance tensile strength.
- Compression Reinforcement: Incorporating #4 - 25ϕ bars designed to resist compression forces effectively.
- Spacer Bars: 25 ϕ bars are installed to maintain proper spacing between reinforcements.
- Shear Reinforcement: 2-leg stirrups of 12ϕ bars are placed at two different spacing intervals: 150 mm c/c for 1.5 meters from the support, transitioning to 300 mm c/c along the middle section.
The careful arrangement and selection of materials aim to maintain structural integrity, optimize tensile and compressive forces, and ensure stability across the beam's length.
Youtube Videos


Audio Book
Dive deep into the subject with an immersive audiobook experience.
Beam Specifications
Chapter 1 of 4
🔒 Unlock Audio Chapter
Sign up and enroll to access the full audio experience
Chapter Content
Draw a detailed longitudinal section, a cross section near the supports and a section at the middle of the span of a Simply Supported Doubly Reinforced beam for the following data: Clear span = 5.4m, Bearing over the supports = 300mm, Size = 300 x 800 mm.
Detailed Explanation
In this chunk, we outline the overall specifications of the simply supported doubly reinforced beam. The clear span refers to the distance between the two supports without any obstruction, which is 5.4 meters in this case. The bearing over the supports is how much of the beam rests on the supports, measured at 300 mm. The size of the cross-section of the beam is 300 mm in width and 800 mm in overall depth. This information is crucial for structural design, ensuring that the beam can handle the loads applied to it without failing.
Examples & Analogies
Think of the beam like a long table where the clear span is the table's length between its legs, the bearing is how much of the table sits on the legs, and the size is the table's width and height. Just as the right dimensions ensure the table can support weight without breaking, the specifications of the beam ensure it can carry the loads without collapsing.
Main Reinforcement Details
Chapter 2 of 4
🔒 Unlock Audio Chapter
Sign up and enroll to access the full audio experience
Chapter Content
Main reinforcement tensile: #7 - 25ϕ. 4 straight and 3 bent up @ 1400mm from support.
Detailed Explanation
This chunk provides details on the main tensile reinforcement of the beam. The designation '#7 - 25ϕ' indicates that there are seven 25 mm diameter bars used to resist tensile forces in the beam. These bars are crucial for handling the pulling forces that occur when the beam is loaded. Additionally, four of these bars are straight, while three are bent up at a specific distance of 1400 mm from the support. The bent bars help to transfer forces effectively into the supports.
Examples & Analogies
Imagine a tug-of-war game; the ropes represent reinforcement bars. The straight segments show how many players (bars) are directly pulling the rope, while the bent parts indicate where some players are positioned differently to leverage better force distribution. Just like positioning players strategically can improve your chances of winning, arranging reinforcement bars enhances the strength and stability of the beam.
Compression Reinforcement
Chapter 3 of 4
🔒 Unlock Audio Chapter
Sign up and enroll to access the full audio experience
Chapter Content
Compression reinforcement: #4 – 25ϕ.
Detailed Explanation
In this part, we detail the compression reinforcement required in the beam, which consists of four 25 mm diameter bars. Compression reinforcement is added to bear the compressive forces that the beam encounters, especially under load. Unlike tensile reinforcement that resists pulling, compression reinforcement is crucial for areas of the beam that will be pushed. This balance between tensile and compression reinforcement is essential for the structural integrity of any concrete beam.
Examples & Analogies
Think of a sandwich. The bread holds the ingredients (the filling) together, just like compression reinforcement supports the structure. If you apply pressure on the sandwich (like a weight on the beam), the bread (compression bars) keeps everything in place, ensuring nothing collapses.
Shear Reinforcement
Chapter 4 of 4
🔒 Unlock Audio Chapter
Sign up and enroll to access the full audio experience
Chapter Content
Shear reinforcement: 2L - 12ϕ @ 150 c/c for a distance of 1.5m from the support and 2L - 12ϕ @300c/c for remaining middle portion.
Detailed Explanation
This section describes the shear reinforcement, which is essential for resisting shear forces that occur in beams when loads are applied. The reinforcement consists of two legged 12 mm diameter stirrups placed at specific spacings: 150 mm center-to-center (c/c) for the first 1.5 meters from the supports and 300 mm c/c for the remaining portion of the beam. This setup allows the beam to effectively handle shear stresses, which could cause it to crack or fail if not adequately supported.
Examples & Analogies
Visualize a bridge. The beams that support the road experience forces from vehicles above (the load). Shear reinforcement is like the additional supports or braces put under the bridge to ensure it doesn't sway or collapse. Just as these braces help maintain stability in the bridge structure, shear reinforcement helps maintain the integrity of the beam under load.
Key Concepts
-
Main Tensile Reinforcement: The reinforcement found at the bottom of the beam designed to resist tensile forces.
-
Compression Reinforcement: Reinforcement added to resist compressive forces that can develop in the beam.
-
Shear Reinforcement: Reinforcement used specifically to resist shear stresses which might cause failure.
-
Reinforcement Spacing: The distance maintained between the stirrups to ensure structural integrity.
Examples & Applications
An example of a simply supported doubly reinforced beam would be one utilized in large structural applications, such as bridges, where higher load capacities are essential.
In a residential building, a doubly reinforced beam might be used to support wide openings or heavy loads, necessitating a design that includes both tensile and compressive reinforcements.
Memory Aids
Interactive tools to help you remember key concepts
Rhymes
Doubly reinforced beams stand tall, with reinforcement for load, they won't fall.
Stories
Imagine a bridge where heavy vehicles pass. A doubly reinforced beam holds it firm with support on both sides, never letting the structure down.
Memory Tools
SBS: Supports, Beams, Spacing - remember the three keys in designing a beam!
Acronyms
DRB
Doubly Reinforced Beam - a phrase to signify strength and reliability.
Flash Cards
Glossary
- Doubly Reinforced Beam
A beam that has tensile and compressive reinforcement to accommodate higher loads and moments.
- Clear Span
The distance between two supports measured along the length of the beam.
- Shear Reinforcement
Reinforcements that are used to resist shear forces and prevent shear failure.
- Tensile Reinforcement
Reinforcement used to resist tensile stresses in concrete.
- Compression Reinforcement
Reinforcement used to resist compressive stresses in concrete.
Reference links
Supplementary resources to enhance your learning experience.