
Details of One-way Continuous Slab for a Hall
Enroll to start learning
You’ve not yet enrolled in this course. Please enroll for free to listen to audio lessons, classroom podcasts and take practice test.
Interactive Audio Lesson
Listen to a student-teacher conversation explaining the topic in a relatable way.
Understanding One-way Continuous Slabs
🔒 Unlock Audio Lesson
Sign up and enroll to listen to this audio lesson

Today, we're discussing one-way continuous slabs, often used in large spaces like halls. These slabs distribute loads efficiently. Who can tell me the dimensions of the slab we're focusing on?

Isn't the slab 8 meters by 14.25 meters?
Absolutely right! And what about the thickness, can anyone recall?

The slab thickness is 150mm.
Exactly! Remember, the thickness plays a key role in the design.
Reinforcement Patterns for One-way Slabs
🔒 Unlock Audio Lesson
Sign up and enroll to listen to this audio lesson

Now let’s talk about the reinforcement. What can anyone tell me about the positive reinforcement in our one-way slab?

The main positive reinforcement consists of 10ϕ bars at 120c/c at the ends and interior panels.

And I think the negative reinforcement at the supports is also 10ϕ at 120c/c?
Correct! These reinforcements help manage tensile stresses effectively.
What’s the distribution steel used for?
Great question! The distribution steel, which is 8ϕ at 250c/c, helps carry loads and distribute them across the slab.
Structural Significance of Reinforcement Placement
🔒 Unlock Audio Lesson
Sign up and enroll to listen to this audio lesson
Why is the placement of reinforcement so crucial in our slab design?
Because it helps prevent cracking and ensures the slab can handle the loads without failing?
Exactly! Proper reinforcement placement is essential to withstand both vertical and lateral loads.
So, if the supports didn't have sufficient negative reinforcement, could that lead to a failure?
Yes, without adequate negative reinforcement, we risk shear failure at the supports. Always remember: reinforce where the load paths converge.
Introduction & Overview
Read summaries of the section's main ideas at different levels of detail.
Quick Overview
Standard
The section outlines the specifications for a one-way continuous slab, detailing its dimensions, reinforcement patterns, and overall structural significance. It emphasizes the importance of specific bar placements in both positive and negative reinforcement throughout the slab's supports and spans.
Detailed
Detailed Summary
In this section, we cover the specifications and reinforcement details essential for constructing a one-way continuous slab, particularly in a hall setting. The one-way slab has clear dimensions of 8m by 14.25m, supported by RCC beams spaced at 3.5m center to center. The column dimensions resting on the beams are 250mm x 500mm, with beam dimensions of 250mm x 600mm. The thickness of the slab is set at 150mm, which is included in the overall beam depth. The reinforcement details are crucial for structural integrity:
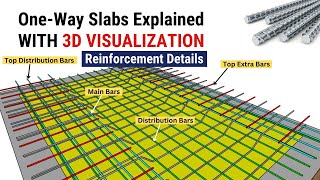
- Main Positive Reinforcement: 10ϕ bars spaced at 120c/c at the end and interior panels.
- Main Negative Reinforcement: 10ϕ bars spaced at 120c/c at all supports.
- Distribution Steel: Smaller 8ϕ bars spaced at 250c/c across the slab.
Such reinforcement strategies are vital in enhancing the load-bearing capacity and preventing failure in structural elements.
Youtube Videos


Audio Book
Dive deep into the subject with an immersive audiobook experience.
Dimensions of the Slab
Chapter 1 of 6
🔒 Unlock Audio Chapter
Sign up and enroll to access the full audio experience
Chapter Content
One-way continuous slab has been provided for a hall of clear dimensions 8m x 14.25m.
Detailed Explanation
This chunk describes the overall dimensions of the slab that is being designed. The 'clear dimensions' refer to the usable span of the slab without any obstructions. The width of the slab is 8 meters, and the length is 14.25 meters, making it a rectangular shape suitable for a hall.
Examples & Analogies
Think of laying down a large piece of carpet in a room. The clear dimensions of the carpet would represent the area that is visible and usable in the room. Similarly, the clear dimensions of the slab indicate how much space it covers in the hall.
Support Structure
Chapter 2 of 6
🔒 Unlock Audio Chapter
Sign up and enroll to access the full audio experience
Chapter Content
The slab is supported on RCC beams. The following details are given: C/C distance of supporting beams = 3.5m.
Detailed Explanation
The slab relies on Reinforced Cement Concrete (RCC) beams for support. 'C/C distance of supporting beams' refers to the center-to-center spacing of the supporting beams, which is 3.5 meters. This spacing is crucial for ensuring the slab can distribute loads effectively without sagging or cracking.
Examples & Analogies
Imagine a long shelf divided by several brackets. The brackets' spacing is important; if they are too far apart, the shelf might sag in the middle. Similarly, properly spacing the supporting beams ensures the slab remains flat and stable.
Beam and Column Dimensions
Chapter 3 of 6
🔒 Unlock Audio Chapter
Sign up and enroll to access the full audio experience
Chapter Content
Column dimensions on which beam rest = 250mm x 500mm, C/S of beams = 250mm x 600mm.
Detailed Explanation
The columns and beams have specific dimensions that contribute to the overall strength of the structure. The columns that support the beams are 250mm wide and 500mm deep. The cross-section of the beams is 250mm wide and 600mm deep. These dimensions are chosen based on the expected loads and the materials used, ensuring stability and safety.
Examples & Analogies
Consider the legs of a table. If the legs are too thin or not spaced properly, the table may wobble or collapse when weight is applied. Similarly, appropriate dimensions for columns and beams ensure the entire structure is sturdy and can support the intended loads.
Slab Thickness
Chapter 4 of 6
🔒 Unlock Audio Chapter
Sign up and enroll to access the full audio experience
Chapter Content
Slab thickness = 150mm.
Detailed Explanation
The thickness of the slab is an important factor in its structural integrity. A thickness of 150mm helps to distribute loads evenly and resist bending or cracking. The thickness plays a crucial role in determining how much weight the slab can support and its overall durability.
Examples & Analogies
Think of a piece of bread. A thicker slice is less likely to bend or break when you put a spread on it compared to a thin slice. The same principle applies to the slab; sufficient thickness is essential for supporting weight without deformation.
Reinforcement Specifications
Chapter 5 of 6
🔒 Unlock Audio Chapter
Sign up and enroll to access the full audio experience
Chapter Content
Main positive reinforcement at the end and interior panels = 10ϕ @ 120 c/c, Main negative reinforcement at all supports = 10ϕ @ 120 c/c, Distribution steel = 8ϕ @ 250 c/c.
Detailed Explanation
Reinforcement is critical in concrete slabs to improve tensile strength, which concrete lacks. The main positive reinforcement refers to the bars placed in the tension zones (bottom of the slab) at 120mm spacing, which help prevent sagging. The main negative reinforcement, which is also placed at supports, is designed to handle forces at the top of the slab. The distribution steel provides additional support across the slab. Each type of reinforcement has specific spacing to ensure optimal support.
Examples & Analogies
Think of reinforcement as the structure of a bridge. Just as a bridge has various supports and arches designed to handle the forces acting on it, the reinforcement bars in a slab help manage the forces acting on the concrete, ensuring it stays intact under load.
Drawing Requirements
Chapter 6 of 6
🔒 Unlock Audio Chapter
Sign up and enroll to access the full audio experience
Chapter Content
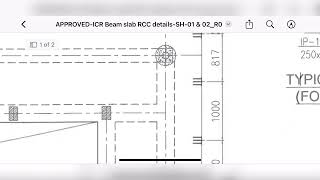
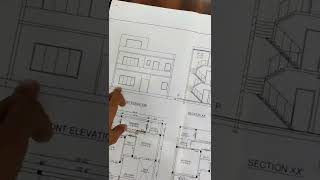
Draw cross section and plan showing the details of reinforcement (Bottom & top).
Detailed Explanation
This instruction emphasizes the importance of visualizing the slab design through drawings. A cross-section provides a side view of the slab showing how thick it is and where the reinforcements are placed. The plan view shows the layout of the slab from above, indicating the arrangement of the reinforcement bars. These drawings are essential for understanding how the slab is constructed and ensuring it meets design specifications.
Examples & Analogies
Think of a recipe for a cake. The recipe gives you detailed instructions on how to prepare, combine, and bake the ingredients. Similarly, drawings are like a 'recipe' for constructing the slab, telling builders how to place the materials to achieve the desired result.
Key Concepts
-
One-way Continuous Slab: Used for efficient load distribution in one direction.
-
Reinforcement Placement: Critical for slab integrity, varying between positive and negative reinforcement.
-
Load Distribution: Distribution steel mitigates load concentration to enhance durability.
Examples & Applications
The specified one-way continuous slab for a hall must support live loads and dead loads effectively. Thus, the correct placement of 10ϕ bars ensures this load handling.
An understanding of how negative reinforcement is placed at supports can prevent shear failure due to bending moments.
Memory Aids
Interactive tools to help you remember key concepts
Rhymes
For every slab, thick and wide, put your bars where loads reside.
Stories
Imagine building a hall with a slab so wide. You must remember to place your bars where they abide! At the ends and supports, load you can’t hide.
Memory Tools
Remember 'POSITIVE' means 'Panel' and 'NEGATIVE' means 'Nailed' at supports.
Acronyms
RPD
Remember Placement of Distribution steel to safeguard against cracks.
Flash Cards
Glossary
- Oneway Continuous Slab
A structural element that supports loads in one direction, commonly used for floors and roofs in buildings.
- Reinforcement
Steel bars or mesh used within concrete to enhance its tensile strength and overall stability.
- Negative Reinforcement
Reinforcement placed at supports to counteract tensile stresses due to applied loads.
- Positive Reinforcement
Reinforcement placed in spans between supports to handle tensile forces.
- Distribution Steel
Reinforcement that distributes load over wider areas in slabs, typically less than main reinforcement.
Reference links
Supplementary resources to enhance your learning experience.