
The microscope
Enroll to start learning
You’ve not yet enrolled in this course. Please enroll for free to listen to audio lessons, classroom podcasts and take practice test.
Interactive Audio Lesson
Listen to a student-teacher conversation explaining the topic in a relatable way.
Introduction to the Microscope
🔒 Unlock Audio Lesson
Sign up and enroll to listen to this audio lesson

Today, we'll learn about the microscope, a vital tool in science that helps us see small objects. Can anyone tell me what they think a microscope does?

It makes small things look bigger!
Exactly! It allows us to magnify objects that are otherwise too tiny to see with the naked eye. Now, let's talk about the type of lens used in a simple microscope.

Is it a concave lens?
Good guess, but it’s actually a converging lens! This type converges light rays to a point. Can anyone remember why focal length is important?

It helps determine how much the image is magnified.
Correct! The shorter the focal length, the greater the magnification. It's fascinating how a small change can greatly affect what we see!
Image Formation with a Microscope
🔒 Unlock Audio Lesson
Sign up and enroll to listen to this audio lesson

Now, let’s explore how images are formed using the microscope. Who can tell me what a virtual image is?

It’s an image that you can’t project onto a screen because it doesn’t really exist in space...
Exactly! In a microscope, the lens creates a virtual image that appears to be behind the lens. If the object is very close to the lens, how does this affect the image?
It makes the object look even bigger!
Right! When the object is within the focal length, we see an erect and enlarged virtual image, making it easier for us to observe details. Let's remember that magnification helps us see the details clearly!
Compound Microscopes
🔒 Unlock Audio Lesson
Sign up and enroll to listen to this audio lesson
In advanced applications, we often use compound microscopes. Can anyone explain what distinguishes a compound microscope from a simple microscope?
It uses more than one lens, right? Like an objective and an eyepiece!
Exactly! The objective lens creates a magnified image which the eyepiece further magnifies. Do you think this results in a higher overall magnification?
Yes, more lenses mean more magnification!
Correct! It's essential for observing very small samples. Remember, the total magnification is the product of the separate magnifications from both lenses.
Calculating Magnification
🔒 Unlock Audio Lesson
Sign up and enroll to listen to this audio lesson
Let’s move on to calculating magnification. When the image is at the near point, we use the formula m = 1 + (D/f). Who remembers what D stands for?
It's the distance of distinct vision, usually around 25 cm.
Great job! This formula helps quantify how much larger an image appears to the human eye. How would you modify it for an image at infinity?
I think it’s just m = D/f then!
Excellent! This is an important distinction. Let's summarize our findings: using lenses effectively allows us to unlock new dimensions in our scientific observations.
Introduction & Overview
Read summaries of the section's main ideas at different levels of detail.
Quick Overview
Standard
The section elaborates on the design and use of microscopes, specifically discussing simple and compound microscopes, their magnifying powers, and how they help in viewing small objects. Key points include the concepts of focal length, virtual images, and the construction of compound microscopes.
Detailed
The Microscope
The microscope is an optical device that allows us to view extremely small objects by magnifying them. Simple microscopes utilize a single converging lens to enlarge an object while keeping the eye close to the lens. This produces either an erect virtual image or an image at infinity for comfortable viewing...
Key Concepts:
- Focal Length: The distance from the lens to its focus, significant for determining magnification.
- Magnification (m): The ratio of the height of the image (h') to the height of the object (h), calculated as m = h'/h. Two types are considered:
- Linear Magnification: When the image is at the near point D (around 25 cm), it can be calculated as m = D/f.
- Angular Magnification: If the image is formed at infinity, the angular magnification can also be calculated.
- Compound Microscopes: Utilizing two lenses (the objective and the eyepiece), the compound microscope achieves much higher magnifications by taking advantage of this dual-lens system...
The significance of microscopes in scientific studies cannot be overstated, as they enable detailed observation crucial for fields like biology and material science.
Youtube Videos


Audio Book
Dive deep into the subject with an immersive audiobook experience.
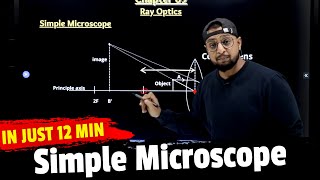
Simple Magnifier or Microscope
Chapter 1 of 6
🔒 Unlock Audio Chapter
Sign up and enroll to access the full audio experience
Chapter Content
A simple magnifier or microscope is a converging lens of small focal length (Fig. 9.23). In order to use such a lens as a microscope, the lens is held near the object, one focal length away or less, and the eye is positioned close to the lens on the other side.
Detailed Explanation
A simple microscope uses a converging lens with a small focal length. When using it, the lens is placed very close to the object, ideally at a distance equal to its focal length or less. This arrangement allows the lens to create a magnified image that can be viewed comfortably by the eye. When the eye is close to the lens, it can focus easily on the image produced by the lens, resulting in magnification of the small object.
Examples & Analogies
Think of looking through a magnifying glass to read the fine print on a label. By bringing the magnifying glass close to the text, you're effectively using a simple microscope that allows your eye to see the letters much larger than they appear to the naked eye.
Erect, Magnified, and Virtual Image
Chapter 2 of 6
🔒 Unlock Audio Chapter
Sign up and enroll to access the full audio experience
Chapter Content
The idea is to get an erect, magnified and virtual image of the object at a distance so that it can be viewed comfortably, i.e., at 25 cm or more.
Detailed Explanation
The microscope is designed to produce an erect (upright), magnified, and virtual image, which is perceived by the eye as being closer than its actual position. The optimal viewing distance for comfortable observation is generally around 25 cm. A virtual image is one that cannot be projected onto a screen because the light rays appear to diverge from the image location rather than converging at that point.
Examples & Analogies
Imagine holding a smartphone's camera to take a picture of a small flower petal. As you bring your camera lens close to the petal, you see a detailed, enlarged image on the screen. Even though the image looks large, it is virtual, and the phone's screen cannot capture a physical representation of the flower—it is a mere reflection of the light coming from the petal.
Viewing Comfortable Distances
Chapter 3 of 6
🔒 Unlock Audio Chapter
Sign up and enroll to access the full audio experience
Chapter Content
Although the closest comfortable distance for viewing the image is when it is at the near point (distance D ≈ 25 cm), it causes some strain on the eye.
Detailed Explanation
While images viewed through microscopes can be comfortably focused at around 25 cm, this distance can cause eye strain if maintained for prolonged periods. Therefore, adjusting the lens or distance can help reduce this strain and allow for clearer viewing.
Examples & Analogies
When using a pair of binoculars to focus on a bird in the distance, you might feel comfortable at a certain distance, but if you keep adjusting your focus too closely, it can lead to fatigue in your eyes. Similarly, when using a microscope, keeping the image at a distance that accommodates your vision is essential to avoid discomfort.
Image Formation at Infinity
Chapter 4 of 6
🔒 Unlock Audio Chapter
Sign up and enroll to access the full audio experience
Chapter Content
If the object is at a distance f, the image is at infinity. However, if the object is at a distance slightly less than the focal length of the lens, the image is virtual and closer than infinity.
Detailed Explanation
When the object is placed exactly at the focal length (f), the light rays focus to form the image at a point far away, effectively at infinity. On the other hand, if the object is closer than the focal length, it results in a virtual image that remains within reach, making it observable without the need for advanced optics to capture it.
Examples & Analogies
Think of a camera lens set to capture the sunset. If you set the focus to a point in the distance (at infinity), the sunset is perfectly clear. But if you point the camera at the trees close by without adjusting the focus, you'll see nothing but a blurry image, akin to observing a virtual image that is not sharp but is ever so enticing.
Linear Magnification of Simple Microscope
Chapter 5 of 6
🔒 Unlock Audio Chapter
Sign up and enroll to access the full audio experience
Chapter Content
The linear magnification m, for the image formed at the near point D, by a simple microscope can be obtained by using the relation m = D/f.
Detailed Explanation
In a simple microscope, the linear magnification is calculated using the formula m = D/f, where D is the near point distance (about 25 cm) and f is the focal length of the lens. This means that the magnification increases as the focal length decreases, allowing for stronger magnification capabilities with shorter focal lengths.
Examples & Analogies
When looking closely at a small insect through a magnifying glass, if you adjust the lens to a shorter focal length, you can see almost every detail of the insect, such as the texture of its wings. This adjustment gives you not just a better view but also a more substantial apparent increase in size, just like adjusting the settings on your camera to capture finer details.
Angular Magnification
Chapter 6 of 6
🔒 Unlock Audio Chapter
Sign up and enroll to access the full audio experience
Chapter Content
We will now find the magnification when the image is at infinity. In this case we will obtain the angular magnification.
Detailed Explanation
When the image is formed at infinity, we calculate the angular magnification by comparing the angles subtended by the object and the image at the eye. This is important for understanding how much the image can be enlarged based on the setup and position of the lenses used. The formula helps distinguish between simple linear magnification and the more practical angular magnification that affects real-world viewing experiences.
Examples & Analogies
Think about viewing distant mountains through a telescope. As you look, the mountains seem to fill up more of your field of vision, giving you an immersive experience of their massive peaks. This is similar to how angular magnification allows you to perceive small objects much larger than they are by simply manipulating light and angles through lenses.
Key Concepts
-
Focal Length: The distance from the lens to its focus, significant for determining magnification.
-
Magnification (m): The ratio of the height of the image (h') to the height of the object (h), calculated as m = h'/h. Two types are considered:
-
Linear Magnification: When the image is at the near point D (around 25 cm), it can be calculated as m = D/f.
-
Angular Magnification: If the image is formed at infinity, the angular magnification can also be calculated.
-
Compound Microscopes: Utilizing two lenses (the objective and the eyepiece), the compound microscope achieves much higher magnifications by taking advantage of this dual-lens system...
-
The significance of microscopes in scientific studies cannot be overstated, as they enable detailed observation crucial for fields like biology and material science.
Examples & Applications
Using a simple microscope with a focal length of 5 cm can achieve a magnification of 6x.
A compound microscope with an objective focal length of 1 cm and eyepiece of 2 cm can provide a maximum magnification of 250x.
Memory Aids
Interactive tools to help you remember key concepts
Rhymes
To see small things, bring it near, A simple lens can make them clear.
Stories
Once upon a time, there was a curious scientist who used a magical lens to explore the tiny world. Every small creature became gigantic when viewed through her wondrous microscope!
Memory Tools
LENS: L = Lens, E = Enlarges, N = Near point, S = See clearly.
Acronyms
MEM
Magnification = Enlarged
Magnified
Viewed.
Flash Cards
Glossary
- Focal Length
The distance from the center of a lens to its focus.
- Magnification
The process of enlarging the appearance of an object.
- Virtual Image
An image formed by rays that do not actually converge; it cannot be projected on a screen.
- Converging Lens
A lens that focuses incoming light rays to a point.
- Objective Lens
The lens in a microscope closest to the object being viewed.
- Eyepiece Lens
The lens in a microscope through which the viewer looks.
Reference links
Supplementary resources to enhance your learning experience.