
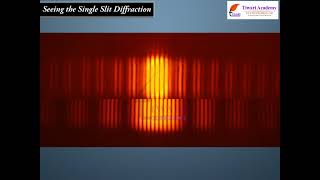
Seeing the single slit diffraction pattern
Enroll to start learning
You’ve not yet enrolled in this course. Please enroll for free to listen to audio lessons, classroom podcasts and take practice test.
Interactive Audio Lesson
Listen to a student-teacher conversation explaining the topic in a relatable way.
Introduction to Diffraction
🔒 Unlock Audio Lesson
Sign up and enroll to listen to this audio lesson

Today, we're going to explore how light behaves when it passes through a narrow opening. This phenomenon is known as diffraction. Can anyone tell me what they think happens to light when it encounters a slit?

Does it get blocked, or does it just go straight through?
Great question! While part of the light does travel straight, some of it actually bends around the edges of the slit. This bending creates a pattern of bright and dark regions — the diffraction pattern. It's pretty cool how we can see this pattern with a simple experiment!

How can we actually see this pattern?
You can see it using two razor blades and a clear glass electric bulb with a straight filament. Let's proceed to set up this experiment.
Setting Up the Experiment
🔒 Unlock Audio Lesson
Sign up and enroll to listen to this audio lesson

To perform the experiment, hold the two razor blades so that their edges are parallel, creating a small slit between them. Can someone help me visualize the setup?

So, we are pinching the blades together to create a narrow opening?
Exactly! Now, position this slit in front of the bulb filament and look through it. This will allow you to see the diffraction pattern formed by the light from the filament.

Why do we need to adjust the slit width?
The width of the slit influences how prominently the diffraction pattern appears. A narrower slit typically leads to a more pronounced diffraction effect. Let's try adjusting it together.
Observing the Diffraction Pattern
🔒 Unlock Audio Lesson
Sign up and enroll to listen to this audio lesson
Now that we've observed the pattern, can anyone describe what they see?
There are dark and bright bands! It looks like a series of stripes.
I noticed the central stripe is the brightest.
Exactly! The central stripe is the maximum intensity due to constructive interference of light. Can anyone tell me why we see colors when we use different filters?
I think it’s because different wavelengths of light create different fringe separations?
Correct! That's great observation! The different wavelengths interact with the slit differently, leading to the observed colors.
Conclusion and Review
🔒 Unlock Audio Lesson
Sign up and enroll to listen to this audio lesson
So, today we successfully observed the single slit diffraction pattern! Can anyone summarize what we’ve learned?
We learned how to set up the experiment and see the diffraction pattern, which has bright and dark bands due to light bending around the slit!
Exactly! Remember, the width of the slit and the wavelength of light are key factors influencing the pattern we see. What do you think you'd observe if we used a wider slit?
I think the pattern would be less visible, right?
Correct! Great job, everyone! This interaction of light is a fundamental part of studying wave behaviors.
Introduction & Overview
Read summaries of the section's main ideas at different levels of detail.
Quick Overview
Standard
This section provides a hands-on method to visualize the single-slit diffraction pattern through an experimental setup involving two razor blades and a clear glass electric bulb, highlighting practical aspects of light diffraction.
Detailed
Detailed Summary
In this section, we learn how to observe the phenomenon of single-slit diffraction in a straightforward manner. Using common tools, specifically two razor blades and a clear electric bulb with a straight filament, we can form a narrow slit that allows light to pass through and create a diffraction pattern. As light travels through the narrow slit created by the parallel edges of the blades, it bends and spreads, leading to the formation of a distinctive pattern of bright and dark bands on our visual field. The experiment involves holding the slit in front of our eyes and adjusting it to clearly see the resulting diffraction pattern, which consists of alternating dark and bright regions. The section further notes that the width of the fringes observed depends on the wavelength of light used, thus allowing the experimenter to see effects of different colors of light through the use of filters such as red or blue.
Youtube Videos


Audio Book
Dive deep into the subject with an immersive audiobook experience.
Setting Up the Experiment
Chapter 1 of 5
🔒 Unlock Audio Chapter
Sign up and enroll to access the full audio experience
Chapter Content
It is surprisingly easy to see the single-slit diffraction pattern for oneself. The equipment needed can be found in most homes –– two razor blades and one clear glass electric bulb preferably with a straight filament. One has to hold the two blades so that the edges are parallel and have a narrow slit in between. This is easily done with the thumb and forefingers.
Detailed Explanation
To observe the single-slit diffraction pattern, all you need is simple equipment that most people can find at home—two razor blades and a clear glass electric bulb. By holding the two blades in such a way that there is a narrow slit between them, you create an opening through which light from a filament bulb will pass. The light will diffract as it moves past the narrow slit, allowing you to see the diffraction pattern.
Examples & Analogies
Think of this setup like preparing a simple filter. Just as you would use a coffee filter to allow liquid to pass through while blocking coffee grounds, the blades create a barrier that shapes how the light waves from the bulb spread out. So, in a practical way, this experiment allows you to see something similar to how liquid flows through a filter.
Observing the Diffraction Pattern
Chapter 2 of 5
🔒 Unlock Audio Chapter
Sign up and enroll to access the full audio experience
Chapter Content
Keep the slit parallel to the filament, right in front of the eye. Use spectacles if you normally do. With slight adjustment of the width of the slit and the parallelism of the edges, the pattern should be seen with its bright and dark bands. Since the position of all the bands (except the central one) depends on wavelength, they will show some colours. Using a filter for red or blue will make the fringes clearer.
Detailed Explanation
Adjust the slit so that it is parallel to the light filament of the bulb and positioned directly in front of your eyes for the best view. A slight alteration in the slit width can enhance the visibility of the diffraction pattern. The central bright band is surrounded by alternating dark (minimum intensity) and bright (maximum intensity) bands. Depending on the wavelength of light and any color filters used, the colors of these bands can vary. This is due to the different wavelengths of light diffracting at different angles.
Examples & Analogies
You can think of this like looking through a long, narrow window (the slit) at a sunset. Depending on how wide or narrow that window is, the colors you see change. For instance, if you squint your eyes and narrow your field of view, the bright colors of the sunset might appear different than if you opened your eyes wide.
Navigating Bright and Dark Bands
Chapter 3 of 5
🔒 Unlock Audio Chapter
Sign up and enroll to access the full audio experience
Chapter Content
With both filters available, the wider fringes for red compared to blue can be seen.
Detailed Explanation
When you use both red and blue filters, the diffraction pattern becomes even more pronounced. The color red generally has a longer wavelength compared to blue, so the red fringes appear wider as they are spread out more with the same slit size. This means that for the same setup, red will create a broader and more noticeable diffraction pattern compared to blue.
Examples & Analogies
Consider this like the difference in width of shadows cast by different colored light sources. If you've ever used colored lights for decoration, you might have noticed that red lights create a softer, larger shadow effect than blue lights. This difference in size and intensity can help visualize how different wavelengths behave when they go through a narrow opening.
Practical Experiment Environments
Chapter 4 of 5
🔒 Unlock Audio Chapter
Sign up and enroll to access the full audio experience
Chapter Content
With some effort, one can cut a double slit in an aluminium foil with a blade. The bulb filament can be viewed as before to repeat Young’s experiment. In daytime, there is another suitable bright source subtending a small angle at the eye. This is the reflection of the Sun in any shiny convex surface (e.g., a cycle bell). Do not try direct sunlight – it can damage the eye and will not give fringes anyway as the Sun subtends an angle of (1/2)°.
Detailed Explanation
To explore diffraction further, one can create a double slit using a blade to cut slits in aluminum foil. This setup allows you to see what is known as Young's double-slit experiment, which provides clear interference patterns due to the overlapping light waves from the two slits. If you're experimenting in daylight, you can utilize reflections from shiny surfaces, like a bicycle bell, instead of the direct sunlight, which is harmful to the eyes and doesn’t produce a well-defined pattern due to its large angular spread.
Examples & Analogies
Just as a camera can focus on a reflection in a shiny object to capture unique images, you can capture intriguing light effects using reflections without risking eye damage from the sun. This is similar to how we sometimes use filters to manage the light entering a camera to enhance image quality.
Understanding Energy Redistribution
Chapter 5 of 5
🔒 Unlock Audio Chapter
Sign up and enroll to access the full audio experience
Chapter Content
In interference and diffraction, light energy is redistributed. If it reduces in one region, producing a dark fringe, it increases in another region, producing a bright fringe. There is no gain or loss of energy, which is consistent with the principle of conservation of energy.
Detailed Explanation
The process of diffraction is based on the principle of energy conservation. As light passes through the slit, the energy does not disappear; instead, it is redistributed. This means that wherever a dark region appears (a point of destructive interference), the light energy has not been lost but has been shifted to create a bright band elsewhere. This understanding helps reinforce the overarching scientific principle that energy in a closed system is conserved.
Examples & Analogies
Think about how people might rearrange furniture at home. If someone takes up space in one area, another area appears more open. Similarly, with light, as it concentrates in one spot, it inevitably lessens in another, just as moving a couch from one side of the room makes another side feel more spacious.
Key Concepts
-
Diffraction Pattern: The distribution of light intensity resulting from light passing through a single slit and spreading out.
-
Single-Slit Experiment: An experiment that demonstrates the diffraction and interference of light using a single narrow slit.
-
Effect of Wavelength: The observable characteristics of the diffraction pattern vary with the wavelength of the light used.
Examples & Applications
Using two razor blades to create a thin slit in front of a light source allows observing the diffraction pattern.
Applying color filters such as red or blue can enhance the visibility of different fringe patterns.
Memory Aids
Interactive tools to help you remember key concepts
Rhymes
When light does split, don’t get in a fit; through a slit, it bends a bit!
Stories
Imagine two brave blades, standing side by side, helping us see the magical patterns light can provide!
Memory Tools
SLIT: S for Single, L for Light, I for Interference, T for Pattern - remember the steps to see!
Acronyms
BAND
for Bright
for Alternating
for Narrow
for Diffraction - useful for remembering the pattern.
Flash Cards
Glossary
- Diffraction
The bending of waves around the edges of an obstacle or aperture, leading to interference patterns.
- Slit
A narrow opening that allows light to pass through, affecting its direction and intensity.
- Filament
A thin wire in a light bulb that lights up to produce light when electricity passes through.
- Wavelength
The distance between successive peaks of a wave, which affects its diffraction pattern.
Reference links
Supplementary resources to enhance your learning experience.