
Application Demo: Building a Ranging Sensor Kernel Module
Enroll to start learning
You’ve not yet enrolled in this course. Please enroll for free to listen to audio lessons, classroom podcasts and take practice test.
Interactive Audio Lesson
Listen to a student-teacher conversation explaining the topic in a relatable way.
Understanding Ultrasonic Sensors
🔒 Unlock Audio Lesson
Sign up and enroll to listen to this audio lesson

Today, we're learning about ultrasonic sensors, like the HC-SR04. Can anyone explain how these sensors measure distance?

They send sound waves and measure how long it takes for them to bounce back?
Exactly, great job! The time taken by the sound to return is crucial for distance measurement. Does anyone remember the formula to calculate distance?

Distance equals time times the speed of sound divided by two!
Well done! Remember that we divide by two because the sound travels to the obstacle and back. This is key for our module.

What's the speed of sound at room temperature?
Good question! It's approximately 343 meters per second. Let’s keep that in mind for our calculations.
Kernel Module Design
🔒 Unlock Audio Lesson
Sign up and enroll to listen to this audio lesson

Now, let’s talk about how we will design our kernel module. What are the first steps we need to take?

We need to initialize the GPIO pins!
Correct! Initializing the GPIOs is crucial because we need to set up the trigger and echo pins. What’s next after initialization?
Sending a pulse to the trigger pin to start the measurement?
Yes! Creating a pulse prompts the sensor to begin its measurement process. Can anyone summarize the main steps for our module?
Initialize GPIO pins, send the trigger pulse, measure the echo, calculate distance, and provide the data to user space!
Excellent summary! Remember this sequence as we move into writing the actual code.
Writing the Kernel Module Code
🔒 Unlock Audio Lesson
Sign up and enroll to listen to this audio lesson
Let's dive into writing the kernel module code. Can someone tell me what our first task is?
Including the necessary header files!
That's right! We need the appropriate headers for GPIO and kernel module functions. Afterwards, how do we initialize the GPIO pins?
We use `gpio_request` to request the pins and then set their directions.
Exactly! And don’t forget to check if the GPIO pins are valid first. Let’s look at how to measure the distance next.
We send a pulse to the trigger pin and then monitor the echo pin?
Yes! It’s crucial to measure the duration of the echo properly. Can anyone outline the importance of `jiffies` in our code?
Because it helps us track time precisely for how long the echo signal lasts.
Exactly! We use `jiffies` for efficient timing. Lastly, how do we clean up?
By unregistering the device and freeing the GPIO pins.
Well done! Cleaning up is just as important as initialization to prevent resource leaks.
Compiling and Testing the Module
🔒 Unlock Audio Lesson
Sign up and enroll to listen to this audio lesson
Now we move on to compiling and testing our module. Who can explain how we compile it?
We create a Makefile and run the `make` command!
Correct! The Makefile specifies how to build our module. Once we have the `.ko` file, what’s next?
We can load it using `insmod`!
Yes, and how do we check if it loaded correctly?
By checking the kernel logs with `dmesg`.
Exactly! Subsequently, we can create a device file and read the distance by using `cat`. What about unloading the module?
We use `rmmod` to remove it.
Great job, everyone! This process highlights how kernel modules interact with hardware in Linux.
Module Significance and Applications
🔒 Unlock Audio Lesson
Sign up and enroll to listen to this audio lesson
Finally, let’s discuss why creating kernel modules is important. What are some applications of the knowledge we've gained?
We could build drivers for various hardware components in embedded systems!
Excellent point! Kernel modules are essential for hardware interaction. What’s another area where this knowledge applies?
IoT devices! They often require custom drivers to interface sensors and actuators.
Absolutely! This modular approach allows for flexible hardware management. Can anyone think of a challenge this poses?
Kernel programming can be complex and errors might lead to system crashes.
That’s right! It requires careful debugging and testing. Overall, the skills we developed today are foundational for advanced programming in Linux embedded systems.
Introduction & Overview
Read summaries of the section's main ideas at different levels of detail.
Quick Overview
Standard
In this section, we explore how to build a kernel module that interfaces with an ultrasonic ranging sensor, such as the HC-SR04. The module is designed to initialize the sensor, measure the distance based on echo time, and provide this data to user-space applications through device files.
Detailed
Detailed Summary
In this section, we cover the development of a kernel module designed for ultrasonic ranging sensors, particularly the HC-SR04. The section starts with an introduction to the ultrasonic sensor's functionality and the typical GPIO setup used in such applications. It explains how the sensor measures distance by emitting sound waves and timing their return, emphasizing the formula utilized for distance calculation:
Distance = (Time * Speed of Sound) / 2.
The module design steps are laid out, detailing how to initialize GPIO pins, trigger measurements, and expose data to user applications. The programming part includes practical code snippets illustrating the complete life cycle of the module, from initialization to cleanup. Overall, this section provides a comprehensive guide for developers looking to interface with hardware at the kernel level in Linux, demonstrating core concepts of kernel module development.
Youtube Videos


Audio Book
Dive deep into the subject with an immersive audiobook experience.
Introduction to Ranging Sensor Kernel Module
Chapter 1 of 10
🔒 Unlock Audio Chapter
Sign up and enroll to access the full audio experience
Chapter Content
In this chapter, we will demonstrate how to create a kernel module for a ranging sensor (such as an ultrasonic sensor) on a Linux-based embedded system. The ranging sensor is commonly used to measure distances by emitting sound waves and measuring the time it takes for the echo to return. We will build a kernel module that interacts with the sensor hardware, retrieves the distance measurement, and provides an interface for user-space applications to read the sensor data. This chapter will walk through the steps of writing the kernel module, compiling it, and interacting with it from user space.
Detailed Explanation
This chunk introduces the concept of building a kernel module specifically for a ranging sensor, which works by sending out sound waves and measuring how long it takes for the sound to bounce back. The module we will create will manage the communication with the sensor hardware and provide a way for applications running in user space to access the collected distance data. The chapter outlines the steps we'll follow, including writing the module, compiling it, and ensuring user-space interactions.
Examples & Analogies
Think of it like an echo in a canyon. When you shout, your voice travels out, bounces off the walls, and returns to you. The time between shouting and hearing the echo helps you figure out how far away the walls are. Similarly, our system will send out a signal and listen for the echo to calculate the distance to an object.
Overview of Ranging Sensor
Chapter 2 of 10
🔒 Unlock Audio Chapter
Sign up and enroll to access the full audio experience
Chapter Content
For this example, we'll assume that we're working with a commonly used ultrasonic sensor, such as the HC-SR04 sensor, which has:
● Trigger Pin: Sends a pulse to start the measurement.
● Echo Pin: Receives the echo signal and measures the time taken.
The formula to calculate the distance is based on the speed of sound:
Distance = (Time * Speed of Sound) / 2
Where:
● Time is the duration for which the echo pulse is received.
● Speed of Sound is approximately 343 meters per second at room temperature.
In this demo, the kernel module will interact with the sensor's GPIO pins, measure the time for the echo to return, and calculate the distance. The user can then retrieve this data from user space.
Detailed Explanation
In this section, we discuss the specifics of the HC-SR04 ultrasonic sensor, highlighting its two main pins: the trigger pin, which starts the measurement process, and the echo pin, which captures the response. We also outline the methodology used to calculate distance based on how long it takes for the sound to return, incorporating the speed of sound in the calculation. This demonstrates how the kernel module will facilitate communication with the sensor to perform these actions.
Examples & Analogies
Imagine you're playing a game of fetch and you throw a ball down a long hallway. You clap your hands at the end of the hallway, and when the sound of the clap comes back to you, you can use the time it took for the echo to return to estimate how long the hallway is. The sensor operates under the same principle but uses sound instead of your voice and measures the exact time for precise distance calculation.
Design of the Kernel Module
Chapter 3 of 10
🔒 Unlock Audio Chapter
Sign up and enroll to access the full audio experience
Chapter Content
Our kernel module will:
1. Initialize the GPIO pins (trigger and echo).
2. Generate a pulse to trigger the sensor.
3. Measure the echo pulse duration.
4. Calculate the distance based on the time of flight.
5. Provide an interface to read the distance from user space using device files.
Detailed Explanation
Here, we outline the fundamental tasks that our kernel module will perform. First, it will prepare the GPIO pins for communication with the sensor, then it will trigger the sensor to start measuring. Next, it will wait for the echo and calculate how long the echo pulse takes to return. Finally, the module will translate this time into a distance measurement and present it in a way that user-space applications can access, typically via a device file.
Examples & Analogies
Think of this like setting up a movie projector. First, you need to check the power source (initializing the GPIOs), then hit play to start the movie (generate a pulse), listen for the sound (measure the echo), and finally display the scene on screen while providing controls for others to access it (providing access to distance data). Each step needs to be done in sequence for everything to work smoothly.
Writing the Ranging Sensor Kernel Module
Chapter 4 of 10
🔒 Unlock Audio Chapter
Sign up and enroll to access the full audio experience
Chapter Content
The following is an example of a kernel module that interacts with the ranging sensor and exposes the distance data to user space:
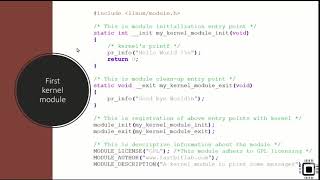
Step 1: Include Necessary Headers
include
include
include
include
include
include
include
define TRIGGER_PIN 17 // GPIO pin for trigger
define ECHO_PIN 27 // GPIO pin for echo
define DEVICE_NAME "ranging_sensor"
// Variables to store device data
static int distance = 0;
static int major_number;
Step 2: Initialize the GPIO pins and Sensor
The module initialization function will configure the GPIO pins and set them up for reading the sensor data.
Detailed Explanation
We begin by including necessary headers that allow us to use functions for kernel module writing. We define the GPIO pins that will be used (trigger and echo), and prepare variables to store distance measurements and the major device number. Following this, we have the initialization function, which is essential for configuring the GPIO pins for interaction with the sensor. This function will ensure the system can correctly manage the hardware resources.
Examples & Analogies
Imagine setting up a new phone. You initialize it (include headers) by selecting your language and connecting to Wi-Fi (defining GPIO pins). Once it's configured, you can start installing and using your apps (sensor data reading). Similar initial setup is crucial for the kernel module before it comes to life and performs measurements.
Measuring the Distance
Chapter 5 of 10
🔒 Unlock Audio Chapter
Sign up and enroll to access the full audio experience
Chapter Content
To measure the distance, the module will send a trigger pulse and wait for the echo response. The gpio_get_value() function will be used to read the state of the echo pin.
static int measure_distance(void) {
int duration;
unsigned long start_time, end_time;
// Send a 10us pulse to the Trigger Pin
gpio_set_value(TRIGGER_PIN, 1);
udelay(10); // 10 microseconds
gpio_set_value(TRIGGER_PIN, 0);
// Wait for the Echo Pin to go high (indicating signal return)
start_time = jiffies;
while (gpio_get_value(ECHO_PIN) == 0) {...}
}
Detailed Explanation
This section describes the distance measurement process in detail. The module sends a short pulse to the trigger pin, which tells the sensor to emit sound waves. Then, the program waits for the echo pin to go high, indicating the sound wave has returned. The time spent waiting provides enough data to calculate how far away the object is based on the speed of sound. This function operates in real-time, giving immediate measurements.
Examples & Analogies
Picture yourself throwing a stone into a pond and waiting for the ripples to come back after hitting the other side. You send out the signal when you throw the stone (sending a pulse) and watch for the ripples (waiting for the echo). By counting how long it takes for the ripples to return, you can estimate how wide the pond is — this is exactly what our module does but with sound instead of stone and water.
Reading Distance from User Space
Chapter 6 of 10
🔒 Unlock Audio Chapter
Sign up and enroll to access the full audio experience
Chapter Content
The module exposes the distance through a device file. The read() system call is overridden to return the measured distance.
static ssize_t device_read(struct file file, char __user buffer, size_t len, loff_t *offset) {
char dist_str[10];
int ret;
// Measure the distance
if (measure_distance() < 0) {...}
}
Detailed Explanation
In this portion, we focus on how the distance measured by the kernel module can be accessed from user-space applications. The device file acts as a bridge between user space and kernel space, allowing the user to read the distance value easily. The overridden read() function handles this request, returning the latest measurement when asked. This effectively makes the distance data available for any application that needs it.
Examples & Analogies
Imagine you have a special mailbox connected to your house that only you can open. When your friend wants to know how far down the street they have to look for a lost ball, they can send a request to open the mailbox (read system call), and your system will provide the answer based on the latest measurements that you collected. That mailbox is like our device file that connects user space to the kernel's method of measuring distances.
Cleaning Up the Module
Chapter 7 of 10
🔒 Unlock Audio Chapter
Sign up and enroll to access the full audio experience
Chapter Content
When the module is removed, we need to free the GPIO pins and unregister the device.
static void __exit sensor_exit(void) {
unregister_chrdev(major_number, DEVICE_NAME); // Unregister device
gpio_free(TRIGGER_PIN); // Free Trigger Pin
gpio_free(ECHO_PIN); // Free Echo Pin
printk(KERN_INFO "Ranging Sensor Kernel Module: Unloaded\n");}
Detailed Explanation
In this final part, we cover the cleanup process when the module is no longer needed. It is crucial to free up hardware resources to avoid conflicts or errors in future operations. This includes unregistering the device from the kernel and releasing the GPIO pins we no longer use. This step ensures that the embedded system remains stable and resources are efficiently managed.
Examples & Analogies
Think of it like wrapping up a party. Once the guests leave, you want to ensure everything is cleaned up — putting away chairs, cleaning up the drinks, and turning off the music. By meticulously handling these tasks, you make sure the house is ready for the next gathering and nothing is left out of place. Similarly, the cleanup removes any clutter left by the module to maintain system integrity.
Compiling and Testing the Module
Chapter 8 of 10
🔒 Unlock Audio Chapter
Sign up and enroll to access the full audio experience
Chapter Content
To compile the kernel module, create a Makefile in the same directory as your source file (sensor.c).
Makefile:
obj-m += sensor.o
all:
make -C /lib/modules/$(shell uname -r)/build M=$(PWD) modules
clean:
make -C /lib/modules/$(shell uname -r)/build M=$(PWD) clean
Run the following command to build the module:
make
Detailed Explanation
This chunk focuses on the compilation process of the kernel module. A Makefile is crucial and defines how to build the module with the kernel's build system. By issuing the 'make' command, we instruct the system to compile our code into a loadable kernel module that can later be inserted into the kernel. The clean rules allow for proper cleanup after builds to maintain an organized codebase without leftover artifacts.
Examples & Analogies
Imagine you’re cooking — you need a recipe (Makefile) to gather your ingredients and follow the steps to put everything together (compile the module). Once the dish is prepared (module compiled), you can serve it up to your guests (load it into the kernel). Cleaning up your kitchen after cooking ensures you’re ready for the next meal, just like using the clean rule keeps the project tidy.
Loading and Testing the Module
Chapter 9 of 10
🔒 Unlock Audio Chapter
Sign up and enroll to access the full audio experience
Chapter Content
Once the module is compiled into a .ko file, you can load and unload the kernel module using the following commands:
Load the Module:
sudo insmod sensor.ko
1. Check Kernel Logs:
dmesg | tail
2. Access the Distance via Device File:
Create a device file to interact with the module:
sudo mknod /dev/ranging_sensor c
3. Read the Distance:
cat /dev/ranging_sensor
4. Unload the Module:
sudo rmmod sensor
Detailed Explanation
To effectively test our kernel module, we need to load it into the kernel after compiling. This process is done using the 'insmod' command, which inserts the module. Checking kernel logs is next to uncover any issues or confirmations of successful loading. After loading, we need to create a device file that interacts with the module, allowing us to read the distance measurements. Finally, we can unload the module once our testing is complete using 'rmmod'. Each step is crucial for testing and ensuring that the module functions as intended.
Examples & Analogies
Loading and testing a kernel module is like launching a new game from your gaming console. First, you insert the game cartridge (load the module), then check for any updates or information (check kernel logs). You create a save file to track your progress (create a device file), enjoy playing the game (reading distance), and when you’re done, you properly exit and remove the game (unload the module) to keep everything ready for next time.
Conclusion of the Application Demo
Chapter 10 of 10
🔒 Unlock Audio Chapter
Sign up and enroll to access the full audio experience
Chapter Content
In this demo, we've created a simple kernel module for an ultrasonic ranging sensor. This kernel module interacts with hardware GPIO pins to trigger the sensor, measure the echo pulse duration, and calculate the distance. It provides an interface for user-space applications to read the distance data via a device file. This example demonstrates how to write kernel modules that interact with hardware in Linux, and how to provide user-space applications with access to kernel-level functionality.
Detailed Explanation
The conclusion summarizes the essential aspects of this chapter, reinforcing that we successfully created a kernel module designed to work with an ultrasonic ranging sensor. We explored the interactions between this module and the underlying hardware while also noting the significance of allowing user-space applications access to the data gathered by the kernel module. Understanding this process showcases how Linux handles device interactions effectively.
Examples & Analogies
Imagine you just completed building a new gadget that can measure distances. Not only does it function well by using sound waves, but you also designed the gadget for others to use easily—like providing them with an intuitive app to access the measurements. This project reflects both innovation in creating a tool and the importance of ensuring others can utilize it successfully.
Key Concepts
-
Kernel Module: A program that extends the functionality of the Linux kernel.
-
GPIO: Pins used for interfacing hardware in embedded systems.
-
Distance Calculation: The process of measuring distance based on sound wave timing.
Examples & Applications
Using the HC-SR04 ultrasonic sensor, when a pulse is sent and the echo returns in 100 microseconds, calculate the distance using the formula: Distance = (100 * 343) / 2, resulting in 17.15 meters.
A simple kernel module that interacts with a LED by turning it on when a pulse is sent to the trigger pin of an ultrasonic sensor.
Memory Aids
Interactive tools to help you remember key concepts
Rhymes
Sound waves commit, to the ADC fit, measure distance oh so neat, and the calculation can't be beat!
Stories
Imagine a brave sound wave, traveling to find an object. It goes out and returns, helping us measure how far away it is.
Memory Tools
Remember the acronym 'TME' - Trigger, Measure, Echo - for the steps in using the sensor.
Acronyms
Use 'DREAM' to remember
Distance = (Time * Speed) / 2.
Flash Cards
Glossary
- Kernel Module
A piece of code that can be loaded into the Linux kernel to extend its functionality.
- GPIO
General Purpose Input/Output; pins on a microcontroller used for interfacing with other devices.
- Echo Pin
The pin used by the sensor to receive the echo signal.
- Trigger Pin
The pin used to initiate the measurement in a ranging sensor.
- Distance Measurement
Calculating the distance based on the time it takes for a sound wave to return.
Reference links
Supplementary resources to enhance your learning experience.