
Kernel Module Design
Enroll to start learning
You’ve not yet enrolled in this course. Please enroll for free to listen to audio lessons, classroom podcasts and take practice test.
Interactive Audio Lesson
Listen to a student-teacher conversation explaining the topic in a relatable way.
GPIO Initialization
🔒 Unlock Audio Lesson
Sign up and enroll to listen to this audio lesson

Let's start our discussion with the first step, which is initializing the GPIO pins. Can anyone tell me why initialization is important?

I think it’s needed to set the pins to know which ones to use for triggering and receiving data.
Exactly! Initializing ensures all pins are correctly set up for their specific roles. Remember, GPIO pins are like our module’s hands, controlling how it interacts with the sensor!

What happens if we don't initialize them properly?
Great question! If they’re not initialized correctly, we could receive inaccurate measurements or even damage our hardware. Always validate your GPIO configurations before moving on!

So, what's next after the initialization?
After initialization, we'll generate a pulse to trigger the sensor. Let's dive into that next.
Pulse Generation
🔒 Unlock Audio Lesson
Sign up and enroll to listen to this audio lesson

Next, we generate a pulse on the trigger pin. Why do you think this pulse is crucial?

Isn’t it what starts the measurement process?
Exactly right! The pulse sends a signal to the sensor to start emitting sound waves. We typically send a short pulse, around 10 microseconds.
How do we know when to stop sending the pulse?
Great point! We set the pulse for a specific duration. Then we reset the pin to low to stop the trigger. This quick action helps the sensor recognize the start of a measurement.
And this is all done in the kernel space, correct?
Yes, that's right! Kernel space is where we directly interact with hardware, ensuring precise control over the GPIO.
Measuring Echo Duration
🔒 Unlock Audio Lesson
Sign up and enroll to listen to this audio lesson
Now we need to measure the echo pulse's duration. Why is that significant?
Because it tells us how long it took for the sound waves to return, which is how we calculate the distance!
Perfect! We use the `gpio_get_value()` function to read the echo pin's status. We can determine the start time when the echo pin goes high and the end time when it goes low.
And we calculate the duration based on those timestamps?
Exactly! This allows us to derive the distance by using the speed of sound in air.
How do we convert the duration to distance?
We divide the measured duration by 58 to convert it to centimeters, as there are 58 microseconds per centimeter for sound in air.
Providing User-space Access
🔒 Unlock Audio Lesson
Sign up and enroll to listen to this audio lesson
Now let's discuss how we can provide the calculated distance to user-space applications. Who can tell me how we do this?
By using a device file, right?
Absolutely! We override the `read()` function in our module, so when a user-space application reads from this device file, it gets the current distance.
Does that mean we have to convert the data to a string format?
Yes, indeed! We typically convert the integer distance into a string before sending it to user space.
What happens if there’s an error during this process?
Good question! It's crucial to handle errors gracefully and return meaningful error codes if measurements fail or copying to user space fails.
Final Steps and Cleanup
🔒 Unlock Audio Lesson
Sign up and enroll to listen to this audio lesson
Finally, let's discuss cleanup. Why is it essential to free resources when our module is removed?
To prevent memory leaks and ensure all allocated resources are properly returned?
Exactly! Leaving resources allocated can lead to system instability and incorrect future measurements.
What specific steps do we take during cleanup?
We unregister the device and free the GPIO pins. This step is fundamental in any kernel module development.
So, we summarize: initialization, triggering, measuring, exposing, and cleaning up?
Correct! Those are the foundational steps of our kernel module design for the ranging sensor.
Introduction & Overview
Read summaries of the section's main ideas at different levels of detail.
Quick Overview
Standard
This section outlines the design steps for a kernel module intended for a ranging sensor, focusing on initializing GPIO pins, sending triggers, measuring echo pulse duration, calculating distance, and providing a user-space interface. It sets the foundation for interaction between the kernel module and the sensor hardware.
Detailed
Detailed Summary of Kernel Module Design
In this section, we dissect the essential components for creating a kernel module for a ranging sensor, such as an ultrasonic sensor.
Key Design Steps:
- GPIO Initialization: We begin with initializing General Purpose Input/Output (GPIO) pins. The trigger pin will initiate the measurement, while the echo pin receives the signal return.
- Pulse Generation: The module generates a pulse on the trigger pin to start the measurement sequence.
- Echo Measurement: It measures the duration of the echo pulse received from the hardware to determine how long it took for the sound wave to return.
- Distance Calculation: Based on the duration of the echo pulse, we calculate the distance using the known speed of sound in air.
- User-space Access: Finally, the kernel module exposes this measurement via a device file, allowing user-space applications to retrieve the data easily.
Significance:
This section is pivotal as it lays out the implementation framework of the kernel module, emphasizing both the technical aspects and user is interaction, bridging the gap between hardware and software. By understanding these steps, developers can effectively create modules that interface with various sensors in Linux-based systems.
Youtube Videos


Audio Book
Dive deep into the subject with an immersive audiobook experience.
Overview of Kernel Module Functionality
Chapter 1 of 5
🔒 Unlock Audio Chapter
Sign up and enroll to access the full audio experience
Chapter Content
Our kernel module will:
1. Initialize the GPIO pins (trigger and echo).
2. Generate a pulse to trigger the sensor.
3. Measure the echo pulse duration.
4. Calculate the distance based on the time of flight.
5. Provide an interface to read the distance from user space using device files.
Detailed Explanation
This chunk provides an overview of the key functionalities that the kernel module will implement. It starts with initializing the GPIO (General Purpose Input/Output) pins needed to interact with the ultrasonic sensor. The trigger pin is used to send a pulse to start the measurement, while the echo pin receives the signal back after the pulse reflects off an object. The process involves measuring how long the echo takes to return, which is used to calculate the distance using the speed of sound. Finally, the module will expose an interface, allowing user-space applications to read the distance data from the sensor via device files.
Examples & Analogies
Think of this as setting up a sonar system for a ship. First, the ship needs to set up its sonar device (initializing the GPIO pins). Then, it sends out a sound signal (generating a pulse). It waits for the signal to bounce back (measuring the echo duration) to determine how far away an object is (calculating distance). Lastly, the ship can communicate this information to the crew (providing a user interface), allowing them to take necessary actions.
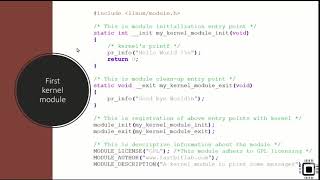
Initialization of GPIO Pins
Chapter 2 of 5
🔒 Unlock Audio Chapter
Sign up and enroll to access the full audio experience
Chapter Content
- Initialize the GPIO pins (trigger and echo).
- Generate a pulse to trigger the sensor.
Detailed Explanation
The initial step of the kernel module is to configure the GPIO pins. This includes checking if the pins assigned for triggering and receiving the echo are valid, requesting their use, and setting one pin as an output (for sending the pulse) and the other as an input (for receiving the echo signal). This setup is crucial as it ensures the module can properly communicate with the sensor.
Examples & Analogies
Imagine preparing a walkie-talkie for a conversation. First, you need to check if both devices are charged and working (initializing the GPIO pins). Next, you press the button (generate a pulse) to transmit your message, and you’ll listen for the response on the other end. If one device isn’t set up correctly, the conversation won’t work.
Measuring Echo Duration
Chapter 3 of 5
🔒 Unlock Audio Chapter
Sign up and enroll to access the full audio experience
Chapter Content
- Measure the echo pulse duration.
Detailed Explanation
After triggering the sensor, the module must accurately measure the duration of the echo pulse that comes back. This is done by starting a timer when the echo pin goes high and stopping it when it goes low again. The duration between these two events is essential for calculating the distance since it indicates how long the sound traveled to the object and back.
Examples & Analogies
This process can be compared to timing a football throw. When you throw a ball, you note the moment it leaves your hand (triggering) and the moment it hits the ground (echo). The total time it was in the air helps you understand how far it traveled. In our case, the sound wave's travel time tells us the distance to the nearest object.
Calculating Distance
Chapter 4 of 5
🔒 Unlock Audio Chapter
Sign up and enroll to access the full audio experience
Chapter Content
- Calculate the distance based on the time of flight.
Detailed Explanation
Once the duration of the echo pulse is measured, this time is used to calculate the distance. Since the sound has to travel to the object and back, the formula used divides the total time by two and then converts it into distance using the speed of sound. The result is the distance to the object in centimeters.
Examples & Analogies
Continuing with the earlier example, when timing the football throw, you realize that the speed of the ball (or sound in this case) matters. If the ball took 2 seconds to hit the ground, you would use that time to estimate its flight distance based on your throwing speed. Here, we're using the time it took for the echo to determine how far away an object is.
User Space Interface
Chapter 5 of 5
🔒 Unlock Audio Chapter
Sign up and enroll to access the full audio experience
Chapter Content
- Provide an interface to read the distance from user space using device files.
Detailed Explanation
Finally, the distance measured is made accessible to user-space applications through a special device file. This file allows users to read the data generated by the kernel module, enabling them to use it in their applications or for further processing. This interface is essential for interacting with the kernel module from the user level.
Examples & Analogies
This is like a radio station that broadcasts weather data. While the meteorologists gather data (the kernel module processing distance), the listeners receive and interpret that data through their radios (user-space applications accessing device files). The device file is essentially a ‘radio station’ that transmits the distance information to interested applications.
Key Concepts
-
GPIO Initialization: Setting up pins to interact with external components.
-
Trigger Pulse: A short signal sent to start distance measurement.
-
Echo Measurement: Timing how long an echo signal takes to return.
-
Distance Calculation: Deriving distance using the time of flight.
-
User-space Access: Providing distance data to applications through device files.
Examples & Applications
The HC-SR04 ultrasonic sensor uses GPIO pins, one to send a trigger pulse and the other to receive the echo return.
Calculating the distance involves measuring the time it takes for the echo pulse to return and converting that time into a distance value.
Memory Aids
Interactive tools to help you remember key concepts
Rhymes
Trigger beats, echo completes, distance gained, knowledge sustained.
Stories
Imagine sending a sound wave on a journey; it travels out and comes back. To know how far it went, you just measure how long it took. That’s the essence of using an ultrasonic sensor!
Memory Tools
TIP - Trigger, Intensity (measure), Provide (data to user).
Acronyms
GPI - GPIO Pin Initialization.
Flash Cards
Glossary
- GPIO
General Purpose Input/Output - pins on a microcontroller used for interfacing with the hardware.
- Echo Pulse
The signal returned from a ranging sensor after emitting a sound wave.
- Trigger Pin
The GPIO pin used to initiate the measurement by sending a pulse.
- Distance Measurement
The calculated distance based on the duration of the echo pulse.
- Userspace Application
An application running outside the kernel that interacts with the kernel module.
Reference links
Supplementary resources to enhance your learning experience.