
Image Formation in Lenses Using Ray Diagrams
Enroll to start learning
You’ve not yet enrolled in this course. Please enroll for free to listen to audio lessons, classroom podcasts and take practice test.
Interactive Audio Lesson
Listen to a student-teacher conversation explaining the topic in a relatable way.
Introduction to Ray Diagrams in Lenses
🔒 Unlock Audio Lesson
Sign up and enroll to listen to this audio lesson

Today, we’re going to discuss ray diagrams, especially how they relate to lenses. Can anyone tell me what a ray diagram is?

Isn't it a visual way to show how light rays travel?
Exactly! Ray diagrams help us understand how light behaves as it travels through lenses. Now, what types of lenses can you think of?

Convex and concave lenses.
That's right! We’ll start with the convex lens. Can anyone recall what happens to parallel rays of light passing through a convex lens?

They converge!
Correct! They meet at the focal point on the opposite side of the lens. This is a key concept in understanding image formation using ray diagrams. Remember: Convex lenses converge light—think 'C for Converging!'

So, where is this focal point located?
Good question! The focal point is at a distance 'f' from the lens. In our discussions, we'll use the sign convention for distances. Now, let's summarize—Convex lenses converge parallel rays at the focal point.
Image Characteristics for Convex Lenses
🔒 Unlock Audio Lesson
Sign up and enroll to listen to this audio lesson

Now that we understand the basic properties of a convex lens, what do you think happens if we move the object closer or further away from the lens?
I think the image size changes?
Exactly! As the object moves relative to the focal point, the size, position, and nature of the image change. For instance, at infinity, the image is highly diminished and real, while between F and 2F, it's enlarged and real. Remember the acronym REA—Real, Enlarged, and also inverted images!
And is the image virtual at any point?
Good point! A convex lens only forms a virtual image when the object is placed within the focal length. Let’s summarize: Convex lenses produce real images when the object is outside the focal point, and virtual images when inside.
Exploring Concave Lenses
🔒 Unlock Audio Lesson
Sign up and enroll to listen to this audio lesson
Switching gears, let’s talk about concave lenses. What’s the first thing that comes to mind about them?
They diverge light, right?
Correct! Concave lenses diverge parallel rays of light, making them appear to originate from a virtual focal point on the same side as the object. Can someone explain what images are formed by concave lenses?
They create virtual images that are upright and diminished.
Exactly! Always remember, concave lenses create virtual images at any object distance other than at infinity. Does anyone recall the mnemonic for this?
VUD—Virtual, Upright, Diminished!
Perfect! Let’s summarize: Concave lenses always produce virtual, erect, and diminished images.
Summarizing Ray Diagrams
🔒 Unlock Audio Lesson
Sign up and enroll to listen to this audio lesson
Now that we’ve discussed both types of lenses, let’s recap how to draw ray diagrams for each. What are the steps?
We need to draw three main rays for the lens!
Correct! For a convex lens, we can draw a ray parallel to the principal axis, one through the focal point, and one through the optical center. What about for concave lenses?
For the concave lens, the parallel ray appears to diverge from the focal point on the same side.
Exactly! Additionally, rays through the optical center in both types of lenses will pass straight through. Remember the acronym 'PFO'—Parallel, Focal, Optical center!
Are those rays all we need for the diagram?
Yes! These are essential for locating the image and understanding its characteristics. Let’s summarize one last time: Ray diagrams can effectively show image formation based on object placement in relation to the lens.
Introduction & Overview
Read summaries of the section's main ideas at different levels of detail.
Quick Overview
Standard
It explains the principles of image formation using ray diagrams for both convex and concave lenses, detailing the behavior of light rays as they refract through these lenses. The section covers classes of images formed – real and virtual – depending on the position of the object relative to the lens.
Detailed
In this section, we explore the method of using ray diagrams to illustrate how lenses form images. A lens, either convex (converging) or concave (diverging), alters the path of light rays passing through it, creating images with varying characteristics based on the object’s position relative to the lens. For convex lenses, rays parallel to the principal axis converge at the focal point on the opposite side after refraction, whereas, in concave lenses, they appear to diverge from a virtual focal point on the same side. The distinction between real and virtual images is emphasized, with real images formed on the opposite side of the lens and virtual images appearing on the same side. Understanding these concepts is essential for optical applications and clarifies the mechanics behind various lens-driven devices.
Youtube Videos


Audio Book
Dive deep into the subject with an immersive audiobook experience.
Introduction to Ray Diagrams
Chapter 1 of 5
🔒 Unlock Audio Chapter
Sign up and enroll to access the full audio experience
Chapter Content
We can represent image formation by lenses using ray diagrams. Ray diagrams will also help us to study the nature, position and relative size of the image formed by lenses.
Detailed Explanation
Ray diagrams are visual tools that illustrate how light rays behave when they pass through lenses. These diagrams help us understand how images are formed by different lenses based on the light paths. By drawing these diagrams, we can clearly see how the position of the object influences the position and nature of the resulting image.
Examples & Analogies
Imagine using a magnifying glass to read tiny text. The way you position the magnifying glass over the text can change how big or clear the letters look. A ray diagram would be like a map showing how you can adjust the lens to get the best view.
Light Rays and Convex Lens Interaction
Chapter 2 of 5
🔒 Unlock Audio Chapter
Sign up and enroll to access the full audio experience
Chapter Content
A ray of light from the object, parallel to the principal axis, after refraction from a convex lens, passes through the principal focus on the other side of the lens.
Detailed Explanation
For a convex lens, rays of light that approach the lens parallel to its principal axis are refracted as they pass through the lens. After refraction, these rays converge at a single point on the other side of the lens known as the principal focus. This shows how convex lenses can concentrate light and form images.
Examples & Analogies
Think of sunlight shining through a magnifying glass onto a piece of paper. The rays of sunlight that come in parallel to the lens focus at a point where the paper begins to burn, demonstrating how the lens transforms the light's path.
Light Rays and Concave Lens Interaction
Chapter 3 of 5
🔒 Unlock Audio Chapter
Sign up and enroll to access the full audio experience
Chapter Content
In case of a concave lens, the ray appears to diverge from the principal focus located on the same side of the lens.
Detailed Explanation
For a concave lens, when parallel rays of light hit the lens, they are diverged. This means the light rays appear to come from a point behind the lens called the principal focus, even though they never actually converge there. This is characteristic of concave lenses, which always produce virtual images.
Examples & Analogies
Imagine standing in front of a funhouse mirror that curves inward. When you look at your reflection, it appears distorted and stretched. Similarly, a concave lens creates images that seem to come from a virtual point behind the lens.
Ray Diagrams for Image Formation
Chapter 4 of 5
🔒 Unlock Audio Chapter
Sign up and enroll to access the full audio experience
Chapter Content
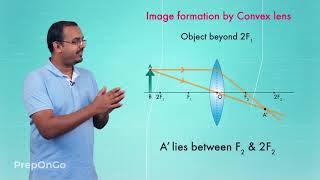
The ray diagrams for the image formation in a convex lens for a few positions of the object are shown in Fig. 9.16.
Detailed Explanation
Ray diagrams can be drawn for different positions of objects relative to the lens. For example, if the object is placed at a distance greater than twice the focal length from a convex lens, the image formed is real, inverted, and smaller than the object. These diagrams help visualize how the image changes with different object placements.
Examples & Analogies
Consider a projector working with a film slide. Depending on where you place the slide in relation to the lens, the projected image will either be small or large, clear or blurry. Each positioning corresponds to a specific ray diagram showing the behavior of light through the lens.
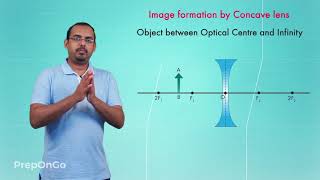
Concave Lens Image Formation
Chapter 5 of 5
🔒 Unlock Audio Chapter
Sign up and enroll to access the full audio experience
Chapter Content
The ray diagrams representing the image formation in a concave lens for various positions of the object are shown in Fig. 9.17.
Detailed Explanation
In contrast to convex lenses, ray diagrams for concave lenses show that the images are always virtual, erect, and diminished regardless of the object's position. Understanding these diagrams clarifies how concave lenses consistently behave.
Examples & Analogies
Using a concave lens in eyeglasses is similar to using a rearview mirror. Both provide a clear view of larger spaces or objects close by while objects far away appear smaller. Just as the rearview mirror gives a broader perspective, a concave lens helps us focus on nearby objects.
Key Concepts
-
Ray Diagrams: Visual tools used to represent the paths of rays through lenses.
-
Convex Lens: Converging lens that focuses rays to a point.
-
Concave Lens: Diverging lens that makes rays appear to emanate from a point.
-
Focal Point: The point where light rays converge or appear to diverge.
-
Real Image: Formed on the opposite side of the lens from the object.
-
Virtual Image: Formed on the same side of the lens as the object.
Examples & Applications
When a convex lens is used to project the image of a distant tree, the rays converge at the focal point, resulting in a real and inverted image.
Using a concave lens, an object held close will result in a virtual image that is upright and diminished, appearing behind the lens.
Memory Aids
Interactive tools to help you remember key concepts
Rhymes
Lights converge in a convex beam, virtual in concave, that's our theme.
Stories
Imagine having a magic lens that shows you a beautiful garden. If it’s convex, you'll see flowers in detail; if concave, just a whiff of their beauty from close up.
Memory Tools
VUD for the images of concave lenses: Virtual, Upright, Diminished!
Acronyms
R.E.A for convex images
Real
Enlarged
and Inverted!
Flash Cards
Glossary
- Convex Lens
A lens that converges incoming light rays to a point called the focus.
- Concave Lens
A lens that diverges incoming light rays, causing them to appear to originate from a virtual focal point.
- Focal Point
The point where converging light rays meet after passing through a lens.
- Ray Diagram
A graphical representation of the paths taken by light rays to show how images are formed.
- Virtual Image
An image that cannot be projected onto a screen because it appears to originate from a point behind the lens.
- Real Image
An image that can be projected onto a screen because it is formed on the opposite side of the lens from the object.
Reference links
Supplementary resources to enhance your learning experience.