
Representation of Images Formed by Spherical Mirrors Using Ray Diagrams
Enroll to start learning
You’ve not yet enrolled in this course. Please enroll for free to listen to audio lessons, classroom podcasts and take practice test.
Introduction & Overview
Read summaries of the section's main ideas at different levels of detail.
Quick Overview
Standard
Focusing on the formation of images by spherical mirrors, this section explains the significance of ray diagrams in locating the image of an object. It details different types of rays used in ray diagrams for concave and convex mirrors, emphasizing the intersection of reflected rays to determine image positions and characteristics.
Detailed
Representation of Images Formed by Spherical Mirrors Using Ray Diagrams
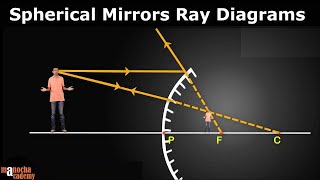
In this section, we explore how spherical mirrors create images and represent this process with ray diagrams. An extended object placed in front of the spherical mirror emits an infinite number of rays. However, to simplify the analysis, we consider only two specific rays for clarity. Each type of ray behaves differently when interacting with concave or convex mirrors, making the understanding of reflections essential:
- Parallel Ray: A ray directed parallel to the principal axis reflects through (or appears to diverge from) the principal focus (
F), for both concave and convex mirrors, respectively. - Focal Ray: A ray passing through the principal focus emerges parallel to the principal axis after reflection.
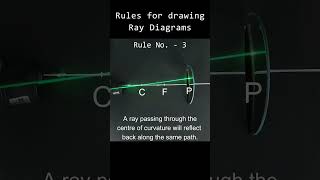
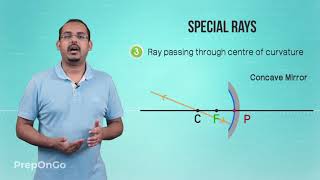
- Centre Ray: A ray directed at the center of curvature reflects back along the same path.
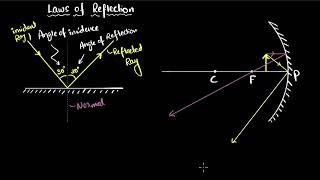
- Oblique Ray: An obliquely incident ray reflects off the mirror, following the laws of reflection.
Recognizing these behaviors allows us to construct ray diagrams that efficiently depict the nature, position, and size of the image formed by the mirrors. This section underscores the importance of these diagrams in visualizing light behavior and enhances our understanding of optical phenomena.
Youtube Videos


Audio Book
Dive deep into the subject with an immersive audiobook experience.
Introduction to Ray Diagrams
Chapter 1 of 3
🔒 Unlock Audio Chapter
Sign up and enroll to access the full audio experience
Chapter Content
We can also study the formation of images by spherical mirrors by drawing ray diagrams. Consider an extended object, of finite size, placed in front of a spherical mirror. Each small portion of the extended object acts like a point source. An infinite number of rays originate from each of these points.
Detailed Explanation
In our study of image formation by spherical mirrors, we use ray diagrams as a visual aid. When dealing with an extended object, such as a tree or a building, think of it as being made up of many tiny points. Each point emits light rays that will contribute to the image formed by the mirror. However, instead of drawing all possible light rays for clarity, we typically focus on just a few key rays that make it easier to determine the image's location.
Examples & Analogies
Imagine a city skyline viewed in a curved mirror. The reflection you see combines many smaller images from various points of the skyline, but to explain the reflection, we only track a couple of key rays to understand where they go after bouncing off the mirror.
Key Rays for Image Formation
Chapter 2 of 3
🔒 Unlock Audio Chapter
Sign up and enroll to access the full audio experience
Chapter Content
To construct the ray diagrams, in order to locate the image of an object, an arbitrarily large number of rays emanating from a point could be considered. However, it is more convenient to consider only two rays, for the sake of clarity of the ray diagram. These rays are so chosen that it is easy to know their directions after reflection from the mirror.
Detailed Explanation
To make ray diagrams effective, we focus on two specific rays after considering that a large number of rays could emerge from any point of the object. The two rays selected simplify the process: one ray travels parallel to the principal axis and the other passes through the principal focus. The use of these two rays allows us to easily see where they intersect and thus locate the image formed by the spherical mirror.
Examples & Analogies
Think of it as using two main paths to find your way through a forest. If you choose only the most prominent trails (the key rays), it becomes easier to navigate and reach your destination (the image location) without getting lost in the countless smaller paths.
Types of Rays for Concave Mirrors
Chapter 3 of 3
🔒 Unlock Audio Chapter
Sign up and enroll to access the full audio experience
Chapter Content
The intersection of at least two reflected rays gives the position of the image of the point object. Any two of the following rays can be considered for locating the image.
(i) A ray parallel to the principal axis, after reflection, will pass through the principal focus in case of a concave mirror or appear to diverge from the principal focus in case of a convex mirror.
(ii) A ray passing through the principal focus of a concave mirror or a ray which is directed towards the principal focus of a convex mirror, after reflection, will emerge parallel to the principal axis.
(iii) A ray passing through the centre of curvature of a concave mirror or directed in the direction of the centre of curvature of a convex mirror, after reflection, is reflected back along the same path.
(iv) A ray incident obliquely to the principal axis, towards a point P (pole of the mirror), on the concave mirror or a convex mirror, is reflected obliquely.
Detailed Explanation
Understanding how different rays behave when they hit the mirror is crucial for using ray diagrams to find images. For a concave mirror:
1. Rays parallel to the principal axis reflect through the focal point.
2. Rays through the focus emerge parallel to the axis.
3. Rays going through the center of curvature reflect back on themselves.
4. Rays hitting the mirror at an angle reflect off according to the angle of incidence.
This knowledge allows us to predict the image's position, size, and nature based on the object's location relative to the mirror.
Examples & Analogies
Imagine throwing a frisbee: if you throw it straight (parallel to the axis), it will curve to a specific spot (focus). If you throw it towards a target directly (focus), it flies straight out! Adjusting your throw angle (obliquely) changes how far or in what direction the frisbee will go, much like how the reflected rays behave with the mirror.
Examples & Applications
When drawing a ray diagram for a concave mirror with the object located beyond C, the image formed is real, inverted, and smaller.
For a convex mirror, regardless of where the object is located, the image produced is always virtual, erect, and diminished.