
Photogrammetric Terminology
Enroll to start learning
You’ve not yet enrolled in this course. Please enroll for free to listen to audio lessons, classroom podcasts and take practice test.
Interactive Audio Lesson
Listen to a student-teacher conversation explaining the topic in a relatable way.
Understanding Principal and Nadir Points
🔒 Unlock Audio Lesson
Sign up and enroll to listen to this audio lesson

Today's lesson is centered around two key concepts in photogrammetry: the principal point and the nadir point. Can anyone tell me what the principal point is?

Is it where the optical axis intersects the image plane?
Exactly! This intersection is critical when we analyze photographs for measurements. Now, what about the nadir point? Student_2, can you clarify?

I think it’s the point directly below the camera at exposure time?
Correct! The nadir point helps us understand the camera's perspective relative to the ground. Let's remember this: ‘Nadir = below’ - a simple mnemonic!

How do these points help with the overall imaging process?
Both points are essential for accurate geometric measurements in photogrammetry. The principal point serves as a reference, and knowing the nadir point helps to correct distortions in images.
To recap, we learned that the principal point is where the optical axis intersects the image plane, and the nadir point is directly beneath the camera. Great work today!
Flight Lines and Overlap
🔒 Unlock Audio Lesson
Sign up and enroll to listen to this audio lesson

Next, let's explore flight lines and their importance in aerial photogrammetry. What do we mean by a flight line?
Is it the path taken by the aircraft while taking pictures?
Exactly! Images must be captured along these lines at intervals. Why do we need overlap in these images? Student_4?

To have enough data for 3D modeling, right?
Right again! Forward overlap is usually 60-70%, while side overlap is 20-30%. Remembering these numbers can be tricky. How about using the phrase ‘60 forward, 20 side’ as a simple rhyme to help recall?
That’s a good trick! So, without enough overlap, we might miss important spatial information?
Exactly! Let's summarize: Flight lines direct the path of aerial imagery capture, while overlap is crucial for accurate modeling. Excellent participation today!
Isocenter and Its Significance
🔒 Unlock Audio Lesson
Sign up and enroll to listen to this audio lesson
Now we will discuss the isocenter. Can anyone share what the isocenter represents?
Is it the midpoint between the principal point and the nadir?
That's correct! The isocenter helps in mapping because it indicates where we should expect our camera distance from ground features. Why is this important, Student_1?
It probably helps in making accurate measurements by providing a reference point?
Exactly! Using the isocenter allows us to minimize distortion in our images. A quick way to recall this is ‘Isocenter = Mid’ - it's the middle point!
How do we apply this concept practically?
In photogrammetry mapping, the isocenter assists in achieving proper scale and alignment during the processing. Remember this, and you will master photogrammetry terms in no time! Great class today!
Introduction & Overview
Read summaries of the section's main ideas at different levels of detail.
Quick Overview
Standard
Photogrammetric Terminology outlines key terms such as Principal Point, Nadir Point, Isocenter, Flight Line, and Overlap. These concepts are crucial for comprehending photogrammetry, especially for applications in mapping and measurement.
Detailed
Photogrammetric Terminology
Photogrammetry utilizes specific terminology to convey key concepts essential for understanding the discipline. This section defines several significant terms:
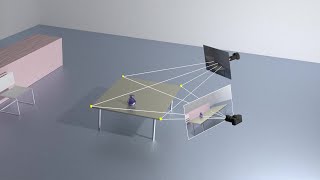
- Principal Point (P): The intersection of the optical axis and the image plane, crucial for understanding image geometry.
- Nadir Point: Located directly beneath the camera during exposure, it's essential for orientation tasks.
- Isocenter: The midpoint between the principal point and the nadir point, useful in determining camera perspective.
- Flight Line: The planned path of an aerial vehicle for capturing images, vital for systematic data collection.
- Overlap: Critical in stereoscopic vision, specifying how much images overlap during capture.
- Forward Overlap: Typically 60-70%, important for 3D reconstruction.
- Side Overlap: Around 20-30%, essential for ensuring continuous image coverage.
These definitions are foundational for further study in photogrammetry and underscore the significance of precise language in the field.
Youtube Videos


![[What is? #1] What is photogrammetry?](https://img.youtube.com/vi/ljGzuY6tfzk/mqdefault.jpg)
Audio Book
Dive deep into the subject with an immersive audiobook experience.
Principal Point (P)
Chapter 1 of 5
🔒 Unlock Audio Chapter
Sign up and enroll to access the full audio experience
Chapter Content
• Principal Point (P): The intersection of the optical axis with the image plane.
Detailed Explanation
The Principal Point (P) is a crucial concept in photogrammetry. It represents the point where the optical axis of the camera intersects with the image plane. In simpler terms, it's the center point on the photograph where the camera focused directly during the exposure. Understanding where this point is located helps in accurately mapping and interpreting the captured images, especially when creating 3D models from 2D images.
Examples & Analogies
Think of the Principal Point as the bullseye on a dartboard. Just as hitting the bullseye indicates precision, identifying the Principal Point ensures that the most important details in an image are captured clearly and accurately.
Nadir Point
Chapter 2 of 5
🔒 Unlock Audio Chapter
Sign up and enroll to access the full audio experience
Chapter Content
• Nadir Point: The point directly beneath the camera at the time of exposure.
Detailed Explanation
The Nadir Point is the exact point on the ground that lies directly below the camera when a photograph is taken. It serves as a reference point to understand the vertical alignment of the photograph relative to the ground. Recognizing the Nadir Point is essential for mapping applications and for understanding how the terrain appears in the captured image. Accurate identification of this point aids in creating topographic maps and conducting surveys.
Examples & Analogies
Imagine dropping a pebble straight down while standing on a tall building; the point where the pebble hits the ground is like the Nadir Point. In aerial photography, knowing this point helps in using the image effectively, just as knowing where your pebble landed helps you understand the height of the building.
Isocenter
Chapter 3 of 5
🔒 Unlock Audio Chapter
Sign up and enroll to access the full audio experience
Chapter Content
• Isocenter: Midpoint between principal point and nadir.
Detailed Explanation
The Isocenter is defined as the midpoint between the Principal Point and the Nadir Point. This point is significant in photogrammetry as it can assist in measurements and calculations involving image perspective and distortions. Understanding the Isocenter also helps in interpreting the spatial relationships within the captured images, particularly when creating models and studies involving height and elevation.
Examples & Analogies
Consider the Isocenter as the middle of a seesaw. Just as the middle point is crucial for achieving balance between two sides, the Isocenter provides an essential reference for balancing measurements and interpretations in photogrammetry.
Flight Line
Chapter 4 of 5
🔒 Unlock Audio Chapter
Sign up and enroll to access the full audio experience
Chapter Content
• Flight Line: Path followed by the aircraft; images are taken at equal intervals along it.
Detailed Explanation
The Flight Line refers to the specific path or route that an aircraft follows while capturing images from the air. This path is critical for photogrammetric projects to ensure that images are taken in a systematic manner, allowing for proper overlap and quality in the resultant photographs. Understanding the concept of Flight Lines is important in planning aerial surveys, as it influences coverage and the quality of data captured.
Examples & Analogies
Think of the Flight Line as a train track; just as trains follow tracks to reach their destination efficiently, aircraft follow Flight Lines to ensure they cover the area of interest effectively, capturing all necessary images for analysis.
Overlap
Chapter 5 of 5
🔒 Unlock Audio Chapter
Sign up and enroll to access the full audio experience
Chapter Content
• Overlap: Required for stereoscopic vision.
– Forward Overlap: 60–70%
– Side Overlap: 20–30%
Detailed Explanation
Overlap in photogrammetry is vital for creating stereoscopic images, which are essential for generating 3D representations. Forward Overlap refers to the shared imagery between sequential photos taken by the aircraft, ideally ranging from 60% to 70%. Side Overlap is the percentage of overlap between adjacent flight lines, which should ideally be between 20% to 30%. This overlap ensures that there is sufficient information to generate accurate 3D models and helps in minimizing gaps in the spatial data.
Examples & Analogies
Consider overlapping images to be like puzzle pieces; when pieces overlap just right, they create a complete picture. Just like a puzzle reveals its whole image with each piece connected, in aerial photography, overlap allows us to piece together an accurate 3D model of the terrain.
Key Concepts
-
Principal Point: A crucial point where the optical axis intersects the image plane.
-
Nadir Point: The point directly under the camera, critical for spatial orientation.
-
Isocenter: Midpoint used for understanding camera perspective.
-
Flight Line: The predetermined path for aerial imagery capture.
-
Overlap: Essential for ensuring exploratory depth in captured images.
Examples & Applications
The Principal Point is used in calculating the distortions while mapping a building from captured aerial images.
Understanding the Nadir Point helps correct the image perspective when creating 3D models from 2D photographs.
Memory Aids
Interactive tools to help you remember key concepts
Rhymes
To find the place, where light will trace, the principal point's your space!
Stories
Imagine a drone flying above a landscape, its camera directly aiming down. The point right below it is the nadir, and half-way to the horizon from that point is where the isocenter lies.
Memory Tools
P.N.I.F.O - Principal, Nadir, Isocenter, Flight line, Overlap - remember this order for key terms!
Acronyms
N.P.I.F - Nadir, Principal, Isocenter, Flight line - Helpful for recalling important photogrammetric terms!
Flash Cards
Glossary
- Principal Point (P)
The intersection of the optical axis with the image plane, crucial in image geometry.
- Nadir Point
The point directly beneath the camera at the time of exposure.
- Isocenter
Midpoint between the principal point and nadir, used for determining camera perspective.
- Flight Line
Path followed by the aircraft; images are taken at equal intervals along this path.
- Overlap
The required image overlap for stereoscopic vision, critical for accurate depth perception.
Reference links
Supplementary resources to enhance your learning experience.