
Synthesis and Implementation
Enroll to start learning
You’ve not yet enrolled in this course. Please enroll for free to listen to audio lessons, classroom podcasts and take practice test.
Interactive Audio Lesson
Listen to a student-teacher conversation explaining the topic in a relatable way.
Introduction to Synthesis
🔒 Unlock Audio Lesson
Sign up and enroll to listen to this audio lesson

Today, we'll focus on the synthesis process in FPGA design. Can anyone tell me what synthesis means?

Isn't it where we convert our design into a netlist?
Exactly! Synthesis translates our VHDL or Verilog code into a netlist of logical gates and components. This is crucial because it's the first step where our design becomes a functional system. Remember the acronym ‘SYNTH’: Synthesis Yields Netlist To Hardware.

What tools do we use for this?
Great question! Common tools are Vivado from Xilinx and Quartus from Intel. They take care of converting the code to a netlist.
Implementation Process
🔒 Unlock Audio Lesson
Sign up and enroll to listen to this audio lesson

After synthesis, we move to implementation. Who can summarize what this stage involves?

It's where we place and route the circuit on the FPGA?
Spot on! The implementation phase ensures our design is optimally placed within the FPGA's architecture and that the routing between components adheres to timing and resource constraints. Can anyone think of why proper placement is vital?

It affects the speed and functionality of the FPGA system, right?
Exactly! Proper placement and routing can significantly enhance performance.
Verifying Implementation
🔒 Unlock Audio Lesson
Sign up and enroll to listen to this audio lesson
Verification is an ongoing process. Can anyone explain what we should check after implementing our design onto the FPGA?
We need to ensure it works as intended and adheres to all timing constraints.
Right! Post-implementation, we should test our system in real-world conditions to verify that it still functions correctly. Always remember, verification is key—think of the acronym ‘TEST’: Thorough Evaluation Saves Time.
Introduction & Overview
Read summaries of the section's main ideas at different levels of detail.
Quick Overview
Standard
The synthesis and implementation phase is critical in the FPGA design flow, where hardware descriptions are transformed into netlists that define the configuration of logical components on the FPGA.
Detailed
Synthesis and Implementation
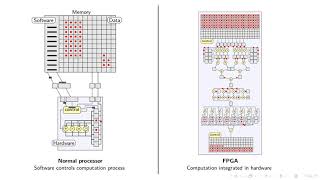
In this section, we delve into the critical phase of synthesis and implementation within the FPGA design flow. After successfully simulating the digital circuit to verify its functionality, the next step is synthesis. This process involves using synthesis tools, such as Vivado (Xilinx) or Quartus (Intel), to convert the hardware description—written in VHDL or Verilog—into a netlist of logical elements that represent the design. The netlist consists of gates and components that will be utilized in the FPGA architecture.
Once the synthesis is complete, the next step is implementation, which includes placement and routing of the circuit on the FPGA. During this stage, the tool ensures that the design is correctly placed in available FPGA resources and that routing is established between components while adhering to timing constraints and resource limits. The effectiveness of this stage directly impacts the performance and functionality of the implemented FPGA systems, making understanding synthesis and implementation essential for aspiring FPGA designers.
Youtube Videos

Audio Book
Dive deep into the subject with an immersive audiobook experience.
Overview of Synthesis
Chapter 1 of 3
🔒 Unlock Audio Chapter
Sign up and enroll to access the full audio experience
Chapter Content
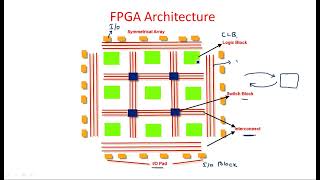
After successfully simulating the design and ensuring its correctness, the next step is synthesis. The synthesis tool converts the hardware description into a netlist, mapping the design onto the FPGA's resources (logic blocks, I/O, etc.).
Detailed Explanation
Synthesis is a crucial process in digital design. After you have written your code and tested it through simulation, synthesis translates your design into a structure that the FPGA can understand. This involves converting the high-level code into a netlist, which is a collection of the logic gates and connections needed to implement your design. Think of synthesis as transforming a recipe into an organized list of ingredients and instructions that can be physically assembled in the kitchen.
Examples & Analogies
Imagine you wrote a detailed recipe for baking a cake. Before baking, you need to gather all the ingredients (like flour, eggs, and sugar) and organize them. Synthesis is like the step where you translate the recipe into a list of these ingredients, ready for the baking process.
Tools Used in Synthesis
Chapter 2 of 3
🔒 Unlock Audio Chapter
Sign up and enroll to access the full audio experience
Chapter Content
● Synthesis Tools: Vivado (Xilinx), Quartus (Intel), or other FPGA vendor-specific tools.
Detailed Explanation
Various tools are available to perform synthesis for FPGA designs. Vivado, created by Xilinx, is commonly used for Xilinx FPGAs, while Quartus is designed for Intel FPGAs. These tools not only assist in synthesis but also provide functionalities for simulation and implementation. Essentially, they are the workstations where you conduct all necessary operations to prepare your FPGA for real-world applications.
Examples & Analogies
Consider these tools like different kitchen appliances. Vivado is like a high-end oven that specializes in baking recipes specific to a certain style of cooking (Xilinx), while Quartus is a versatile oven suitable for a broader range of culinary tasks (Intel). Both ovens can produce excellent results, but their specialties differ.
Implementation Process
Chapter 3 of 3
🔒 Unlock Audio Chapter
Sign up and enroll to access the full audio experience
Chapter Content
● Implementation: The synthesis tool performs placement and routing of the design, ensuring that the logic is correctly mapped to the FPGA.
Detailed Explanation
Once the design is synthesized into a netlist, the implementation process begins. This step involves two main activities: placement and routing. Placement determines where each logic block will reside on the FPGA, while routing decides how these blocks connect to each other. This is akin to constructing a circuit on a physical board, where you must decide the physical location of each component and how they connect to form a functioning circuit.
Examples & Analogies
Think of implementation like setting up a large exhibition. First, you decide which exhibits (logic blocks) go where in the exhibition hall (FPGA). Then, you arrange the pathways (routing) that visitors (signals) will take to move between exhibits. A well-planned exhibition ensures that visitors can easily explore all the exhibits without confusion.
Key Concepts
-
Synthesis: The process of transforming HDL code into a netlist.
-
Netlist: A list of components and their connections representing a digital circuit.
-
Implementation: The process of physically mapping the synthesized design onto the FPGA.
-
Placement: Assigning components to specific FPGA locations for efficient performance.
-
Routing: Establishing connections between components in the FPGA.
Examples & Applications
Using Vivado to synthesize a VHDL description of a counter to generate the corresponding netlist.
Mapping a designed circuit layout onto an Intel FPGA and performing placement for optimal speed.
Memory Aids
Interactive tools to help you remember key concepts
Rhymes
Synthesizing leads to a netlist so fine, mapping to FPGA, it’s design time!
Stories
Imagine a chef synthesizing ingredients into a delicious recipe – that's like creating a netlist for your FPGA!
Memory Tools
Remember ‘SYNTH’: Synthesis Yields Netlist To Hardware.
Acronyms
For placement and routing, think ‘PRIME’
Placement Rules Involve Mapping Everywhere.
Flash Cards
Glossary
- Synthesis
The process of converting a Hardware Description Language into a netlist that defines a digital circuit.
- Netlist
A representation of a circuit that lists the components and the connections between them.
- Implementation
The step in which the synthesized design is mapped to the FPGA architecture, involving placement and routing.
- Placement
The process of assigning the netlist components to specific physical locations in the FPGA.
- Routing
The step that establishes the electrical connections between components in the FPGA.
Reference links
Supplementary resources to enhance your learning experience.