
Understanding the Design Flow for FPGA-Based Systems
Enroll to start learning
You’ve not yet enrolled in this course. Please enroll for free to listen to audio lessons, classroom podcasts and take practice test.
Interactive Audio Lesson
Listen to a student-teacher conversation explaining the topic in a relatable way.
Design Specification
🔒 Unlock Audio Lesson
Sign up and enroll to listen to this audio lesson

The first step in our design flow is 'Design Specification'. This is where we clearly define what problem we are solving and what functionality is required. We detail our inputs, outputs, and expected behaviors. Can anyone give an example of what could be defined in a design specification?

Maybe for a simple LED controller, we could specify how many buttons we need and what the LEDs should do based on those buttons?
Exactly, great example! Specifying the inputs - like how many buttons you have - is crucial for understanding the design. Now, why do you think a clear design specification is so important?

If we don’t specify it well, we might end up designing something that doesn't meet the requirements.
That's correct! A thorough specification helps avoid costly redesigns later on. Remember the acronym S.M.A.R.T. when specifying: Specific, Measurable, Achievable, Relevant, and Time-bound. Now that we’ve discussed this step, who can remind us what the next step is?

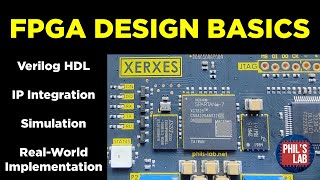
It's Hardware Description using VHDL or Verilog, right?
Yes, well done! Let's phase into that next.
Hardware Description
🔒 Unlock Audio Lesson
Sign up and enroll to listen to this audio lesson

Next, we move to Hardware Description! In this stage, we use languages like VHDL or Verilog to describe how our circuit behaves. Why do you think we need a hardware description?

It helps translate our design specification into a format that machines can understand?
Correct! It’s crucial for the synthesis process later on. Can anyone summarize what a simple VHDL code segment might look like?
Maybe something that describes inputs and outputs clearly like in that binary adder example?
Good recall! Writing clear code is vital as it’ll be the blueprint for all subsequent stages. Have you all thought about why choosing between VHDL or Verilog matters?
Maybe it’s about project requirements or personal preference?
Exactly, both languages have their pros and cons. Let’s keep those in mind as we proceed!
Simulation
🔒 Unlock Audio Lesson
Sign up and enroll to listen to this audio lesson
Now let’s explore Simulation! After we write our code, why do you think it’s necessary to simulate our design before implementation?
To find any errors before we actually try to put it on the FPGA!
Right! Simulation allows us to detect problems early. How many of you know what a testbench is?
Isn't it a module that generates input stimuli and checks the output?
Exactly! Testbenches are essential for thorough verification. Can anyone explain the difference between functional errors and timing errors?
Functional errors are logic errors and timing errors happen when the outputs don't align properly with the clock?
Spot on! Understanding these distinctions helps create more robust designs.
Synthesis and Implementation
🔒 Unlock Audio Lesson
Sign up and enroll to listen to this audio lesson
Moving on to Synthesis and Implementation—can anyone explain what happens during synthesis?
It converts our hardware description into a netlist for logical gates?
Exactly—this is where your design begins to take shape. How does this relate to resource usage on an FPGA?
The synthesized design needs to fit within the FPGA's available resources!
Right again! Once we synthesize, we move to mapping our design onto the FPGA architecture; that’s the implementation step. Why is verifying timing constraints important?
To ensure that data propagates correctly across our circuit!
Perfect! Timing verification can make or break your design success. Understanding this flow is essential!
Testing and Debugging
🔒 Unlock Audio Lesson
Sign up and enroll to listen to this audio lesson
Finally, let’s discuss Testing and Debugging. Why might this step be just as critical as the initial design stages?
If we don’t test correctly, we might launch a faulty product in the market!
Absolutely! Testing ensures that our design meets specifications and works under real conditions. Can anyone share common debugging techniques?
Using simulation results to tweak the design, or physical tools like logic analyzers!
Great answers! Always remember, the debugging phase is where many designs either shine or fail. Let's recap all steps from design specification to testing—who can list them for me?
Design Spec, Hardware Description, Simulation, Synthesis, Implementation, Verification, Programming, and Testing!
Well done! Understanding this design flow is crucial for success in FPGA projects.
Introduction & Overview
Read summaries of the section's main ideas at different levels of detail.
Quick Overview
Standard
The design flow for FPGA-based systems includes several critical stages: defining the design specification, creating hardware descriptions using VHDL or Verilog, simulating the design, synthesizing it, implementing it on the FPGA, verifying functionality, programming the FPGA, and testing/debugging the system. Each stage ensures the accurate realization of digital circuits on FPGAs.
Detailed
Understanding the Design Flow for FPGA-Based Systems
The design flow for FPGA-based systems is a systematic approach that facilitates the development of digital circuits. Each stage of this flow is crucial to ensure that designers can successfully translate specifications into functioning hardware. The key stages are as follows:
- Design Specification: Define the problem clearly, detailing the required functionality along with inputs, outputs, and expected behavior.
- Hardware Description: Utilize VHDL or Verilog to articulate the circuit's structure and behavior through code.
- Simulation: Verify the design's functionality through simulations, identifying any discrepancies or errors.
- Synthesis: Transform the hardware description into a netlist, delineating logical gates and components that can be physically implemented on the FPGA.
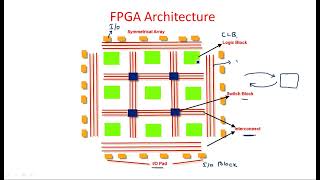
- Implementation: Map the synthesized design onto the FPGA architecture while considering resource constraints and timing.
- Verification: Ensure that the design is functional in real-world conditions by utilizing testbenches and stimuli to probe the FPGA's operation.
- Programming the FPGA: Generate the necessary bitstream for the FPGA to program the chip and realize the designed circuit.
- Testing and Debugging: Conduct comprehensive tests to ensure the system operates as intended, making adjustments as needed.
Understanding and mastering this design flow is vital for anyone interested in FPGA-based systems, as each stage builds upon the last to create efficient, robust digital circuits.
Youtube Videos

Audio Book
Dive deep into the subject with an immersive audiobook experience.
Introduction to the Design Flow
Chapter 1 of 9
🔒 Unlock Audio Chapter
Sign up and enroll to access the full audio experience
Chapter Content
The design flow for FPGA-based systems consists of several stages that ensure the correct implementation of a digital circuit.
Detailed Explanation
The design flow refers to the sequence of steps you need to follow when designing a digital system using FPGAs. Each stage is crucial for ensuring that the final product operates as intended. It helps to visualize the entire process from start to finish as if you were assembling a puzzle, where each piece contributes to the entire picture.
Examples & Analogies
Think of designing an FPGA-based system like planning a road trip. You start by deciding your destination (design specification), mapping out the route (hardware description), checking the car and ensuring everything works (simulation), loading your car with the necessary supplies (synthesis), driving the route (implementation), checking if you arrive at the right place (verification), preparing the vehicle (programming), and finally, troubleshooting any issues along the way (testing and debugging).
Stage 1: Design Specification
Chapter 2 of 9
🔒 Unlock Audio Chapter
Sign up and enroll to access the full audio experience
Chapter Content
Define the problem and the required functionality. Create a detailed description of the digital circuit, including its inputs, outputs, and behavior.
Detailed Explanation
During the design specification stage, you outline exactly what you want your digital circuit to do. This includes defining the problems it will solve and detailing not only its inputs and outputs but also how it behaves in different scenarios. It’s foundational because any misstep here can affect the entire project.
Examples & Analogies
Imagine you are writing a recipe. The recipe must clearly state what ingredients you need (inputs), what the final dish should look, taste, and feel like (outputs), and the steps required to get there (behavior). If you miss an ingredient or overlook a step, the final dish won't turn out right.
Stage 2: Hardware Description
Chapter 3 of 9
🔒 Unlock Audio Chapter
Sign up and enroll to access the full audio experience
Chapter Content
Write the design using VHDL or Verilog to describe the circuit’s behavior and structure.
Detailed Explanation
In the hardware description stage, you start coding your design using hardware description languages like VHDL or Verilog. This is similar to translating your recipe into actual cooking steps. You define how the circuit operates and how its components interact with one another.
Examples & Analogies
Continuing with the cooking analogy, this would be like converting your recipe into a set of instructions that someone else can follow. For instance, specifying not just 'mix the ingredients', but 'combine flour, sugar, and eggs in a bowl and stir until smooth'. It’s very precise so that others can recreate your dish exactly as intended.
Stage 3: Simulation
Chapter 4 of 9
🔒 Unlock Audio Chapter
Sign up and enroll to access the full audio experience
Chapter Content
Simulate the design to verify its functionality and check for any errors in the behavior or performance.
Detailed Explanation
Simulation involves running your design in a controlled environment where you can test how it behaves without deploying it to the actual FPGA. It's essentially a trial run to catch any mistakes or unexpected behavior before moving forward.
Examples & Analogies
Think of this step as a dress rehearsal before a play. The actors go through their lines and cues to ensure everything runs smoothly, and any mistakes can be corrected before the opening night performance.
Stage 4: Synthesis
Chapter 5 of 9
🔒 Unlock Audio Chapter
Sign up and enroll to access the full audio experience
Chapter Content
Convert the hardware description into a netlist that represents the logical gates and components to be implemented on the FPGA.
Detailed Explanation
Synthesis is the process where your high-level hardware description code is transformed into a lower-level netlist. This netlist contains all the logical gates and connections needed for your design, translating your ideas into something the FPGA can understand and implement.
Examples & Analogies
Imagine taking your detailed recipe and having a master chef translate it into a shopping list and a plan for how many pots and pans to use, so that each ingredient is prepared and cooked correctly. This way, the master chef has a clear picture of how to create the final dish.
Stage 5: Implementation
Chapter 6 of 9
🔒 Unlock Audio Chapter
Sign up and enroll to access the full audio experience
Chapter Content
Map the synthesized design to the FPGA architecture, considering constraints like timing and resource usage.
Detailed Explanation
In the implementation stage, the synthesized netlist is mapped to the specific architecture of the FPGA. This involves placing your design elements in specific locations and routing the connections between them to ensure everything operates effectively under constraints such as timing and available resources.
Examples & Analogies
This is like putting together a large, complicated jigsaw puzzle. You need to ensure that not only do the pieces fit together, but that they also adhere to the space on the table and don’t overlap with other pieces.
Stage 6: Verification
Chapter 7 of 9
🔒 Unlock Audio Chapter
Sign up and enroll to access the full audio experience
Chapter Content
Verify the design's functionality on the actual FPGA using testbenches and real-world stimulus.
Detailed Explanation
Verification ensures that once your design is on the FPGA, it still functions as intended. You test it using specially designed testbenches, which are essentially testing platforms that supply inputs and check outputs against expected results.
Examples & Analogies
This is like taking a final exam where you verify your understanding of the topic. You might practice with sample questions before the real event to see if you are prepared and can demonstrate your knowledge accurately.
Stage 7: Programming the FPGA
Chapter 8 of 9
🔒 Unlock Audio Chapter
Sign up and enroll to access the full audio experience
Chapter Content
Generate the configuration bitstream and program the FPGA to implement the design.
Detailed Explanation
Once verified, you create a configuration file called a bitstream, which encompasses your design and upload it to the FPGA. Programming the FPGA loads your design into its memory so that it can operate as intended.
Examples & Analogies
This process resembles downloading software onto your computer. Just like you need a file to install an application, the FPGA requires the configuration bitstream to know how to function.
Stage 8: Testing and Debugging
Chapter 9 of 9
🔒 Unlock Audio Chapter
Sign up and enroll to access the full audio experience
Chapter Content
Test the FPGA-based system, troubleshoot any issues, and make necessary modifications.
Detailed Explanation
The final stage involves real-world testing of your FPGA-based system. Here, you check if everything works as it should in practical scenarios, and if any issues arise, you diagnose and address them through debugging, which may involve going back to earlier stages of the design flow.
Examples & Analogies
Consider this final step as the quality assurance phase in product development. It’s like a beta test where real users try out the product to find bugs, and the developers make adjustments before a full launch.
Key Concepts
-
Design Specification: The initial step to outline functionalities and requirements.
-
Hardware Description: Utilizing VHDL or Verilog to describe the design.
-
Simulation: Verifying design functionality in a test environment.
-
Synthesis: Converting the HDL code into a netlist.
-
Implementation: Mapping the netlist to FPGA resources.
-
Verification: Testing design functionality on actual hardware.
-
FPGA Programming: Configuring the FPGA with the design bitstream.
-
Testing and Debugging: Last checks and modifications to ensure proper operation.
Examples & Applications
Creating a design specification for a 4-bit adder that includes inputs for two binary numbers and a carry input.
Writing a simple VHDL code for a 4-bit adder to describe its functionality.
Memory Aids
Interactive tools to help you remember key concepts
Rhymes
First we specify, then describe, simulate, synthesize in the vibe.
Stories
Imagine you're baking a cake. You must write down the recipe (specification) before gathering ingredients (codes), and baking requires testing (simulation) to ensure it's done right before serving to guests (FPGA).
Memory Tools
Remember the word 'DSPIVE' to recall the design flow: Design, Specification, Programming, Implementation, Verification, Evaluation.
Acronyms
The acronym 'SHIV' can help recall
Synthesis
Hardware
Implementation
Verification.
Flash Cards
Glossary
- Design Specification
A document that outlines the functionalities, inputs, outputs, and behaviors of the digital circuit being designed.
- Hardware Description Language (HDL)
Programming languages such as VHDL or Verilog used to describe the functionality and structure of a digital circuit.
- Simulation
The process of testing a design in a virtual environment prior to hardware implementation to ensure correctness.
- Netlist
A representation of a circuit describing all the components and their connectivity after synthesis.
- Synthesis
The phase where the hardware description is converted into a netlist for implementation on an FPGA.
- Verification
The process of checking that the design works as intended and meets the design specifications.
- Testbench
A simulation environment used to apply stimuli to a design and observe its outputs.
- FPGA Programming
Configuring the FPGA with a bitstream generated from the design so that it implements the desired logic.
- Debugging
The process of identifying and fixing errors in both the design and implementation of a circuit.
Reference links
Supplementary resources to enhance your learning experience.