
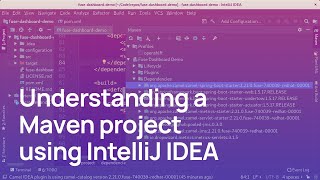
Case Study: Java Project with IntelliJ and Maven
Enroll to start learning
You’ve not yet enrolled in this course. Please enroll for free to listen to audio lessons, classroom podcasts and take practice test.
Interactive Audio Lesson
Listen to a student-teacher conversation explaining the topic in a relatable way.
Creating a New Maven Project
🔒 Unlock Audio Lesson
Sign up and enroll to listen to this audio lesson

Today, let's learn how to create a new Maven project in IntelliJ. Can anyone tell me what Maven is?

Isn't Maven a tool for managing project dependencies and builds?
Exactly, Student_1! Maven helps automate the build process and manage dependencies. Now, when you start IntelliJ, you select 'New Project', choose 'Maven' from the options, and proceed from there.

What do we need to set up while creating the project?
Great question, Student_2! You will need to define the project coordinates, including the `groupId`, `artifactId`, and `version`. Remember it as GAV for 'Group, Artifact, Version'.

Can you remind us how we recall the GAV?
Sure! Just think of it as 'GAV' for 'Great Anticipated Version.' Now, let's summarize what we've learned: you start a project by selecting Maven in IntelliJ, define your GAV, and that's how you begin!
Defining Dependencies in pom.xml
🔒 Unlock Audio Lesson
Sign up and enroll to listen to this audio lesson

Next, let's define dependencies in the `pom.xml`. Does anyone know why this file is crucial?

It's where we specify the libraries our project needs, right?
"Correct! In the `pom.xml`, you add dependencies like so:
Building the Project
🔒 Unlock Audio Lesson
Sign up and enroll to listen to this audio lesson
Once dependencies are set, we need to build the project. What command do we use?
We use `mvn package`!
Correct! And what does this command do?
It compiles the code and packages it into a JAR or WAR file depending on our configuration!
Exactly! Building with Maven not only updates the binaries but also ensures everything is prepared for deployment. Always remember: 'Build early, build often.'
Running and Debugging the Application
🔒 Unlock Audio Lesson
Sign up and enroll to listen to this audio lesson
Finally, let's run and debug our app. What do we do to run our application in IntelliJ?
We can use the run/debug configuration feature, right?
Exactly! IntelliJ has built-in tools to streamline this. It makes running tests and tracking down bugs much simpler. Can someone remind us of a debugging tip?
Always set breakpoints to check variables during runtime!
Spot on! Remember: 'Debugging is like solving a puzzle.' By using IntelliJ effectively, we maintain a clean workflow and maximize productivity.
Introduction & Overview
Read summaries of the section's main ideas at different levels of detail.
Quick Overview
Standard
In this section, we explore a hands-on case study that demonstrates how to create a new Maven project in IntelliJ. We will define dependencies in the project configuration file and build the project to create a reproducible development environment.
Detailed
Case Study: Java Project with IntelliJ and Maven
In this section, we will walk through a practical example of managing a Java project using IntelliJ IDEA and Maven. This case study emphasizes the importance of a clean and organized workflow in software development. The steps involved include creating a new Maven project, defining project dependencies using Maven's pom.xml, building the project with the command mvn package, and utilizing IntelliJ's powerful features for running and debugging the application. The expected outcome is to establish a streamlined, repeatable, and efficient development process.
Youtube Videos


Audio Book
Dive deep into the subject with an immersive audiobook experience.
Creating a New Maven Project
Chapter 1 of 5
🔒 Unlock Audio Chapter
Sign up and enroll to access the full audio experience
Chapter Content
- Create a new Maven project in IntelliJ
Detailed Explanation
To start a new project in IntelliJ using Maven, you will first open IntelliJ IDEA and select 'New Project'. From there, choose 'Maven' as the type of project. This option integrates Maven's capabilities for managing dependencies and building your application. Follow the prompts to name your project and set the desired location on your computer.
Examples & Analogies
Think of this step as setting up a new workspace where you will build a piece of furniture. Just as you would choose a clean space with the right tools, in software development, you're establishing a new workspace that is equipped with the right tools (Maven) to help you construct your project effectively.
Defining Dependencies
Chapter 2 of 5
🔒 Unlock Audio Chapter
Sign up and enroll to access the full audio experience
Chapter Content
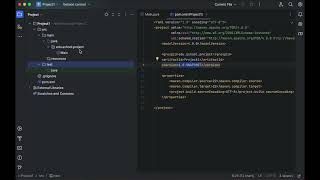
- Define dependencies in pom.xml:
org.springframework
spring-context
6.0.0
Detailed Explanation
With Maven, managing external libraries (also called dependencies) is simple. In the project's 'pom.xml' file, you specify the libraries you need. This example shows how to add the Spring Framework's context component, which provides functionalities for application configuration. The 'groupId', 'artifactId', and 'version' uniquely identify the library in the Maven Central repository.
Examples & Analogies
Imagine you are baking a cake; the pom.xml is your recipe where you list all the ingredients needed (dependencies). If you forget to include eggs, your cake (project) won't come out as expected. Here, specifying the right 'groupId', 'artifactId', and 'version' ensures you have the correct ingredients.
Building the Project
Chapter 3 of 5
🔒 Unlock Audio Chapter
Sign up and enroll to access the full audio experience
Chapter Content
- Build the project with mvn package
Detailed Explanation
Once you have defined your dependencies and finished coding, you use Maven to compile and package your application. The command 'mvn package' executes a series of predefined steps in the Maven lifecycle, which includes compiling your code, running tests, and ultimately packaging your application into a deployable format, such as a JAR file.
Examples & Analogies
Think of this step like sending your completed cake to a bakery for packaging. The 'mvn package' command helps to ensure everything is processed correctly and beautifully wrapped (ready for deployment), so it's ready for the next stage (like distribution to customers).
Running and Debugging the Application
Chapter 4 of 5
🔒 Unlock Audio Chapter
Sign up and enroll to access the full audio experience
Chapter Content
- Use IntelliJ to run/debug the app and test it
Detailed Explanation
After packaging the project with Maven, IntelliJ provides an easy way to run and debug your application. You can click the Run button in the IDE to start the application. If issues arise, you can set breakpoints and use the debugger to step through your code, analyze variable states, and identify bugs.
Examples & Analogies
This process is akin to a director reviewing a movie scene. Running the application is like watching the scene unfold, while debugging is like stopping the film to discuss error points—helping make necessary adjustments for improvement.
Outcome of the Project Setup
Chapter 5 of 5
🔒 Unlock Audio Chapter
Sign up and enroll to access the full audio experience
Chapter Content
Outcome: Clean, organized, and reproducible workflow with minimal manual configuration.
Detailed Explanation
The ultimate goal of using IntelliJ and Maven together is to create a workflow that is efficient and organized. By following these steps, you ensure that your project can be built and run consistently across different environments without the need for extensive configurations each time.
Examples & Analogies
Consider this as having a well-organized kitchen where every tool is in its place, and every recipe is predictable. When you need to bake again, you can trust that everything is ready to go, ensuring quality and saving time—all essential for a productive cooking (or coding) experience.
Key Concepts
-
Maven is a critical tool for managing project builds and dependencies in Java.
-
The pom.xml file is essential for configuring a Maven project, detailing its dependencies and build settings.
-
Proper dependency management helps avoid conflicts and ensures all necessary libraries are included.
-
Building a project with
mvn packagecompiles the code and prepares it for execution. -
Using IntelliJ's features for running and debugging the application streamlines the development process.
Examples & Applications
Creating a Maven project for a Spring application and defining its dependencies in pom.xml.
Using IntelliJ to set breakpoints in the source code for debugging during application execution.
Memory Aids
Interactive tools to help you remember key concepts
Rhymes
In IntelliJ, with Maven so bright, GAV’s keys guide us right.
Stories
Imagine a student named Maven who built a house (project) requiring specific materials (dependencies). By listing these in his house plan (pom.xml), he ensured he had everything he needed, avoiding any surprises during construction (building).
Memory Tools
Remember 'GAV' for group, artifact, and version. 'GAV – Great Art with Versions'.
Acronyms
GAV
Group
Artifact
Version.
Flash Cards
Glossary
- Maven
A build automation tool primarily for Java projects that simplifies the management of project dependencies.
- pom.xml
The configuration file for Maven projects that defines project structure, dependencies, and build settings.
- Dependency Management
The process of ensuring a software application has all the necessary libraries and versions needed to build and run.
- Build
The process of compiling source code and packaging it into executable formats.
- Run/Debug Configuration
Settings within an IDE that allow developers to run and debug their applications conveniently.
Reference links
Supplementary resources to enhance your learning experience.