
Step 4: Verify Performance - 3.3.1.4
Interactive Audio Lesson
Listen to a student-teacher conversation explaining the topic in a relatable way.
Importance of Verification
🔒 Unlock Audio Lesson
Sign up and enroll to listen to this audio lesson

Today, we are going to talk about the last step in designing resonant circuits: verifying performance. Can anyone tell me why this step is important?

I think it’s to make sure our circuit actually works as we intended.
Exactly! We need to ensure that our circuits operate at the desired resonant frequency and bandwidth. Verification helps us determine if adjustments are necessary.

What do we do if it doesn’t meet those expectations?
Good question! We go back to our components and may need to adjust values based on the simulation results. This iterative process helps us refine our design.

So, it’s like trial and error?
Yes! It’s a systematic approach to ensure optimal performance.

Can we use software simulations for that?
Absolutely! Software allows us to experiment virtually before physical implementation.
To summarize, verifying performance is critical for ensuring that our resonant circuits meet the design specifications and perform effectively.
Simulation Techniques
🔒 Unlock Audio Lesson
Sign up and enroll to listen to this audio lesson

Now, let’s discuss how we can simulate the behavior of our circuits. Can anyone suggest a method?
We can use circuit simulation software like LTspice or Multisim!
That’s correct! These tools can model the behavior of our circuits and provide valuable insights into their performance metrics.
What specific parameters should we focus on during simulations?
Great question! Key parameters include resonant frequency, impedance, bandwidth, and the quality factor. Monitoring these helps us ensure accuracy.
How do we know if we need to make adjustments afterward?
If the results deviate from our desired specifications, we should adjust the component values systematically and re-run the simulation, refining them until the required performance is achieved.
In summary, using simulation tools allows for effective performance verification and provides a virtual platform for iterating designs before building actual circuits.
Adjustments and Optimization
🔒 Unlock Audio Lesson
Sign up and enroll to listen to this audio lesson
After performing simulations and verifying the performance of your circuit, what comes next?
Making adjustments to the components to optimize performance!
Exactly! What kinds of adjustments can you think of?
We might change the values of the inductors or capacitors to alter the resonant frequency.
And also adjust the resistors to modify the bandwidth or quality factor!
Correct! Every component plays a role in defining the circuit's behavior. Continuous optimization ensures that the circuit meets all applicable performance criteria.
Does this mean we have to keep simulating after each adjustment?
Yes, indeed! Each change should be verified through simulations to assure the effectiveness of the adjustments.
In conclusion, the adjustment process is integral to refining our circuit designs and achieving optimal performance.
Introduction & Overview
Read summaries of the section's main ideas at different levels of detail.
Quick Overview
Standard
In this section, students learn that verifying the performance of designed resonant circuits is crucial to ensure they meet expected specifications. It outlines steps to simulate the circuit's behavior and adjust component values to achieve the desired outcomes in resonant frequency and bandwidth.
Detailed
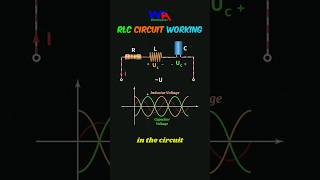
Step 4: Verify Performance
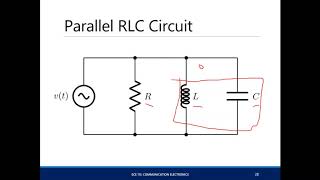
After selecting the appropriate components for a resonant circuit, the next critical step is verifying its functionality. This involves simulating the circuit to analyze its performance, including assessing how closely the circuit operates to the desired resonant frequency and bandwidth. If the circuit does not meet the expected performance, adjustments to components may be required. Proper verification ensures that the resonant circuit will perform effectively in real-world applications, confirming that the design meets the initial requirements and specifications established during the design process.
Youtube Videos

Audio Book
Dive deep into the subject with an immersive audiobook experience.
Simulation of the Circuit
Chapter 1 of 2
🔒 Unlock Audio Chapter
Sign up and enroll to access the full audio experience
Chapter Content
After selecting components, simulate the circuit to verify its performance and adjust component values if necessary.
Detailed Explanation
Once the components for the resonant circuit have been chosen based on the desired specifications, the next step is to simulate how the circuit would perform with those components. Simulating the circuit allows you to visualize the response of the circuit to different frequencies, helping to identify if it resonates at the intended frequency and operates within your desired parameters. If the performance is not satisfactory, adjustments can be made to the component values.
Examples & Analogies
Think of the simulation like a virtual test drive for a car. Just as you would want to test how a car handles at various speeds before buying it, simulating the circuit lets you see if it functions correctly under conditions you expect it to face without risking damage to actual components.
Adjusting Component Values
Chapter 2 of 2
🔒 Unlock Audio Chapter
Sign up and enroll to access the full audio experience
Chapter Content
If necessary, adjust component values based on simulation results to achieve the desired performance.
Detailed Explanation
After running the simulation, you may find that the circuit does not behave as anticipated. This could be due to several factors like the wrong inductance or capacitance values. When this happens, you can alter these component values—either increasing or decreasing them—to refine the circuit's performance, aiming to meet the designed specifications of resonance frequency and bandwidth.
Examples & Analogies
Adjusting component values is similar to cooking a recipe. After tasting your dish, you may decide it needs more salt or spices. In the same way, modifying component values helps you 'season' the circuit until it meets your ideal performance 'taste.'
Key Concepts
-
Performance verification: Essential for confirming that the circuit operates as intended.
-
Simulation tools: Allow for virtual testing of circuit designs before physical implementation.
-
Component adjustments: Important for achieving optimal performance through iterative refinement.
Examples & Applications
Using LTspice to simulate a series resonant circuit to verify that it functions at the targeted resonant frequency.
Adjusting the capacitance in a parallel resonant circuit after simulation shows that the bandwidth is too wide.
Memory Aids
Interactive tools to help you remember key concepts
Rhymes
To check if circuits play nice, simulate them twice!
Stories
Imagine a chef (the engineer) who prepares a dish (the circuit) by tasting (simulating) and adjusting ingredients (components) until it's perfect!
Memory Tools
S.A.C: Simulate, Adjust, Confirm - the steps to ensure your circuit performs!
Acronyms
V.S.E
Verify
Simulate
Enhance - a guide to the verification process.
Flash Cards
Glossary
- Simulation
The process of using software to model the behavior of a circuit before actual implementation.
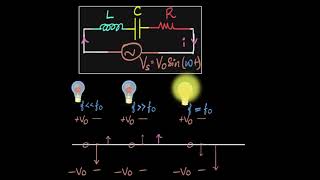
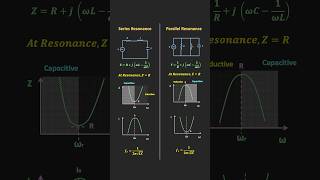
- Resonant Frequency
The frequency at which a resonant circuit operates optimally.
- Bandwidth
The range of frequencies over which the circuit operates effectively.
- Quality Factor (Q)
A measure of the selectivity of the resonant circuit, indicating how sharp the resonance is.
Reference links
Supplementary resources to enhance your learning experience.