
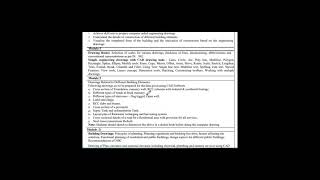
CIRCLE COMMAND
Enroll to start learning
You’ve not yet enrolled in this course. Please enroll for free to listen to audio lessons, classroom podcasts and take practice test.
Interactive Audio Lesson
Listen to a student-teacher conversation explaining the topic in a relatable way.
Basic Circle Command Usage
🔒 Unlock Audio Lesson
Sign up and enroll to listen to this audio lesson

Today, we will learn about the Circle Command. It's a powerful tool that helps us create circles with precision. Can anyone tell me the first method we can use to create a circle?

Is it the center and radius method?
Exactly! In the center and radius method, we choose a center point and then specify the radius. This gives us a perfect circle.

How does that work?
You initiate the command by typing 'CIRCLE', then specify your center point, and finally, input the radius. This is critical for accurate designs.

Can we also draw a circle with diameter?
Yes! That's also an option. Instead of radius, we can specify the diameter just as easily.

What about the three-point and two-point options?
Great question! The three-point option allows us to define a circle by selecting three locations on its circumference, while the two-point option requires the selection of two endpoints of the diameter.
To summarize, today we've discussed the Circle Command, including its center and radius, center and diameter, and the two and three-point methods. All of which assist us in precision drawing.
Advanced Circle Options
🔒 Unlock Audio Lesson
Sign up and enroll to listen to this audio lesson

Now that we understand the basics of the circle command, let’s talk about the tangent circles. What can anyone guess about tangent circles?
Are they circles that touch other shapes?
Correct! A tangent circle touches a specific point on another object. We use the TTR option for this. Can anyone tell me how we would input that command?
We would pick the two tangential objects and specify the radius?
Exactly! This allows for accurate design work when circles need to be perfectly aligned with other geometry.
What are some practical applications of this?
Great question! Common applications can be found in architectural designs, mechanical parts, or any layout that requires curved interfaces.
So to recap, we've explored how to create circles using the tangent tangent radius method, and its importance in achieving precise designs.
Introduction & Overview
Read summaries of the section's main ideas at different levels of detail.
Quick Overview
Standard
This section introduces the Circle Command, detailing its operations including different methods for drawing circles like using center and radius, diameter, three-point and two-point specifications, as well as tangent circles. Each method offers unique benefits for precision in design.
Detailed
CIRCLE COMMAND
The Circle Command is a fundamental tool in computer-aided design, allowing users to create geometric circles easily and accurately. This command can be used in various methods to suit different design needs:
- CENTER AND RADIUS: Users can specify a center point and the radius to create a circle with precise dimensions.
- CENTER AND DIAMETER: Similarly, a circle can be drawn by specifying its center and the desired diameter.
- THREE POINT CIRCLE (3P): This method allows the user to define a circle through three points on its circumference, ensuring accurate placement of curves.
- TWO POINT CIRCLE (2P): This allows users to create a circle defined by two endpoints of a diameter.
- TANGENT TANGENT RADIUS (TTR): This advanced option allows users to draw a circle that is tangent to two existing objects with a specified radius.
The command syntax is consistent across these options, ensuring a user-friendly experience. Mastery of the Circle Command is essential for effective design and planning, making it a crucial topic in the study of computer-aided design.
Youtube Videos


Audio Book
Dive deep into the subject with an immersive audiobook experience.
Introduction to Circle Command
Chapter 1 of 5
🔒 Unlock Audio Chapter
Sign up and enroll to access the full audio experience
Chapter Content
B. CIRCLE COMMAND: It creates a circle.
Detailed Explanation
The Circle Command is used to create a circle in the drawing. Circles can be defined by various methods based on specific parameters like the center and radius, center and diameter, or by setting specific points on the circumference.
Examples & Analogies
Think of the Circle Command like drawing circles in real life. If you have a compass, you can choose a center point, adjust the legs to a specific length, and draw a circle. Alternatively, if you don't have a compass, you could mark points around a round object and connect them to form a circle.
Methods of Creating Circles
Chapter 2 of 5
🔒 Unlock Audio Chapter
Sign up and enroll to access the full audio experience
Chapter Content
CENTER AND RADIUS: Draw a circle based on a center point and radius.
CENTER AND DIAMETER: Draw a circle based on a center point and diameter. THREE POINT (3P) CIRCLE: Draw a circle based on 3 points on circumference. TWO POINT (2P) CIRCLE: Draw a circle based on two points of a diameter. TANGENT TANGENT RADIUS: Draw a circle tangent to an existing object with a specified radius.
Detailed Explanation
There are several methods to create circles in the drawing:
1. Center and Radius: Specify the center and the radius of the circle.
2. Center and Diameter: Specify the center and the diameter instead.
3. Three Point Circle (3P): Select three points on the circumference to define the circle.
4. Two Point Circle (2P): Select two points to define the diameter of the circle.
5. Tangent Tangent Radius (TTR): Create a circle that is tangent to an existing object with a given radius.
Examples & Analogies
Imagine a playground swing. The 'center and radius' method would be like choosing the swing's pivot point and how far out the swing goes (the radius). For 'two points', picture using two stakes in the ground to define the width of a swing set’s support (the diameter). The 3-point circle is like creating a circle around three children standing in different spots in a playground.
Using the Circle Command
Chapter 3 of 5
🔒 Unlock Audio Chapter
Sign up and enroll to access the full audio experience
Chapter Content
COMMAND: CIRCLE or C.
3p/2p/TTR/
Detailed Explanation
To execute the Circle Command, type 'CIRCLE' or just 'C'. You then choose the method (3-point, 2-point, or TTR) and enter the necessary coordinates for the center or the radius/diameter. Following prompts will guide you to pick the points or specify the required dimensions.
Examples & Analogies
Using the Circle Command is like ordering a pizza. You can specify the size (diameter) you want right off the bat or choose points (like where to place toppings) to define how big it will be. Instead of making it randomly, you are defining it precisely.
Creating a Circle Using Specific Methods
Chapter 4 of 5
🔒 Unlock Audio Chapter
Sign up and enroll to access the full audio experience
Chapter Content
3p/2p/TTR/
Detailed Explanation
When creating a circle, if you choose the 3-point method, you must click or place the cursor at three distinct points that define the circumference. In the 2-point method, you only need two points that represent the diameter of the circle. This flexibility allows for precision depending on the design needs.
Examples & Analogies
Creating with points is like drawing floor tiles. You could either mark three corners of a triangular garden bed or use two sides to mark a rectangular area. The method you choose can define how accurate or complex your design will be.
Finalizing Circle Parameters
Chapter 5 of 5
🔒 Unlock Audio Chapter
Sign up and enroll to access the full audio experience
Chapter Content
COMMAND: CIRCLE or C.
3p/2p/TTR/
Detailed Explanation
For creating a tangent circle, you'll select two objects that the circle will touch (be tangent to) and then specify the radius. This command is particularly useful when the circle needs to smoothly align with other elements in your design.
Examples & Analogies
Imagine designing a park path that curves around trees. Instead of just going directly through them, you want to create circles that gently touch the edges of the tree canopy. The tangent command allows you to do just that, making the design more natural and aesthetically pleasing.
Key Concepts
-
Circle Command: A tool to create circles in CAD.
-
Center and Radius: The simplest way to create circles.
-
Diameter: Another method to create circles based on diameter length.
-
Three Point Circle: Method of defining a circle by points on its outline.
-
Tangent Circle: A precision method to draw circles that touch another object.
Examples & Applications
Using the Center and Radius method, if the center is (0,0) and the radius is 5, the resulting circle has a radius of 5 units from the center.
When using the two-point method, if the points are (1,1) and (4,1), a circle of 3 unit diameter will form between these points.
Memory Aids
Interactive tools to help you remember key concepts
Rhymes
Create a circle with a center, radius doth contain,
Stories
Imagine a wizard drawing circles in a magical land. He chooses a center and a radius, casting spells to create perfect circles. Each time he needs the circle to just touch his tower, he remembers the special tangential spell, TTR.
Memory Tools
C for Center and Radius, D for Diameter, T for Tangent, 3 for Three points, 2 for Two points.
Acronyms
C.D.T.2.3. - Circle, Diameter, Tangent, 2 Points, 3 Points.
Flash Cards
Glossary
- Circle Command
A CAD command used to create circles in various ways including center and radius, diameter, and tangents.
- Center and Radius
Method of defining a circle by specifying its center point and the radius.
- Two Point Circle (2P)
Circle defined by two endpoints of its diameter.
- Three Point Circle (3P)
Circle created by selecting three points on its circumference.
- Tangent Circle (TTR)
Circle drawn that touches another object at a single point with a specified radius.
Reference links
Supplementary resources to enhance your learning experience.