
POLYGON COMMAND
Enroll to start learning
You’ve not yet enrolled in this course. Please enroll for free to listen to audio lessons, classroom podcasts and take practice test.
Interactive Audio Lesson
Listen to a student-teacher conversation explaining the topic in a relatable way.
Introduction to Polygon Command
🔒 Unlock Audio Lesson
Sign up and enroll to listen to this audio lesson

Today we will learn how to create polygons in CAD. The Polygon Command allows us to define shapes with a specific number of sides and lengths.

What is the command used to draw a polygon?
The command is POLYGON or simply POL. You can specify the number of sides and the side length when using it.

Can you give us an example of creating a triangle using the POLYGON command?
Absolutely! For a triangle, you would type POLYGON, then enter 3 for the number of sides and a chosen length for each side.
To help you remember, think of 'P' in POLYGON standing for 'Polygonal Shapes'.

What if I want to change the size of the polygon later?
Great question! You could use the SCALE command to resize existing geometry.
In summary, the POLYGON command is essential for defining multi-sided shapes quickly.
Combining Polygon with Other Commands
🔒 Unlock Audio Lesson
Sign up and enroll to listen to this audio lesson

Now let's discuss how the POLYGON command works with other drawing commands. Who can tell me about the LINE command?

The LINE command is used to draw straight line segments, right?
Exactly! Using the LINE command, you can create the sides of your polygon individually if needed.
Can we also use the CIRCLE command in combination?
Yes! You can use CIRCLE to add curves at vertices of your polygons to smoothen the edges.
Remember, when combining commands, think like a CAD programmer – each command builds on the previous one.
Today, we've seen how various commands interact and build complex shapes. Always visualize each step!
Practical Application of the Polygon Command
🔒 Unlock Audio Lesson
Sign up and enroll to listen to this audio lesson
Let's look at how the POLYGON command applies in architecture or design. Who can think of a real-world application?
In landscaping design, we often use polygons for garden layouts.
That's right! Using the POLYGON command, landscape designers can create defined areas for planting.
What about in structural engineering?
Good observation! Engineers can use polygons for creating blueprints of complex structures.
Always ask yourself how you will apply these commands in your field, as real-world relevance enhances learning.
Now, can someone briefly summarize what we learned today?
We learned about the POLYGON command and its applications, along with how it works with other drawing commands.
Excellent summary! Remember to practice on your own and think creatively!
Introduction & Overview
Read summaries of the section's main ideas at different levels of detail.
Quick Overview
Standard
The section provides a comprehensive overview of CAD commands for drawing basic geometrical shapes, including polygons, circles, arcs, and more, and outlines their syntax and practical applications within CAD software.
Detailed
Detailed Summary of Polygon Command
This section details essential commands for drawing shapes in Computer-Aided Design (CAD), focusing on how to create polygons, circles, arcs, and other geometric forms. The commands include creating a polygon with specified sides and lengths, as well as other necessary commands like LINE, CIRCLE, and ARC. Each drawing command includes videos of it being executed, with explanations on how to navigate through the CAD interface using commands like POLYGON (POL), LINE (L), CIRCLE (C), and ARC (A). Understanding these commands is vital for students and professionals to efficiently design and modify drawings in a CAD environment.
Youtube Videos


Audio Book
Dive deep into the subject with an immersive audiobook experience.
Introduction to the Polygon Command
Chapter 1 of 3
🔒 Unlock Audio Chapter
Sign up and enroll to access the full audio experience
Chapter Content
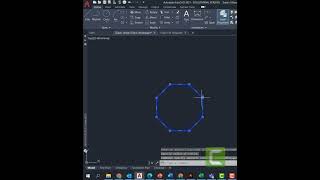
The POLYGON COMMAND creates a regular polygon with a specified number of sides and length of side.
COMMAND: POLYGON or pol.
Detailed Explanation
The Polygon Command is used in CAD software to create regular polygons. A regular polygon is a geometric figure with equal sides and angles. You can specify the number of sides of the polygon and the length of each side before placing it in your drawing. To use the command, you would type 'POLYGON' or simply 'pol' into the command prompt.
Examples & Analogies
Think of this command like drawing a perfect star shape with a bunch of pencils tied together at one end. You just decide how many points (sides) your star will have and how long you want each point to be, and the command helps you draw it evenly.
Using the Polygon Command
Chapter 2 of 3
🔒 Unlock Audio Chapter
Sign up and enroll to access the full audio experience
Chapter Content
When you execute the command, you will be prompted to specify the number of sides. You can also define whether the polygon will be inscribed in a circle or circumscribed around a circle, which helps in setting its dimensions accurately.
Detailed Explanation
Once you activate the Polygon Command, it will ask you for the number of sides. This is how many edges your polygon will have. After defining the number of sides, you'll choose to either inscribe it in a circle (meaning the polygon will fit perfectly inside the circle) or circumscribe it (meaning the circle will fit perfectly around the polygon). This choice affects the size and appearance of the polygon.
Examples & Analogies
Imagine you are crafting a cake in the shape of a hexagon. When you choose to inscribe it, you use a round cake pan and the cake will sit snugly in that round pan. Whereas if you circumscribe, your hexagon-shaped cake would be formed to fit inside a larger circle but still have the corners.
Finalizing the Polygon Creation
Chapter 3 of 3
🔒 Unlock Audio Chapter
Sign up and enroll to access the full audio experience
Chapter Content
After defining the polygon's properties, you can place it by clicking on the desired location in your drawing area. The polygon will be drawn as one object, making it easier to manipulate later.
Detailed Explanation
With the polygon's specifications set (number of sides and size), the final step involves placing the polygon in your workspace. You can click anywhere in the drawing area where you want the polygon to appear. This polygon acts as one complete object, so later you can move, scale, or modify it as a single unit rather than being composed of individual lines.
Examples & Analogies
Think of this process like placing a sticker on a scrapbook. Once you have cut out the perfect shape you wanted, you just pick it up and stick it in your desired spot in one motion, allowing you to capture that perfect moment while keeping everything else in place.
Key Concepts
-
Polygon: A multi-sided geometric shape.
-
CAD commands: Instructions for creating shapes.
-
Line Command: Used to create straight lines.
-
Circle Command: Used to create circular shapes.
-
Arc Command: Used for curved lines.
Examples & Applications
To create a square polygon, input POLYGON, then specify 4 as the number of sides.
To draw a triangle, input POLYGON, follow with 3 for the number of sides and the desired length.
Memory Aids
Interactive tools to help you remember key concepts
Rhymes
To make a hexagon, six sides you’ll stake, for each angle, a shape you’ll make!
Stories
A designer was tasked to create a flower bed, so they drew polygons for petals, adding circles to round off the edges - a perfect garden!
Memory Tools
P in POLYGON reminds us of 'Points'; each point forms part of the shape.
Acronyms
POLY stands for 'Polygonal Online Learning Yields' accurate shapes.
Flash Cards
Glossary
- Polygon
A plane figure that is described by a finite number of straight line segments connected to form a closed polygonal chain.
- Command
An instruction given to a computer program to perform a specified task or series of tasks.
- Circle
A round plane figure whose boundary consists of points equidistant from a fixed center.
- CAD
Computer-Aided Design, the use of computer software to facilitate the creation and design of geometric shapes.
- Arc
A curved line that is part of the circumference of a circle.
- Command line syntax
A specific way of writing commands that the software recognizes to perform tasks.
Reference links
Supplementary resources to enhance your learning experience.