
FILLET COMMAND
Enroll to start learning
You’ve not yet enrolled in this course. Please enroll for free to listen to audio lessons, classroom podcasts and take practice test.
Interactive Audio Lesson
Listen to a student-teacher conversation explaining the topic in a relatable way.
Introduction to Fillet Command
🔒 Unlock Audio Lesson
Sign up and enroll to listen to this audio lesson

Today, we’ll discuss the Fillet command. Can anyone tell me what it does?

Is it used to create curved lines between straight segments?
Exactly! The Fillet command connects two lines with a rounded arc. This is important for creating smoother transitions in your designs.

How do we use it?
You simply type `FILLET`, select your two objects, and specify the desired radius. Remember, if you want to make the curve larger, input a larger radius!

Can you trim the lines when you do that?
Good point! Yes, you can choose to trim the edges that intersect. This keeps your design clean.
In summary, the Fillet command lets you create smooth arcs between lines, enhancing your designs.
Options and Parameters for Fillet Command
🔒 Unlock Audio Lesson
Sign up and enroll to listen to this audio lesson

Now let's dive into some options we can set while using the Fillet command. What can we specify?

Can we set the radius of the fillet?
Yes! When you run the command, you’ll have the option to enter a radius value. This determines how 'curved' the arc will be.
What happens if I don't want to trim the lines?
You can choose not to trim the edges by selecting the appropriate option. It’s crucial for maintaining the original layout if the fillet isn’t your final step.
Is there a command for that too?
Great question! Yes, during the Fillet command, when prompted, you can specify ‘No Trim’ if you don't want to cut the lines.
So, in summary, remember that you can set the radius and choose trimming options to customize your fillet.
Practical Applications of Fillet Command
🔒 Unlock Audio Lesson
Sign up and enroll to listen to this audio lesson
Let’s wrap up by discussing when you would use the Fillet command in your designs.
I imagine it’s useful in furniture design?
Absolutely! Filleting can prevent sharp edges, which is safer and more visually appealing.
What about architectural drawings?
Yes, it helps make connections between walls and curved structures seamless, improving both functionality and style.
Can it be used in mechanical parts too?
Definitely! In design engineering, it reduces stress concentration and can improve material properties.
In summary, the Fillet command is versatile across various design contexts, ensuring beauty and practicality.
Introduction & Overview
Read summaries of the section's main ideas at different levels of detail.
Quick Overview
Standard
This section discusses the Fillet command in computer-aided design (CAD) applications, focusing on its role in creating rounded corners between two lines or objects. It includes commands, options for customizing the radius, and considerations for trimming edges.
Detailed
Detailed Summary
The Fillet command is a crucial tool in CAD software that allows users to create smooth, rounded transitions between two intersecting line segments or curves. This is particularly useful in architectural design, where aesthetically pleasing transitions can significantly impact the overall visual quality of a drawing.
Key Functionality
- Command: The Fillet command is initiated by typing
FILLETor simply pressing the designated shortcut key. - Options: Users can adjust various parameters during the operation. This includes selecting the objects to be filleted, specifying the radius for the arc, and determining trimming options for the selected edges.
- Trimming Settings: Options include trimming the selected edges to the fillet resulting in a cleaner geometry or leaving the edges intact, depending on the design demands.
By employing the Fillet command, designers can enhance both the functionality and aesthetics of their projects, as this command allows for more organic shapes and smoother transitions between different parts of the design.
Youtube Videos


Audio Book
Dive deep into the subject with an immersive audiobook experience.
Introduction to Fillet Command
Chapter 1 of 3
🔒 Unlock Audio Chapter
Sign up and enroll to access the full audio experience
Chapter Content
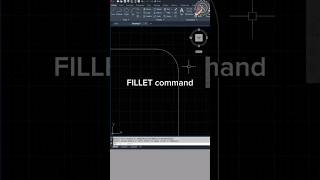
The FILLET COMMAND connects two objects with a round arc of a specified radius.
Detailed Explanation
The Fillet command is used in CAD software to create a smooth, rounded corner between two intersecting lines or objects. It takes the two lines and adds a curved arc where they meet, which is especially useful for visual aesthetics and structural integrity in designs.
Examples & Analogies
Imagine you are building a piece of furniture with sharp corners. Using the Fillet command is like sanding down those corners to make them rounder and safer to touch. This finishing touch not only looks better but also prevents potential injuries from sharp edges.
Basic Command Syntax
Chapter 2 of 3
🔒 Unlock Audio Chapter
Sign up and enroll to access the full audio experience
Chapter Content
COMMAND: FILLET.
Polyline/ radius/ trim/
Detailed Explanation
To use the Fillet command, you first enter 'FILLET' in the command prompt. You then choose whether you're working with a polyline or regular lines, and you decide the radius of the round corner you want to create. This process involves selecting the first line, followed by the second line, which will help the software know where to draw the arc. The choice of radius affects how curved the corner will appear.
Examples & Analogies
Think of it like making a cake. When you want to round off the edges of your cake, you decide how round you want them based on the icing you have. The Fillet command’s radius setting is similar; it determines how much curve you want at the corners, just like how you can choose between a subtle curve or a dramatic round edge on your cake.
Options for Fillet Command
Chapter 3 of 3
🔒 Unlock Audio Chapter
Sign up and enroll to access the full audio experience
Chapter Content
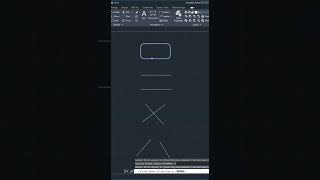
Polyline; insert fillet arc at each corner of 2D objects where two line segments meet.
Trim: controls whether AutoCAD trims the selected edges to fillet.
No trim; does not trim the selected edge.
Detailed Explanation
When using the Fillet command, you have options that influence how the edges will be treated. For instance, if you choose 'Trim,' the software will cut the lines back to the point where the fillet begins, creating a cleaner look. If you select 'No trim,' the original lines will stay intact, with the fillet arc added without altering the end points of the lines.
Examples & Analogies
This can be compared to pruning a plant. If you trim the edges (as in using the 'Trim' option), you make the plant look more polished and controlled. On the other hand, if you choose not to trim (using the 'No trim' option), you leave the edges intact, though they might appear a bit unkempt. The choice depends on whether you prefer sharp edges or smooth transitions in your design.
Key Concepts
-
Fillet Command: The tool used to create arcs between intersecting lines.
-
Radius: The measurement that defines how curved the fillet will appear.
-
Trimming Options: Options available that determine whether to cut the original lines.
Examples & Applications
Using the Fillet command to connect the corners of a furniture drawing smoothly.
Applying the Fillet command in architectural designs to create rounded joints between walls.
Memory Aids
Interactive tools to help you remember key concepts
Rhymes
When two lines meet at a point, round it up, make it joint!
Stories
Once there were two roads that met at a sharp corner. They decided to make a smoother path, thus they used the Fillet command to round their intersection.
Memory Tools
C-R-T: Connect, Radius, Trim - the steps to remember when using the Fillet command.
Acronyms
F-C-R
Fillet
Connect
Radius for effective usage in projects.
Flash Cards
Glossary
- Fillet Command
A CAD command that connects two lines or curves with a rounded arc.
- Radius
The distance from the center of the arc to any point on the arc itself, determining the curvature of the fillet.
- Trimming
The action of cutting or shortening edges of lines and shapes to achieve a neater design.
- Command Options
Selectable functionalities provided during a command that allow for customization of actions taken during the use of the command.
Reference links
Supplementary resources to enhance your learning experience.