
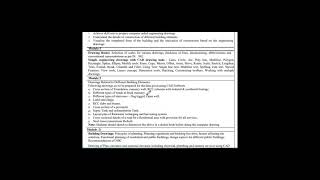
COMPUTER AIDED BUILDING PLANNING AND DRAWING (BCV305)
Enroll to start learning
You’ve not yet enrolled in this course. Please enroll for free to listen to audio lessons, classroom podcasts and take practice test.
Interactive Audio Lesson
Listen to a student-teacher conversation explaining the topic in a relatable way.
Understanding the Line Command
🔒 Unlock Audio Lesson
Sign up and enroll to listen to this audio lesson

Today we start with the Line Command in CAD. This command is essential for creating straight lines. Can anyone tell me how you can access it?

I think we can just type 'LINE' or 'L' and press enter!
Exactly right! After that, you'll specify the starting point. Let's say, for instance, we start at coordinates 10, 10. What would you do next?

We would move the cursor, and then you type the coordinates you want to go to, like 20, 10!
That's correct! So, we create segments, one after the other. This is vital because each line is an individual object. Remember, **L for Line**! It’s a mnemonic to help you recall.

So if I wanted to go vertically up after that, I might type 10, 20, right?
Exactly! Well done. To finish the series of lines, the command lets us type 'C' for close. Can anyone recap the key things we’ve learned about the line command?

We use the 'LINE' command! We start with coordinates, and then create segments with endpoints until we close it with 'C'.
Perfect recap! Today we've understood the **Line Command**, which is foundational for drafting in CAD.
Circle Command Overview
🔒 Unlock Audio Lesson
Sign up and enroll to listen to this audio lesson

Next, let's look at our **Circle Command**. What are some ways we can create circles?
We can use the center and radius or center and diameter options!
Correct! Would anyone like to elaborate on how to draw using the center and radius?
We specify a center point and then the radius length.
Great! How about the case for a three-point circle?
We choose three points on the circumference to form it.
Excellent! This versatility is why the Circle Command is widely used. Remember, you can keep circles simple. Think: **C for Circle**! Can anyone summarize the different methods to create circles?
We have center & radius, center & diameter, 3-point, and tangent tangent radius!
Wonderful! That's a solid understanding of the **Circle Command** and its versatility.
Modifying Objects with Edit Commands
🔒 Unlock Audio Lesson
Sign up and enroll to listen to this audio lesson
Now that we’ve covered some drawing commands, let’s switch gears to **modification commands** like COPY, MIRROR, and TRIM. Why do you think these commands are important?
They help us manage and edit our existing drawings more efficiently!
Precisely! Let's begin with **COPY**. How do we execute this command?
You can select the object, then type 'COPY' or 'CO', right?
Exactly! After that, we specify where to place our copied object. Then we have the **MIRROR** command. This is useful for symmetrical objects. How do we use it?
Select the object, then choose two points that define the mirror line.
Right! Finally, let’s look at **TRIM**. How do we use that to cut objects?
We select the boundary edges and then the object to trim!
Yes! These commands are crucial to edit and manipulate our drawings efficiently. Through practicing, you will become proficient. Summary: Remember the three key commands we explored: COPY, MIRROR, and TRIM.
Introduction & Overview
Read summaries of the section's main ideas at different levels of detail.
Quick Overview
Standard
In this section, students learn about crucial drawing commands in computer-aided design software, including how to create different shapes like lines, circles, arcs, polylines, and rectangles, as well as modifying these objects with commands such as copy, mirror, and trim. Understanding these commands is essential for efficient building planning and drafting.
Detailed
Detailed Overview
This section of the curriculum focuses on the core drawing commands utilized in computer-aided design (CAD) for building planning and drawing. The Line Command allows users to create straight line segments with specific start and endpoints. The Circle Command provides options to draw circles by center and radius, center and diameter, as well as other methods such as tangents. The Arc Command offers various methods for creating arcs including three-point arcs and those defined by center points. The Polyline Command helps in creating connected line segments as a single object, whereas the Rectangle Command simply allows drawing of rectangles. The section also highlights related modification commands such as Erase, Copy, Mirror, Offset, and Trim, which are pivotal for effectively editing and managing drawings. Each command serves a unique purpose and is critical for facilitating precision in architectural designs, thus forming the backbone of the CAD process in landscape architecture and building planning. Teachers will introduce memory aids such as mnemonics and acronyms to help students retain important information regarding these commands.
Youtube Videos


Audio Book
Dive deep into the subject with an immersive audiobook experience.
Drawing Tools Overview
Chapter 1 of 5
🔒 Unlock Audio Chapter
Sign up and enroll to access the full audio experience
Chapter Content
Drawing tools in computer-aided design (CAD) are essential for creating detailed architectural plans. Each tool serves a specific function, making drafting more accurate and efficient.
Detailed Explanation
In CAD software, various drawing tools are available to help architects and engineers create plans. Each tool has a specific purpose, and understanding how to use them can significantly improve the quality of the designs. For example, the LINE command allows users to create straight lines, while commands like CIRCLE and ARC enable the drawing of circular shapes and arcs, respectively.
Examples & Analogies
Think of it like musicians in a band; each musician plays a different instrument, contributing to a harmonious piece of music. Similarly, each drawing tool contributes to a finished design, with tools for lines, circles, and arcs playing their unique roles.
LINE Command
Chapter 2 of 5
🔒 Unlock Audio Chapter
Sign up and enroll to access the full audio experience
Chapter Content
A. LINE COMMAND: It creates one or series of straight line segments here each line segment is a separate object.
COMMAND: LINE or L (PRESS ENTER)
From point: 10, 10
To point: (Move the cursor horizontally to right with ortho ON) type 20, press enter.
To point: (Move the cursor horizontal, vertically up) type 20, press enter.
To point: (Move the cursor horizontally to left) type 20, press enter.
To point: c.
Detailed Explanation
The LINE command in CAD is used to draw straight lines. You initiate the command, specify a starting point, and then indicate where to draw the line to. For instance, you begin at coordinates (10, 10), move right by typing '20' to draw a horizontal line, and can continue to define additional lines by specifying their endpoints sequentially. This ensures precision as each line is treated as a separate object.
Examples & Analogies
Imagine drawing a straight path on a map. You start at one point, mark how far you want to go, and then turn in another direction. Just like that, the LINE command allows you to create paths and designs in your drawings.
CIRCLE Command
Chapter 3 of 5
🔒 Unlock Audio Chapter
Sign up and enroll to access the full audio experience
Chapter Content
B. CIRCLE COMMAND: It creates a circle.
CENTER AND RADIUS: Draw a circle based on a center point and radius.
CENTER AND DIAMETER: Draw a circle based on a center point and diameter.
THREE POINT (3P) CIRCLE: Draw a circle based on 3 points on circumference. TWO POINT (2P) CIRCLE: Draw a circle based on two points of a diameters.
Detailed Explanation
The CIRCLE command enables user-defined circles with various methods. It can generate a circle using the center and radius or diameter. Additionally, users can define a circle by three points along its circumference (3P) or two points (2P) along the diameter of the circle. Understanding these options allows for flexibility in design.
Examples & Analogies
Think of tracing a circle with a compass. You place the point at the center and then draw the circle by rotating the compass around, much like using the CIRCLE command to define the shape in your designs.
ARC Command
Chapter 4 of 5
🔒 Unlock Audio Chapter
Sign up and enroll to access the full audio experience
Chapter Content
C. ARC COMMAND: It creates an arc and is used to add curved segments to the drawing.
THREE POINT ARC: Draws an arc using three specified points on the circumference.
Detailed Explanation
The ARC command allows for the creation of curved lines in CAD. You can create an arc by using three specified points, which makes it easy to incorporate curves into architectural designs. This command enhances flexibility, allowing for more organic shapes as opposed to the rigid straight lines.
Examples & Analogies
When designing a road, curves are essential for safe driving. Just like how road engineers design gentle bends, the ARC command allows architects to incorporate smooth curves into their buildings or landscapes.
Poly Line and Other Commands
Chapter 5 of 5
🔒 Unlock Audio Chapter
Sign up and enroll to access the full audio experience
Chapter Content
D. PLINE COMMAND (POLY LINE): Poly line is a series of connected lines and are segments created as one object.
E. MLINE COMMAND: It is used to create a set of parallel lines with different properties in a single go.
Detailed Explanation
The PLINE command is used to create poly lines, which are connected lines treated as a single object. This is useful for complex designs as it allows for smooth transitions and connections. Meanwhile, the MLINE command simplifies the process of drawing multiple parallel lines, saving time and effort in design work.
Examples & Analogies
Consider drawing a fence with connected wooden planks (poly lines) and then painting it (using the MLINE command) to ensure that all the planks look uniform without having to paint each one individually.
Key Concepts
-
Line Command: Used to create one or more straight lines.
-
Circle Command: Used to create circles based on various parameters.
-
Arc Command: For creating curved lines.
-
Modify Commands: Tools for altering existing drawings.
Examples & Applications
Using the Line Command, you can draw a simple 2D shape by creating four lines connecting corners.
Applying the Circle Command, create a circle by specifying the center at (10, 10) with a radius of 5.
Memory Aids
Interactive tools to help you remember key concepts
Rhymes
To draw a line, it's quite divine, just use the command, you'll be just fine.
Stories
Imagine a builder using CAD to design a home. They draw lines for walls, circles for windows and arcs for doors, finding each command as easy as pie!
Memory Tools
L for Line, C for Circle, A for Arc — remember these commands to light up your drafting mark!
Acronyms
CAD
Create
Alter
Design; commands for shaping your drawing line.
Flash Cards
Glossary
- Line Command
A command used to create line segments in CAD, either individually or as a series.
- Circle Command
A command used to draw circles in various methods based on center, radius, or points.
- Arc Command
A command to create a curve or arc in a drawing based on specified points.
- Polylines
A series of connected line segments treated as a single object in CAD.
- Modify Commands
Commands that allow alterations of existing objects, such as copy, mirror, and trim.
- Trim Command
A command that precisely cuts off parts of an object at a defined edge.
Reference links
Supplementary resources to enhance your learning experience.