
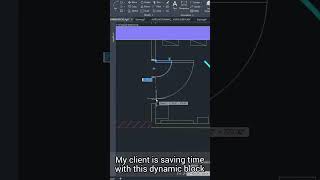
STRETCH COMMAND
Enroll to start learning
You’ve not yet enrolled in this course. Please enroll for free to listen to audio lessons, classroom podcasts and take practice test.
Interactive Audio Lesson
Listen to a student-teacher conversation explaining the topic in a relatable way.
Introduction to the Stretch Command
🔒 Unlock Audio Lesson
Sign up and enroll to listen to this audio lesson

Today, we’re going to explore the Stretch Command in AutoCAD. This command is essential for modifying object sizes and positions effectively.

How exactly does the Stretch Command work?
Great question! You start by selecting the objects using a crossing window, then specify a base point and final displacement point. This process allows you to pull or push objects from a specific side.

So if I want to make a wall longer or move it, I can use the Stretch Command?
Exactly! It’s very useful for making precise adjustments in your designs. Just remember, you can only pull or push from one side at a time.

Are there any shortcuts I should know about?
Yes! The command is simply called 'STRETCH.' Remember that you also need to select items carefully; using a crossing window gives you better control.

Can we practice this command in class today?
Absolutely! We’ll practice stretching various shapes to understand the command better. To summarize, today we learned about the Stretch Command, how to select objects, and the steps to manipulate them.
Practical Applications of the Stretch Command
🔒 Unlock Audio Lesson
Sign up and enroll to listen to this audio lesson

Let’s talk about practical applications of the Stretch Command. Can anyone think of scenarios where it might be particularly useful?
What about when adjusting room dimensions in floor plans?
Exactly! You can stretch a wall if you need more space in a room. Any other examples?
If I have a series of connected lines, can I stretch them all together?
You can, but remember that you must select them in a way that ensures you're only altering the desired parts. Using crossing windows is key here.
What happens if I accidentally select unwanted objects?
Good point! You might need to re-select your objects or undo the last action. It's all part of the learning process!
Can we test this with a floor plan?
Definitely! We'll work on stretching walls in a sample floor plan to improve our skills. Quick recap: Stretch Command helps manipulate size and position and is particularly useful in architectural design.
Introduction & Overview
Read summaries of the section's main ideas at different levels of detail.
Quick Overview
Standard
In AutoCAD, the Stretch Command is a critical tool that permits users to alter the size and snap points of objects effectively. By selecting objects and specifying base and displacement points, users can customize designs and enhance the efficiency of their drawing processes.
Detailed
Stretch Command Overview
The Stretch Command is essential for users working with AutoCAD as it allows for precise modifications to objects. This command enables users not only to increase or decrease the snap points of a selected object on a specified side but also allows the movement of one or more objects to a new location. This flexibility is especially crucial in architectural and engineering designs where precision and alterations are frequently required.
Key Features:
- Command Usage: Activating the Stretch command involves selecting objects through a crossing window, followed by specifying base points for the stretching action.
- Displacement: Users can designate specific displacement points to control how far the selected objects will be moved or stretched. The command significantly enhances design accuracy and aids in maintaining design integrity when adjustments are needed.
Significance:
Understanding and effectively using the Stretch Command contributes to a designer's ability to create detailed and accurate blueprints. Mastery of this tool represents a critical competency in the realm of computer-aided design.
Youtube Videos


Audio Book
Dive deep into the subject with an immersive audiobook experience.
Overview of the Stretch Command
Chapter 1 of 4
🔒 Unlock Audio Chapter
Sign up and enroll to access the full audio experience
Chapter Content
The Stretch command is used to change the snap and size of the object by pulling or pushing from one side and also to move objects from one place to another place.
Detailed Explanation
The Stretch command allows you to modify the size and shape of an object in your drawing. This is done by selecting the objects you wish to stretch and then specifying a base point from which you will pull the object. The stretching occurs from this base point, enabling you to adjust the size while maintaining the original proportions of the object.
Examples & Analogies
Imagine you have a rubber band. If you hold one side of the band with your finger and pull the other side away, you stretch the band. In a similar way, the Stretch command lets you pull or change the size of an object in your drawing space, manipulating it from a specific point, just like manipulating that rubber band.
Command Syntax
Chapter 2 of 4
🔒 Unlock Audio Chapter
Sign up and enroll to access the full audio experience
Chapter Content
COMMAND: STRETCH.
Select objects; select objects by making crossing windows only, press enter. Base point or displacement; specify a point.
Second point of displacement; specify a point.
Detailed Explanation
To use the Stretch command, you start by typing 'STRETCH' into the command line. You'll then select the objects you want to stretch by creating a crossing window. This is typically done by clicking and dragging around the objects. After selecting, you press 'Enter'. Next, you will need to define a base point where the stretching begins. Finally, you choose a second point that determines how far and in which direction you want the object to stretch.
Examples & Analogies
Think of a drawing where you've painted a stretched canvas. Before you start stretching the canvas, you need to grab the corners (selecting them). By pulling on one corner (the base point), you adjust the overall shape of the canvas, just as you would with the Stretch command on your drawing objects.
Selecting Objects
Chapter 3 of 4
🔒 Unlock Audio Chapter
Sign up and enroll to access the full audio experience
Chapter Content
Select objects; select objects by making crossing windows only, press enter.
Detailed Explanation
When selecting objects for the Stretch command, you must use a specific technique called 'crossing windows'. This technique allows you to ensure that only the objects partially included within your bounding box are selected. This careful selection process ensures that you are stretching the intended parts of your drawing without affecting other objects inadvertently.
Examples & Analogies
Imagine you are packing a bag for a trip. You don't want to take everything out of your closet—just the items that fit in your suitcase. By using your arms to outline a section of clothes, you can easily grab what you want without lifting everything else. In the same way, using a crossing window helps you to effectively select the right parts of your drawing.
Displacement Points
Chapter 4 of 4
🔒 Unlock Audio Chapter
Sign up and enroll to access the full audio experience
Chapter Content
Base point or displacement; specify a point.
Second point of displacement; specify a point.
Detailed Explanation
The displacement points in the Stretch command define how and where the object will be stretched. The first displacement point serves as an anchor or starting point, while the second displacement point indicates how much and in what direction to stretch the object. This two-point specification gives you precise control over the stretching process, allowing for tailored adjustments.
Examples & Analogies
This is similar to adjusting a belt. The first point is the fixed buckle, and you have to know where you want the other end (the second point) to be to tighten or loosen it effectively. If you pull your belt too far or not far enough, it won't fit correctly. Thus, just like adjusting a belt, you need to be precise with your base and second points while stretching.
Key Concepts
-
Base Point: The point selected as a reference for where the object will be stretched.
-
Displacement Point: The point that determines how far the object will be moved during the stretch.
Examples & Applications
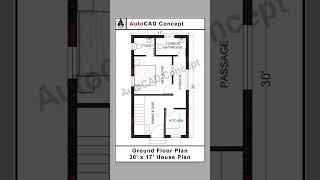
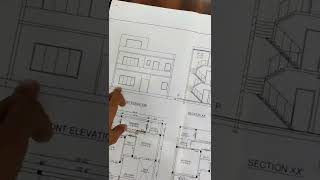
A user modifies the length of a line segment representing a wall in a floor plan using the Stretch Command.
An architect adjusts the corners of a polylined shape to fit a new room design.
Memory Aids
Interactive tools to help you remember key concepts
Rhymes
Stretch it high, stretch it low, move that wall or let it grow!
Stories
Imagine an architect needing to push and pull walls to make a room larger. Using the Stretch Command makes it easy to reshape spaces.
Memory Tools
In Just 3 Steps: Select, base point, displacement, Stretch!
Acronyms
SBD
Select
Base point
Displacement – Remember this for using the Stretch Command.
Flash Cards
Glossary
- Stretch Command
A command in AutoCAD that allows users to change the size and position of objects by pulling them from one side.
- Crossing Window
A selection method where users can select multiple objects by drawing a rectangle that crosses over them.
Reference links
Supplementary resources to enhance your learning experience.