
Circle Command
Enroll to start learning
You’ve not yet enrolled in this course. Please enroll for free to listen to audio lessons, classroom podcasts and take practice test.
Interactive Audio Lesson
Listen to a student-teacher conversation explaining the topic in a relatable way.
Introduction to the Circle Command
🔒 Unlock Audio Lesson
Sign up and enroll to listen to this audio lesson

Today, we'll learn about the Circle Command in CAD. Does anyone know what it requires to create a circle?

Is it the center point and maybe the radius?
Exactly! You need to specify both the center point and the radius or diameter. Can anyone tell me why that's important?

It helps to ensure that the circle is drawn accurately, which is crucial in engineering!

So, using the correct dimensions makes our designs more reliable!
That's correct! Remember: Center plus radius equals precision.
To summarize, the Circle Command is crucial for creating circular elements in your designs using the center point and radius.
Executing the Circle Command
🔒 Unlock Audio Lesson
Sign up and enroll to listen to this audio lesson

Now that we understand the basics, let's look at how to execute the Circle Command. What is the command syntax?
I think it's just CIRCLE, right?
Correct! After typing 'CIRCLE', you will input the center point. For example, if I want my center at (50,50), what would I do next?

Then, you specify the radius, like 10?
Exactly! So we say 'Specify center point: (50,50)' and then 'Specify radius: 10.' Great job! Why is this step crucial?
It ensures that everything fits well, especially for circular features in our designs.
Right! Accurate inputs lead to precise drafting. Let’s summarize: The steps are Command, specify center point, and specify radius.
Practical Application of Circle Command
🔒 Unlock Audio Lesson
Sign up and enroll to listen to this audio lesson
Let's discuss where we might use the Circle Command in civil projects. Can anyone give me an example?
How about in designing roundabouts or circular water tanks?
Exactly! Circles are vital in many structures. How do you think accuracy plays a role in those designs?
If we don't get the dimensions right, it could lead to functional issues later.
Spot on! This is why the Circle Command is not just about drawing but ensuring functionality in engineering. Remember, dimension points equal functional success.
To summarize today's lesson, we explored the Circle Command's definitions, commands, and real-world applications, which ensure our designs are accurate and functional.
Introduction & Overview
Read summaries of the section's main ideas at different levels of detail.
Quick Overview
Standard
This section extensively covers the Circle Command, detailing how to specify the center and radius when drafting circles in CAD software. It emphasizes its significance in the drafting process, particularly in civil engineering, where accurate geometrical shapes are critical.
Detailed
Circle Command in CAD
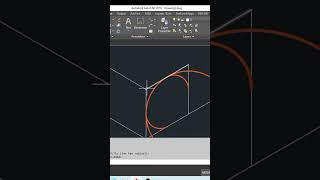
The Circle Command is a fundamental tool in Computer-Aided Drafting (CAD) for creating circular shapes with precision. To draw a circle, the command requires two essential inputs: the center point of the circle and either the radius or diameter.
The command can be executed using the syntax: CIRCLE. For example:
- Command: CIRCLE
- Specify center point: (50,50)
- Specify radius: (10)
This command is essential for civil engineers when constructing designs that require circular elements, such as pipes, roundabouts, or circular parks. The ability to define precise parameters helps enhance accuracy and improve the overall quality of engineering drawings.
Youtube Videos


Audio Book
Dive deep into the subject with an immersive audiobook experience.
Circle Command Overview
Chapter 1 of 3
🔒 Unlock Audio Chapter
Sign up and enroll to access the full audio experience
Chapter Content
Draws circles using center and radius/diameter.
Command: CIRCLE
Detailed Explanation
The Circle Command in CAD software allows users to draw circles easily by defining two main parameters: the center of the circle and either the radius or diameter. The command is initiated by typing 'CIRCLE' into the command line. Then, the user specifies the center point for the circle by clicking on the drawing area or entering the coordinates. Lastly, they set the radius of the circle either by moving the cursor or typing in a specific value. This method ensures precision and efficiency in drafting.
Examples & Analogies
Think of drawing a circle using a compass. You place the pointer of the compass at a chosen point (the center), and then you adjust the pencil to draw the circle at a specific distance (the radius). Just like the compass allows you to create perfect circles with ease, the Circle Command in CAD provides a digital means to achieve the same precision in drafting.
Specifying the Center Point
Chapter 2 of 3
🔒 Unlock Audio Chapter
Sign up and enroll to access the full audio experience
Chapter Content
Specify center point: 50,50
Detailed Explanation
To define where your circle will be located on the drawing, you need to provide the coordinates of the center point. In this example, the center point is specified as (50, 50). This means that the circle will be centered 50 units to the right and 50 units up from the origin (0, 0) of the drawing space. Setting the center point correctly is crucial because it directly affects how the circle interacts with other elements in your drawing.
Examples & Analogies
Imagine you’re placing a dot on the center of a round table. If the table is positioned perfectly in the middle of the room, and you know exactly where that point is (like using coordinates), then you can draw a circle around it, ensuring it’s symmetrical and well-organized, just like how setting a precise center point in CAD gives you a perfect circle in your design.
Specifying the Radius
Chapter 3 of 3
🔒 Unlock Audio Chapter
Sign up and enroll to access the full audio experience
Chapter Content
Specify radius: 10
Detailed Explanation
After setting the center point, the next step is to determine how large the circle will be by specifying its radius. In this case, a radius of 10 units means that from the center point (50, 50), the circle will extend outward 10 units in all directions. This is a crucial variable that affects the size and scale of the circle relative to other elements in your drawing.
Examples & Analogies
Think of drawing a circle around a balloon. If you decide the balloon has a diameter of 20 units, the radius will be half that, 10 units, from the center of the balloon. This is similar to how setting the radius in CAD establishes the size of the circle on your drawing, ensuring it fits well with other design elements.
Key Concepts
-
Circle Command: Used to draw circles by specifying center and radius.
-
Center Point: Essential coordinate establishing the center of the circle.
-
Radius: Determines the size of the circle from the center to the edge.
Examples & Applications
Example of using the Circle Command to outline a circular water tank in a civil engineering project.
Using the Circle Command to design a roundabout in a traffic management model.
Memory Aids
Interactive tools to help you remember key concepts
Rhymes
To make a circle, don’t be shy, center and radius is how you fly.
Stories
Imagine designing a beautiful garden in a circular shape. You start by placing a sign in the middle, marking the center of the garden, and decide how wide it should be by steps away, determining the radius.
Memory Tools
C = CR, where C is for the Circle Command, C for Center, with R for Radius defining the size.
Acronyms
CRD - Circle, Radius, Dimensions!
Flash Cards
Glossary
- Circle Command
A CAD command used to create circles by specifying the center point and radius or diameter.
- Center Point
The specific coordinate point in the CAD workspace where the circle's center will be located.
- Radius
The distance from the center of the circle to any point on its circumference.
- Diameter
The straight line passing through the center of the circle, connecting two points on its edge; equals to twice the radius.
Reference links
Supplementary resources to enhance your learning experience.