
Hatching
Enroll to start learning
You’ve not yet enrolled in this course. Please enroll for free to listen to audio lessons, classroom podcasts and take practice test.
Interactive Audio Lesson
Listen to a student-teacher conversation explaining the topic in a relatable way.
Introduction to Hatching
🔒 Unlock Audio Lesson
Sign up and enroll to listen to this audio lesson

Today, we’re diving into hatching. Can anyone guess what hatching is used for in CAD?

Is it about adding textures to drawings?
Great point! Hatching does add texture. It helps represent different materials in section views. Who can think of an example of a material we might hatch?

Brick! You often see that in building designs.
Exactly! We can use hatching to show the brick material in our section views.

What about the patterns used?
"Good question! We have patterns like ANSI31, SOLID, and BRICK. Each has its purpose. Let’s remember:
Applying Hatching
🔒 Unlock Audio Lesson
Sign up and enroll to listen to this audio lesson

How do we actually apply hatching in our drawings? Does anyone know the command?

Is it the HATCH command?
Absolutely! The command is HATCH. After selecting it, you can choose different patterns. Can anyone suggest why we might adjust the scale or angle?
To make it fit better in the view?
Exactly! Adjusting scale and angle helps clarify our designs. Remember: **S**cale **A**djusts **C**larity = **SAC**.
What if a pattern doesn’t show up clearly?
Great follow-up! Ensure to check your layer properties and visibility settings. Always ensure everything is set correctly!
Importance of Hatching
🔒 Unlock Audio Lesson
Sign up and enroll to listen to this audio lesson
Why is hatching so important in CAD drawings? What do you think?
It helps distinguish various materials, right?
Exactly! It visually communicates which materials are present in a design. Who can tell me another benefit?
It might make the drawing easier to read?
Correct! Hatching enhances legibility and understanding. Remember: **H**atching **E**nhances **R**eadability = **HER**.
Could it also help with sections that are complex?
Absolutely! Complex sections benefit greatly from clear hatching, making interpretations easier.
Introduction & Overview
Read summaries of the section's main ideas at different levels of detail.
Quick Overview
Standard
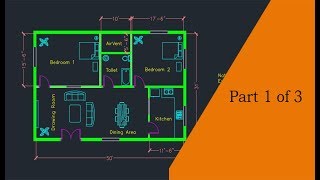
In CAD, hatching enhances the visual representation of materials such as brick and concrete in section views. The HATCH command allows users to apply various patterns, adjusting properties like scale and angle to clarify design intent.
Detailed
Hatching in CAD
Hatching is an essential feature in CAD that is mainly utilized to visually represent different materials in section views. The process involves using the HATCH command to apply specific patterns that indicate various material types, such as brick, concrete, or soil. Common patterns include ANSI31, SOLID, and BRICK, each serving to communicate specific design elements clearly. Additionally, users can adjust the scale and angle of these patterns to enhance their visibility and effectiveness in conveying the intended information. Hatching is crucial for making drawings easier to understand and helps distinguish between different components of a design.
Youtube Videos


Audio Book
Dive deep into the subject with an immersive audiobook experience.
Introduction to Hatching
Chapter 1 of 4
🔒 Unlock Audio Chapter
Sign up and enroll to access the full audio experience
Chapter Content
Hatching is used to represent materials (brick, concrete, etc.) in section views.
Detailed Explanation
Hatching is a technique in CAD that involves filling a given area with a pattern to visually denote different materials in a drawing. For example, if you want to show walls made of brick, you would use a specific hatch pattern that symbolizes bricks rather than leaving the area blank or using a solid color. This helps anyone viewing the drawing to quickly understand what materials are used in each section of the design.
Examples & Analogies
Think of hatching like the labels and colors used in a map. Just as different colors indicate different terrains—like green for forests, blue for water, and brown for mountains—hatching patterns give information about the materials in your architectural drawings, making it easier to interpret.
Hatching Command
Chapter 2 of 4
🔒 Unlock Audio Chapter
Sign up and enroll to access the full audio experience
Chapter Content
Command: HATCH
Detailed Explanation
In CAD software, you can initiate hatching by entering the command 'HATCH'. This command opens up options for selecting the area to hatch, as well as choosing the pattern and scale. After selecting an area, the hatching will visibly fill that space with your chosen pattern, which can enhance both clarity and detail in your drawing.
Examples & Analogies
Using the HATCH command is similar to applying paint to a canvas. You first decide what shape you want to fill (like the area to paint), and then you select the color and texture (the pattern). The paintbrush allows you to cover that area efficiently—just as the HATCH command fills your drawing with patterns.
Available Hatching Patterns
Chapter 3 of 4
🔒 Unlock Audio Chapter
Sign up and enroll to access the full audio experience
Chapter Content
Patterns: ANSI31, SOLID, BRICK, etc.
Detailed Explanation
CAD software offers a variety of hatch patterns such as ANSI31, which is often used for asphalt; SOLID, which fills an area uniformly; and BRICK, which mimics the look of actual bricks. By using these patterns, drafters can communicate different building materials effectively and make their plans more informative and visually appealing.
Examples & Analogies
Consider hatching patterns like different styles of wallpaper. Just as you can choose floral, striped, or solid colors for a room to create a specific look, CAD allows you to select from various hatch styles to enhance the appearance of your engineering drawings, making each section unique and clear.
Adjusting Scale and Angle
Chapter 4 of 4
🔒 Unlock Audio Chapter
Sign up and enroll to access the full audio experience
Chapter Content
Adjust scale and angle for clarity.
Detailed Explanation
When applying hatch patterns, it's important to adjust both the scale and angle to ensure they are clearly visible and accurately represent the materials. Scaling affects how dense the hatch appears, while angle adjustments can help align the pattern with the design or orientation of the component being represented. Proper adjustments ensure that the hatch is both aesthetically pleasing and functional.
Examples & Analogies
Imagine you're laying tile on a floor. The size and layout of the tiles can greatly affect how they look when arranged. If the tiles are too small, they might look cluttered; too large, and they may seem unbalanced. Similarly, adjusting the scale and angle of your hatch patterns makes your drawing easier to read and more professional, just as the right tile arrangement enhances a room's design.
Key Concepts
-
Hatching: A method used to visually represent materials in CAD drawings.
-
HATCH Command: The command in CAD used to apply hatch patterns.
-
Patterns: Various designs used in hatching to signify different materials.
-
Scale and Angle: Adjustments made to improve the appearance and clarity of hatch patterns.
Examples & Applications
Using HATCH to represent a concrete wall in a section view with a solid fill pattern.
Applying a brick hatch pattern to indicate brick walls in architectural drawings.
Memory Aids
Interactive tools to help you remember key concepts
Rhymes
For different heights, use hatching bright,
To show the layers, make it right.
Stories
Imagine an architect who designs a building and needs to specify different materials. Using hatching, they can show bricks for walls and concrete for the foundation, making it clear to all what materials are being used.
Memory Tools
To remember hatching patterns: Bricks Are Central Signs = BACS.
Acronyms
Hatching Enhances Design – **HED**.
Flash Cards
Glossary
- Hatching
A technique in CAD used to represent materials in section views via patterns.
- HATCH Command
The command used in CAD to apply hatching patterns to areas.
- Patterns
Specific designs used in hatching to represent different materials, such as ANSI31 or BRICK.
- Scale
The size of the hatch pattern, which can be adjusted for clarity.
- Angle
The orientation of the hatch pattern, which can also be adjusted to improve visibility.
Reference links
Supplementary resources to enhance your learning experience.